Preliminary actions
To begin with, it is recommended to carefully examine your face in the mirror to feel its perfection. And at the same time, identify the details that make all people unique. And what is similar for everyone.
Having experienced all this, you can create an algorithm that will allow you to simply draw a portrait. Without unnecessary doubts and fears.
Axes and proportions
When drawing a person's face, it is imperative to study and constantly draw centerlines easily.
With experience, you can get by with one or two guides, or without them at all. You don’t need to think that axes are boring and uninteresting; they will help you quickly and correctly build a face with the correct proportions, identical eyes, and symmetrical parts.
In the future, visually imagining these axes, you will be able to work with human facial expressions and emotions. After all, to show sadness, you need to lower your eyebrows and corners of your mouth, close your eyes, and for this you need to imagine at what level all these parts of the face are in a state of calm.
Eye line
The first and main axes that you definitely need to remember are:
The eye line of all adults is in the middle of the head.
Axis of symmetry and eyes
Divide the oval of the head into two equal parts horizontally - this is where the eyes will be located. We also outline a vertical line of symmetry.
Drawing an elephant
At first it’s difficult to do this by eye, so check yourself by measuring identical lengths with a pencil or ruler.
Eyebrow line nose hair
Next you need to divide the oval of the head with horizontal lines into three and a half parts . The upper axis is the growth of hair, in the middle is the level of the eyebrows, below is the axis of the base of the nose. The distance from the hair to the eyebrows is equal to the height of the forehead. Essentially, the face (if you don't take into account the hair) consists of three equal parts that are equal to the height of the forehead.
Line of mouth and lips
Next we will designate the lips. To do this, the lower part of the face (from the nose to the tip of the chin) needs to be divided in half - this way we will find the line of the edge of the lower lip. To determine the level of the mouth cut, you will have to divide the segment from the lower lip to the nose into four more equal parts. The first quarter will be the line of the mouth.
Mouth and lips
The mouth section of most people is at the same level, but the sizes of the upper and lower lips are completely different.
How to draw a hare
Where to place the ears
No matter how strange it may be, very often, with a more or less successful face structure, the ears are not attached at all in the place where they should be located. Therefore, we will pay special attention to the ears.
Placing the ears correctly
At the top, the ears are attached to the axis of the eyes, and at the bottom at the level of the base of the nose. They can be large or small, stand out strongly or lie close to the head, but for all people they are attached to the line of the nose and eyes.
How to place your eyes correctly
How to find out the width of the eyes and the distance between them? To do this, the eye line needs to be divided into 8 equal parts.
Outlining the eyes
- Another eye (2/8) should be placed between the eyes.
- Each eye is 2/8 wide.
- From the outer corners of the eyes to the contour of the head, leave 1/8 (the width of half the eye).
These are rough guidelines. These proportions differ slightly for different people. It is not necessary to divide the axis into 8 parts every time, just check yourself.
How to draw an owl bird
Also read the article on how to draw eyes realistically and correctly.
Make sure that your eyes are not too close to each other, or, conversely, too far away. These settings will help control the size of the eyes so that they are not excessively large or small. The inner corners of the eyes should always be in line with the eyes.
At first glance, all these lines are cumbersome and difficult, but first you can practice drawing a face, taking into account only the horizontal axes. As you work, you will have questions and you yourself will come to the conclusion that you also need vertical guides. With the acquisition of a little experience and skill, you can easily draw faces without preliminary markings and axes.
Eyes, nose wings, mouth
The inner corners of the eyes are at the level of the wings of the nose. The corners of the mouth are level with the center of the eye, or the pupil if the person is looking straight.
This photo shows with light lines that:
- the corners of the eyes are level with the wings of the nose
- and the center of the eyes lies in line with the corners of the mouth
Drawing a beautiful swan
Face drawing scheme
Actually, if you outline all the guides, then you should end up with a diagram like this. You can print it out as a sample, since it is difficult to remember everything at once and practice drawing a person’s face with the correct proportions.
Schematic representation of a person's face
Later, you will be able to give faces features of specific people and draw portraits of everyone you are interested in.
With this we will finish with axes, proportions and guides and start drawing.
Human eyes
At the first stage - after posing the question of how to draw a portrait with a pencil - you should depict all the details with a simple pencil. You can draw yourself, someone you know, or fictional characters.
- The first step, which contains step-by-step instructions for beginners, will be drawing an arc. It is important to see that until the middle it has an elongated shape, after which it sharply goes down.
- The lower arch is approximately similar to the upper one. The only difference is its smaller radius.
- After connecting the arcs, the stage of drawing the upper eyelid begins.
- Then the time of the lower eyelid and cornea - everything is like a real eye.
- Don't forget about eyelashes, since they are also intended by nature.
- To add volume, you need to define a shadow. For greater liveliness, it is recommended to draw folds that indicate the emotionality of the face.
Where to start?
The frame or basis of the portrait is the oval of the head and the location of the eyes, ears, chin, nose, eyebrows. To make it clearer, I’ll show you how to mark the contours of the face. Let's take, for example, a portrait of a girl.
What head shape does she have? Ovoid? Round? Oval with a square chin?
You can buy it here.
Stretch the pencil in your hand, pointing it towards the model. Mark the distance between the top of your head and your chin on paper. We also note the width. Now put all these values on paper using dots, not forgetting about proportions and scale.
To draw from a photo, measure the parameters with a ruler, mark the expected width and height of the head. Write the shape of the head.
Remember that the width of the head is ¾ of the height. In reality, there may be deviations of 1-2 cm. So, carefully measure the height and width, check their ratio.
The outlines should be light and delicate, barely noticeable. An HB pencil is suitable for this. Now you are ready for the next step.
Many people try to master the art of drawing a portrait, but they fail. Either the nose is swollen, like a pig's, or the eyes are too small. It is important at this stage to compare the standard with the original (model or photo).
Each person has his own characteristics. These could be wide cheekbones, a large bulbous nose, and deep-set eyes. Look closely and notice. How do you usually draw? Where do you start your work?
You can buy it here.
Lips
Look at any pictures drawn. The portrait contains the same details as the real face. Plump, thin, smooth, sensual - a full range of impressions.
And a portrait cannot do without lips, the drawing of which will be completed in a few steps.
- To begin with, a wavy line is indicated.
- Next you need to sketch an image of the upper lip.
- The lips will be incomplete without their lower part - you need to add that too.
- By drawing folds and connecting the edges of the lips, you can achieve a natural look.
- An integral element of any drawing is shadows. Their time has come.
Drawing the nose
The nose is in the center of the face. Its forms are so diverse that they can say a lot about a person. Thin, with widened nostrils, potatoes - so many variations.
We recommend reading:
How to draw a star: 10 best options for drawing five-pointed and other stars with your own hands. Pictures of finished works with descriptions- How to draw a dragon with a pencil - the best step-by-step instructions for beginners. TOP pictures for quick visual learning
- How to draw a pony: TOP 10 best lessons for beginners. Detailed instructions for drawing My Little Pony step by step with a pencil
The following is a step-by-step instruction for beginners on how to draw a nose.
- The parallel lines drawn determine the width of the nose.
- The capsule-like figure represents the expansion of the nose.
- Any person's nose would be implausible without nostrils.
- Effects of light and shadow will add naturalness to the picture.
- If you work with the shadow and make it more even, the drawing will look more “alive”.
Achieving similarity using grids and guides
If you really want to learn how to draw any face, it's worth getting used to using grids and guides.
The grid allows you to see the original image divided into parts. Thanks to this, when drawing you can concentrate on a separate area. This helps make the process easier, also allowing you to see the photo in a different light. Don't worry about "not being able to draw faces" - just focus on the similarity of each cell.
Photo of a young girl from PhotoDune.
Guides are also great for knowing where to place each piece.
Basic guides will indicate the positions of the eyes, nose, mouth and center of the face. Once these lines are created, they can be used to better understand the relationships between each piece and ultimately produce a great result.
Photo of a young guy from PhotoDune.
New items in the Premium section
499
Collaging
Collage “An unusual walk”
0 0
99
Web and applications
We create a form for ordering air tickets
12 791 212
99
Web and applications
Creating an order form
18 873 292
499
Collaging
Collage “At a masquerade”
0 0
99
Working with photos
We do artistic retouching of a portrait
26 903 374
499
Working with photos
Artistic processing by Madina Akhtaeva. Series "Summer"
0 0
- part of the Photoshop Master website, where 60 video lessons and 36 express courses from professionals await you.
You can buy them separately, or you can subscribe to the entire section (from 5 rubles/day).
Ears
One of the options for drawing a portrait is ears covered with hair. But this does not always allow maintaining the integrity of the drawing.
- The first arch will become a blank for the future ear.
- Next, the upper part, curl and tragus are drawn.
- An anti-curl will make the lobe complete.
- At the final stage it is necessary to depict the cheek and hair.
Brows
The article describes drawing a classic portrait, so modern trends in the cosmetic industry aside - it’s time to draw eyebrows.
There are two variations in the first step: you can draw an arc and hairs separately, or you can start drawing the shape from the very beginning.
Eyebrow correction involves removing excess lines and correcting hairs to give them a more even shape.
We recommend reading:
- How to draw lips with a pencil - simple instructions with descriptions and pictures. Step-by-step master class for beginners
How to draw a family: a master class on creating a drawing “My Family” for kindergarten or school. The best lessons for children on drawing with pencil and paints
How to draw a bear with a pencil? Review of simple and step-by-step instructions for children and beginners (120 pictures of a bear)
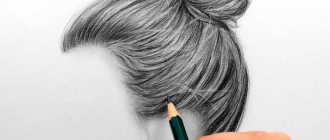
Face and hair
You need to carefully look at the shape of the model’s face and try to depict it as accurately as possible.
Next, outline the neck and draw the outline of the future hairstyle.
Detailed drawing of hair - shape, contour, individual strands.
After gaining the skills to draw individual parts, you need to move on to composing a complete portrait image.
How to do graphic shading?
Before you start shading the face, you need to remove all unnecessary lines on the face. This is due to the fact that once you start working on the tone, you won’t be able to erase them carefully. There are no special rules for shading; they should be done in a way that is convenient for you. This is determined by how you are used to holding tools, as well as your working hand. It is best to start with the dark areas of the drawing and gradually move to the light areas.
Left-handers begin intensive shading from the right corner, and right-handers from the left. This is how halftones are added to the drawing. Then you need to start brightening some areas of the portrait. After this, you need to darken parts of the face again to give it more realism.
Determining the angle
After determining the angle, it becomes clear how easy it is to draw a portrait. The model can be in front of the artist in different positions, and can be drawn from different angles.
The position affects the light, shadows and overall appearance of the future portrait.
- Full face - the model is facing the artist.
- Profile – A portrait depicts a side view of the face.
- For sophisticated drawings, a three-quarter angle is good, which depicts the model half-turned.
We recommend reading:
How to draw a fox with a pencil? Detailed instructions with photos and descriptions. Step-by-step lesson for children + master class- How to draw a girl - make a portrait and general drawing correctly and beautifully (150 photos and videos)
How to draw a child - stages of creating drawings and recommendations for their design (video + 125 photos)
What does similarity mean?
Similarity is a fairly simple concept. It refers to how similar the design is to the original item. If you're an artist, you'll be asked millions of times to draw portraits, characters, or designs based on real people. Understanding similarity is an incredibly useful skill to have in making your clients happy.
The more you practice, the closer your drawing will be to the real photo!
Even if you don't want to completely copy someone's face, studying similarities will be excellent practice in the field of general facial anatomy.
Drawing from a photograph
Working from photography is a separate type of drawing that requires care. As in the previous case, a step-by-step division of the process is necessary.
- Marking the contour of the face with a simple pencil.
- Sketching additional lines aimed at maintaining the proportions of the face.
- “Planting” of individual parts of the face - nose, eyes, lips.
- Removing auxiliary lines and outlining the hair contour. Also, don’t forget about light and shadows.
- Portrait image in color.
A graphic portrait is a pencil drawing
Graphic portraits
sketches for pictorial portraits
In a graphic, pictorial, sculptural portrait - this is a state of inner vitality and harmony, radiating into the world and illuminating every Soul. The energy of this High presence is felt by a sensitive viewer. Each portrait is a human Essence seen from Above in its unique individuality.
Without a good drawing, painting cannot be complete, just as it cannot be complete without color. “Drawing gives form to creatures, color gives them life” (Diderot).
DRAWING IN PAINTING. The role of drawing in the development of fine arts is especially great. “A country in which they taught to draw in the same way as they teach to read would soon surpass all other countries in all arts.” These words of the French materialist philosopher, educator and art critic Diderot give a correct assessment of the role of drawing in the development of painting, graphics, sculpture, decorative and applied arts and architecture. Without a good drawing, painting cannot be complete, just as it cannot be complete without color. “Drawing gives form to creatures, color gives them life” (Diderot). “Drawing does not mean simply reproducing contours; the drawing does not consist only of outlines. Moreover, it lies in expression, in plan, in modeling. Drawing is three-quarters and a half of what painting is.” This is how the great French artist Ingres explained the word “drawing”.
Almost exactly the same explanation is given by the artist I. N. Kramskoy: “A drawing in the narrow sense is a feature, a line, an external outline; in the real sense, this is not only a limit, but also that measure of sculptural modeling of forms that corresponds to reality.” What Ingres called “modeling,” Kramskoy called “sculptural modeling of forms.” From these explanations it is clear that drawing consists not only in a contour image, giving the linear outer outlines of the shapes of an object, but also in the full identification of the form of an object: its character, relief, expression, everything that is achieved by modeling in drawing and painting. But drawing in painting, as Kramskoy puts it, is a “hidden factor”; no one sees it: “tones and colors are superimposed on the drawing, like patterns on a canvas.”
“Drawing,” says the French artist of the mid-17th century, Charles Lebrun, “is always a pole and a compass that guides us, so as not to allow us to drown in the ocean of paint, where many drown, wanting to find salvation.”
Painting without drawing, as the old saying goes, is like a man without bones. The skill of all great painters is largely rooted in knowledge of the laws of drawing, in the ability to draw.
Michelangelo considered drawing “the source and soul of all types of painting and the root of all science.” Leonardo da Vinci wrote that the education of young men who wish to learn painting “should be devoted to drawing, accompanied by shadows and lights.”
Test lesson
To check and consolidate the material covered, it is necessary to once again outline all the stages of drawing a portrait:
- Draw a sketch of the face.
- Indicate additional details for greater proportionality.
- Draw the necessary details.
- Execute in color.
The fascinating process of drawing a portrait is over. Overall, the result is good for a start. But over time, your drawings will become better and your skills will become more confident. Good luck!
Photo tips on how to draw a portrait
Did you like the article?
2+