Drawing a person step by step for children
In the drawing, the child expresses himself, expresses his thoughts and emotions.
Basically, children can cope with simple drawings of trees, sun and clouds, but the human figure is very difficult, so parents’ help is necessary here. If parents do not have drawing skills, and they cannot cope and teach their child to draw a person, then the professionals of our studio can quickly and easily teach this skill. There is a certain scheme according to which children can quickly learn to draw a human image; you just need to follow the following steps:
- In the upper part of the face you need to draw an oval with a pencil, this will be the head;
- Then you should draw a rectangle and use a small segment to connect it to an oval, this is how you get the human body, it’s quite simple and children will quickly master such lessons;
- Draw a line down from the rectangle, and this is how you get the legs;
- Then you should draw the hands, draw lines from the upper corners of the rectangle and at the end draw the fingers;
- In the arm area you need to add a few more lines;
- At the next stage, it’s worth drawing the person’s legs in more detail, highlighting and adding additional lines;
- Then we add the ears, for this you should draw several circles on the sides of the oval, and add the details of the ears in the form of curls inside; here you can also show your imagination and draw a hairstyle;
- Then you should pay attention to the details of the face, draw eyes, eyebrows, nose and mouth. It's not difficult and any child can draw facial features;
- It’s also worth drawing a shirt and don’t forget to highlight the neck and collar;
- After this, you need to select the palms and fingers;
- At the next stage, shoes and trousers are drawn, it is worth highlighting the folds in the knee area, and the lacing on the shoes;
- In conclusion, it is worth erasing all the additional lines that were drawn initially and selecting only the outline and painting it with a colored pencil.
This is how easy it is to learn how to draw a human figure for a child step by step. Our specialists will be able to conduct classes in a playful way, it will be very interesting for children and they will be able to quickly learn and learn something new and find new friends with similar interests.
Step-by-step drawing of a person for children in the Matita studio
When parents notice. That their child constantly reaches for a piece of paper and a pencil and at his young age draws his first original drawings and his imagination is developed, it is worth developing his talent and sending him to a drawing school, where they can embody his talent and teach him the main rules. A child needs a special approach, it is necessary to interest him and show his desire, because at such a young age they are not assiduous and cannot do one thing for a long time. Our studio specialists will be able to find an individual approach to each child and conduct classes in a playful way, so the child will not be bored, and he will be able to learn a lot of new things for himself. By contacting our studio you can enjoy many advantages, such as:
- Our specialists guarantee results and will be able to teach any child art, even the most restless;
- An individual approach is provided to the child, so the masters will be able to find a common language with each child and provide their knowledge and skills;
- Classes are conducted according to the author's program, and there are no boring classes here; a special game program has been developed for children, so they will not be bored with us;
- We are located right next to the metro station and can be easily reached by any transport and from any part of the city.
Many parents doubt whether their child needs it or not, then it’s worth signing up for a free trial lesson, which will make it clear that it’s interesting and necessary for your child. The studio’s specialists are true professionals and masters of their craft, who have many original paintings and will be able to give their experience and professionalism to your child.
He will be able to learn how to draw a person, step by step, and he will do it better than his parents. After our classes, you will be proud of your child, and he will be able to fully reveal his talent. Sign up for classes with us, and we can develop your child’s talent and give him new knowledge, we are waiting for you.
Drawing tools
Each style and type of drawing corresponds to a specific set of artistic tools. To choose the right one, you need to decide on the ultimate purpose of the drawing and the technique of execution.
| Tool | What you need to know when choosing | When is it best to use |
| Graphite pencils | They have different softness, which is indicated by letters: B – soft. The lines are rich, dark, dense; N – hard. Make thin, dim strokes; NV – intermediate type of rigidity. | This is the most convenient and easy-to-use tool for beginning artists, and also in cases where: · it is necessary to convey maximum plausibility (drawing of a person, animal, inanimate objects); · you need to convey volume and perspective; · Draw architectural structures and equipment. |
| Paper | Each type of paper is focused on 1-2 drawing methods and has different qualities: · format; · density; · color; · texture. | · office paper is the easiest option for beginning artists, but it is not paint-resistant; · watercolor – suitable for both pencil and watercolor drawings; Whatman paper – best used for drawing with pencils and gouache; · textured – for paints, pastels. |
| Paints | differ in composition, consistency and color saturation. Some require adding water, others don't need it at all. | · Using watercolors you can easily mix colors to the desired shade. It is easy to apply. Used most often to depict landscapes and still lifes; · gouache is a thick, rich paint that is most often used for painting posters; · acrylic – suitable for experienced artists. |
Required Tools
In order for a child to fully develop his skills and create his first painting, you need to prepare the necessary tools for this and create the conditions:
- good lighting and comfortable workplace;
- hard and soft simple pencils. If children are small, then you should pay attention to the fact that the pencil has edges. They will allow you to quickly learn how to hold the device correctly, and will also prevent it from rolling off the table;
- separate sheets of paper, an album will also work;
- eraser;
- If desired, you can purchase colored pencils. The child will color the picture, while developing his imagination;
- sharpener.
Teaching preschoolers to read - what it gives and when you can start teaching
Note! With the help of drawing, children develop imagination, fine motor skills and visual memory. It is more difficult to depict people on paper than, for example, a flower or animals. Therefore, it is worth breaking the drawing into several simple steps.
Drawing of a man with children 3-4 years old
Fine arts classes with children of primary preschool age develop attention and visual memory well. Before starting training, it is important to introduce the child to the general principles of human structure using the example of dolls: the presence of such important components as the head, neck, torso, arms and legs.
Invite the child to pick up the doll in order to independently assess the length and thickness of the body parts, their proportional relationship, and position relative to each other.
Before you start drawing, you can prepare a template of a person. It can be made as a schematic image or in the form of an application. The latter option will be easier to understand, since in early preschool age the child perceives the image holistically, without detailing it.
To do this, you need to cut out simple geometric shapes from colored paper:
- circle – head;
- a wide rectangle - the body (or a triangle - as a variant of the image of a girl in a dress);
- oblong rectangular stripes - arms and legs.
We draw a person step by step for preschool children.
First, you should invite the child to independently build a person from ready-made figures. As soon as the principle of construction becomes clear, you can start drawing. The main thing is to awaken the child’s interest in new activities without resorting to direct coercion.
A person is drawn in several stages:
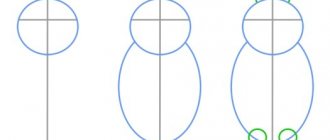
- start from the head - circle;
- Below is a rectangle or triangle - the body, which is connected to the circle by a short straight line - the neck;
- from the upper corners of the rectangle, or just below the upper vertex of the triangle, two straight lines extend - arms;
- At the bottom of the body, two more lines are drawn - the legs.
We draw a person step by step for children, and then, when the child masters the technique of an elementary schematic representation of a person, it is complicated by adding smoothness to the lines and volume to the arms and legs.
To awaken your child's interest, you should offer him various drawing techniques - from pencils to paints. This may be an unusual way - using fingers, foam rubber, or cotton swabs. The main thing is to give him freedom of choice, even if it goes against the goal.
How to teach a 5-6 year old child to draw a person: proportions
Teach your child to see the invisible. Before drawing a dressed figure, you need to outline the frame, understand the position of the arms and legs, the direction and rotation of the body relative to the head, etc. Use diagrams; you can always remove extra lines from the drawing with an eraser.
infourok.ru
When a child learns to think in diagrams, he will not have any difficulties when drawing a human figure.
Preschoolers aged 5-6 years can safely explain how the figure of an adult differs from the figure of a child. The module with which we “measure” the figure is the head. A lot depends on how many times the head is “placed” in the diagram of the human figure.
artrecept.com
Show a photo of a child standing next to an adult. Offer to measure (with a ruler, strip of paper, etc.) how many times the child’s head “fits” in his entire figure. Do the same with the adult figure. The child himself will conclude that children have larger heads (relative to the proportions of the whole body).
sovetunion.ru
In adults, the head “fits” 7-8 times (ideally). If you take this into account when drawing a person, the figure will come out proportional and similar.
profymama.com
It is enough to draw a simple diagram several times in order to continue drawing fat and thin people, men, women and children.
Male and female figures are different. These differences can easily be shown in the diagram using geometric shapes. Men have broad shoulders, women have broad hips.
Very soon your child will learn the basics of drawing a person and will be able to portray the whole family!
Drawing of a person with children of school and senior preschool age
After the child understands the general principle of human structure, further classes are devoted to studying the proportions of the body. To do this, in addition to a pencil and paper, you will need an eraser and a ruler. It is believed that the ratio of head length to height for an adult is on average 1:7, or 1:8. If you take this rule as a basis, you can achieve the most natural proportions of the body.
To do this, you must strictly follow the basic principles:
- determine the height of the head. For example, if it is 2 cm, then the body length will be 16 cm + 2 cm for the head. Closer to the edge of the sheet, measure the specified length using a ruler and divide it into 9 equal segments. From them, perpendicular to the vertical line, lines are drawn dividing the plane into 8 equal cells. For convenience, they are numbered;
- in the topmost cell draw an oval - this is the head. Under the head, just below the second line and parallel to it, draw a segment equal in length to twice the size of the head. In this case – 4 cm. These are the future shoulders;
- Arms are drawn down from each shoulder, and the torso is drawn between them. The elbows are level with the waist;
- the hips widen at the junction of the fourth and fifth cells, and then smoothly narrow towards the knees - they are located at the level of the seventh line. Please note that the arms end at mid-thigh level. From the knees to the middle of the seventh cell, the legs widen to the calf area, then narrow;
- the feet are drawn in a blade-like manner, then the toes and heels are drawn.
We draw in stages so that children can understand the principle of human structure.
Basics of Proportions
How to teach a 7-year-old child to draw a person if he already has good experience behind him? It's time to introduce him to the correct proportions of the human body.
- The head is outlined.
- A vertical line is lowered, which will include seven more ovals of the same size.
- The center of the chest is at a distance of two measured units (ovals below the main one, which is the head).
- Three units will lead to the navel.
- The pubic bone is marked after four units.
- The center of the knees will be indicated by a measured area of five heads and the distance from the top of the head to the future eyes.
- The middle part of the shin is 7 units.
It is also important to consider the following points:
- the width of the head and the female shoulder are equal;
- The shoulder width of men is equal to one measured unit;
- the width of the chest corresponds to three units;
- the elbow of the person depicted should be at the level where the thigh begins;
- the oval, which represents the torso, should be larger than the one that represents the pelvis.
Drawing a portrait
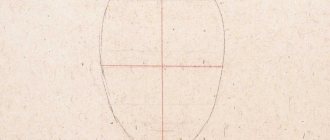
At first, young artists rarely manage to correctly place the eyes, nose and lips in a portrait. To simplify the problem, you need to use the symmetry rule: divide a given plane into equal parts. Auxiliary lines will help determine the location of all parts of the face and depict them harmoniously in relation to each other.
The portrait is created in stages:
- Draw the outline of the face. It can be in the shape of a simple oval, or adapted according to gender: for a woman - oval, or, more often, obovate, narrowed downward; in men it is almost square with a rounded upper edge and an almost straight lower edge with a slightly protruding chin.
- Draw lines of symmetry. One is the vertical axis, passes through the entire length of the face and divides it into left and right halves, the second is horizontal, also passes through the center and divides the face into upper and lower parts.
- The eyes are drawn at the level of a horizontal line that divides each of them into two equal halves. They are located at a short distance from the vertical axis, the same on both sides. The eyes are depicted as two low arcs that meet at the level of a horizontal line and form an oval, pointed on both sides.
- In order to determine the location of the future mouth and nose, the lower half of the face is divided into three equal parts by additional horizontal lines. At the top level the lower edge of the nose is drawn, and at the bottom – the mouth.
- The nose begins to be drawn in the form of two vertical lines, starting at eye level on either side of the main axis. Above the upper additional line, they end in semicircular extensions on the sides - the nostrils, and a slightly convex lower edge - the tip of the nose. It must be remembered that a male portrait is characterized by a wide nose, while a female portrait is characterized by a narrow nose.
- Lips - upper and lower, are drawn respectively on both sides of the lower additional line. The upper one is in the form of a wavy arc with a small notch in the middle. The lower one is a smooth convex arc, slightly fuller than the upper one. Women have a wide, expressive mouth, while men have a narrower mouth.
- Eyebrows in women are arched, while in men they are straighter.
- The ears are located at eye level in the form of small arches.
- In order to draw hair, the upper half of the head is divided into two parts by a horizontal line. This will determine the edge of the hair. Next, using neat strokes, a hairstyle or haircut is formed.
We draw a person step by step for children, so that it is easier for them to remember the sequence. You can complement the image by adding a mustache and beard for a man, or earrings and beads for a woman.
Picture detail
Our pencil-drawn person needs a face to “appear.” And that’s why we depict each element in the picture. And these are ears, hairstyle, eyes, nose and eyebrows.
We were able to draw a human figure. But this was just a diagram. Now we work on each detail of his clothing separately. We make folds on the clothes, and even mark some noticeable seams.
Erase all auxiliary lines. And now we see that this is more reminiscent of a human appearance than the picture of a robot “on hinges” was until now.
Drawing a face in profile
When depicting the head in profile, not only the front part is visible, but also the back part - the cerebral part of the skull. The main task is to find the optimal relationship between these two zones. For the rest, the same principle of symmetry will help as when depicting a face from the front.
The drawing diagram is as follows:
- Draw a basic sketch. Take a circle as a basis - you can draw it by hand, or use a stencil or compass. Using the horizontal and vertical axes, it is divided into four parts, and then a diagonal is drawn through the upper left segment and the lower right. It will be needed to determine the lower border of the chin. Next, the circle is transformed into the shape of an egg, the top of which is directed towards the lower left side. To do this, lines are drawn from the left and bottom sides of the circle so that they intersect along a diagonal line.
- Next, you need to find the center of the resulting sketch, taking into account the new lines, and re-draw the main vertical and horizontal axes. Then the lower half is divided into two and the upper half into three parts using additional horizontal lines.
- We make the upper right segment more convex so that it looks like a forehead.
- The nose immediately begins below, smoothly expanding from the main horizontal axis to the lower additional one. First it is depicted as a triangle, then its protruding apex is made more rounded.
- To draw the mouth, just below the nose, draw a short line, from which arched lines go up and down, reminiscent of a heart. These are lips. They can be wide and narrow, short and long.
- At the level of the horizontal axis, slightly retreating from the edge of the face, draw an eye. It is depicted in the shape of a triangle, or an arrowhead, the top of which is directed to the left and the base to the right. A parallel line is drawn immediately above it - the eyelid. Above it, at the level of the auxiliary line, is the eyebrow.
- The ear is located immediately behind the vertical axis. Its top is level with the line of the eyes, and the bottom edge is with the tip of the nose.
- The upper additional line defines the edge of the hair, which descends in a smooth line from the forehead to the upper edge of the ear. By changing the direction and size of the strokes, you can draw any hairstyle or haircut.
Drawing a face in profile, like in full face, is not as complicated, since it implies a view in a two-dimensional plane. In the future, you can complicate the task by depicting the face in three-dimensional space.
Drawing of a man in motion
When a child first tries to draw a person in motion, he does not know where to start. After all, taking any pose other than strictly vertical, the position and angle of inclination of several parts of the body changes at once. And without some experience it is difficult to grasp this immediately and correctly convey the position of the body.
To make the task easier for the child, you will need to prepare visual material with which he will work in the future:
- wire frame. A little man is twisted from wire and then given different poses. The child will be able not only to understand the elementary principles, but also to immediately sketch them “from life”;
- cardboard model with movable elements . Cut out the silhouette of a person from cardboard, and at the folds, connect individual parts of the body with threads or laces so that they can be moved;
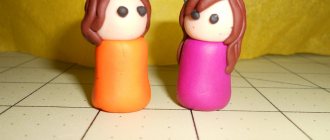
- modeling from plasticine . Will help the child quickly become familiar with body proportions and learn to respect them. Most often, it is precisely such activities that contribute to the development of spatial thinking, which will accelerate knowledge in the fine arts.
Do not immediately start intricate movements. It is better to start by changing the position of one part of the body, for example, draw a person standing upright with an arm raised up or a leg abducted.
Then you can try to display the movements while walking:
- First you need to draw the “skeleton”. From the head, a segment extends vertically downwards - the torso, at the end of which a short line is drawn perpendicular to it - the hips. The legs extend from the hips - the right one is tilted to the left (backward), and the left one is tilted to the right (forward). At the top, under the hip line, they intersect. Hands apart;
- give the “skeleton” shape. Draw additional lines around the main ones, increasing the width of the torso, arms and legs;
- The axes of the “skeleton” are erased, the feet and legs located in the direction of movement are completed.
Using this diagram as a basis, it is not difficult to draw a running man. To do this, it is enough to draw the axis of the body at a slight angle, bend both arms at the elbows, and move the legs at a large angle to each other.
Depicting people from different angles has a lot of nuances and requires maximum visual attention. When we draw a person step by step, this technique is easier for children to understand. They remember the sequence faster and are able to reproduce it independently in the future.
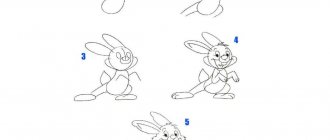
Draw a tennis player in motion with a pencil
Stage 1
Linearly denote the frame of a tennis player. We outline the bend of the torso and legs, the tennis player stands on half-bent legs, leans back, throws his arm back, throws back the racket.
Stage 2
We begin to draw the face; we can also emphasize the movement by turning the head, which is turned almost frontally and thrown back.
Stage 3
We clarify the details of the face, complete the shape of the head, and create a hairstyle.
Stage 4
Let's start drawing clothes. We must take into account that in addition to changes in the body, changes also occur in clothing. Adding folds that form on the T-shirt fabric when the back bends
Stage 5
Let's draw hands. The left hand voluntarily reaches forward in opposition to the hand that holds the racket.
Stage 6
The shorts also change their shape according to the shape and position of the legs.
Stage 7
We emphasize the bend with a stripe on the shorts; it should also go in the direction of the leg.
Stage 8
We finish drawing the legs along the frame that we outlined at the very beginning; the feet also have their own bend, since the position of the legs is on half-toes.
A girl from a support group (cheerleading) with pom-poms, photo
A schoolgirl with pom-poms cheering for her favorite team is also called cheerleading. She performs with other girls in a single tandem, demonstrating mesmerizing dances, distinct movements and gymnastic figures. In the USA, there is even competition between support groups for prizes and the title of American champion. It is not surprising that many artists prefer to depict this character on a white sheet of paper in motion. This allows you to revive the drawing, making the person on it not just drawn, but “free”.
Skier in motion, photo
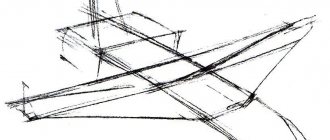
A pencil drawing of a person and part-time skier is much easier to draw than a girl from a support group. A step-by-step master class allows you to reproduce a beautiful and at the same time easy picture in 3 gradual steps.
- Step #1
Draw the main features of a person’s image that will help create a masterpiece from interconnected straight lines.
- Step #2
Bring the sketch to completion by giving proportionality to the skier, clothes and ski poles.
- Step #3
Color the finished picture with pencils, paints or felt-tip pens.
Running man, photo in motion
If our readers have not yet found a suitable option for how to draw a person in motion in pencil, then it’s time to look at more complex MKs. They require strict adherence to proportions, without forgetting about volume, outlines and all kinds of details.
The photo below shows several solutions, although they are all complex and require detailed implementation.
Recommendation!
It is best to use hard and soft pencils that allow you to draw clear and faint lines at the same time.
Simple rule
“Everything ingenious is simple ,” this proverb is perfect for describing the most accurate and correct method of constructing a human figure in motion. The essence of this method is that we initially begin to build a person from the lines “stick, stick, cucumber, we get a little man ,” and then we add a certain body shape to this simplified skeleton.
Here's a simple example:
Stages of creating drawings of funny characters
A small clarification: the very first line on your sheet should reflect the pose, the action of the person (bending, tilting, posture). If necessary, guides for arms or legs can be added to this line.
Drawing a person in motion is interesting; there is always something to learn and something to strive for. Standing, sitting, moving, a person must maintain balance, balance the weight of his body so as not to fall.
There are two main centers of mass that have to be constantly balanced with each other: the mass of the torso and pelvis. The head is usually held straight, and the arms and legs help maintain balance and serve as supports.
Learning to draw a human hand
To stand upright, people tilt their chest slightly back and their pelvis forward. This is especially clearly visible if you look at the figure in profile.
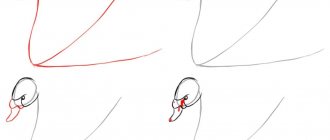
Now we need to define one term that will be useful to us today: The jugular fossa is a depression on the collarbone, it is marked with a red dot in further illustrations for this article. In fact, the jugular fossa is the center of gravity of the human body.
In a straight stance, everything is simple, the weight of the body is evenly distributed on both supports - the legs, and the jugular fossa is located directly above the fulcrum.
Pay attention to how the vertical line runs from the jugular fossa to the support when looking at the person in profile. It also divides the body mass into two equal parts, although in this position it is not as clearly visible as in the front view.