Teaching drawing to a child 2-3 years old
You need to get the most out of the image. The child first draws with vertical, wavy lines. He still has difficulty coloring objects.
First line technique
First you need to introduce your child to drawing subjects. The hand should hold the pencil correctly, the brush should be rinsed in a glass of water. The best way to learn is through demonstration. You can sit down at the table next to your baby, take a pencil and start drawing your drawing, or try to control your child’s hand. You need to take more paper to spread it all over the table.
Important! It should be understood that drawing with children 2-3 years old starts small. To begin with, you need to be content with incomprehensible lines.
The benefits of drawing for child development
Drawing helps you understand the world faster, but this is not the only advantage of such activities, there are others:
- development of fine motor skills of the hands. At 2 years old, the baby learns to hold objects and direct them correctly. Children become smarter and their speech develops faster. Psychologists describe the presence of reflex points on the fingers, from which the signal enters the brain. From their stimulation mental abilities develop;
- the emergence of purposefulness;
- figurative thinking. In the future, for memorization, it is important to associate objects with images;
- emphasizing attention and imagination;
- development of mathematical abilities and logic. Shapes of objects, comparison, equality - these are simple concepts in mathematics that are ingrained in childhood.
What to draw with?
Many parents mistakenly go from simple to complex. They give a child at the age of 2 a felt-tip pen, intending to teach him how to draw without any effort. After all, markers are so bright and so easy to draw with! But this path, on the contrary, is the most difficult. After all, then you will have to re-teach the child to hold the pencil correctly and teach him to press it in order to draw a line on paper. By making efforts to press a pencil from early childhood, the baby trains his hand and develops fine motor skills. It will be easier for him to prepare for school, and even study itself. Therefore, it is better not to give your child a felt-tip pen until he is 4 years old, until he has fully mastered the skill of drawing with a pencil.
Which pencils to choose?
All teachers are unanimous here - triangular. They eliminate the possibility of taking the pencil incorrectly. For kids who are just learning to hold a pencil, wax triangular pencils are suitable, and for older children - wooden ones with a soft lead.
So, let's get started!
How to interest a child
In any business, the most important thing is interest. You can get used to drawing if your child loves it. There are several ways:
- Emotional perception of an adult. The parent should praise and rejoice. Through the emotions of an adult, you can achieve success in drawing a child.
- Turn the lesson into a game. You can come up with a game plot that will be interesting to the baby. For example, a bunny asks for a carrot, you need to draw it. The game should be filled with meaning. You can conduct a dialogue, show the child a toy hare.
- Process. We must not forget about the most important thing. The first drawing will definitely impress the little one, so there should be a lot of different paints, pencils, and felt-tip pens on the table. Many new objects are the main attribute of the first “picture”. The second and third pictures will be even better.
Drugs for concentration and memory improvement for children
Where to start when teaching a child to draw
Research shows that it is best to start learning to paint at an early age. First of all, you need to teach your child to hold a pencil correctly in his hand and only then proceed directly to drawing. At first, you can help the child - guide his hand with yours. It is best to start learning by mastering straight and wavy lines, simple geometric shapes (circle, square). Gradually you can move on to complicating the drawing, for example, draw a tree next to the house with apples on it.
Drawing Techniques
Basic drawing techniques:
- Hatching and sketches. The purpose of this technique is to learn how to paint an area without going beyond the outline.
- Dots. This technique is perhaps easiest for children. With it you can draw winter and rain. Dots can be made using a finger, which the child first dips into the paint. It is also recommended to use cotton swabs, with which, for example, a child can easily draw leaves on a tree.
Drawing with sticks
Interesting drawing ideas
You can choose different ideas for drawing, for example, these:
- Plasticine stamps. Preparation for working with this technique will not take much time. It is enough to make a stamp from a piece of plasticine, giving it the desired shape, decorate it with patterns and paint it in the desired color. You can use a brush or sponge to paint.
- Leaf stamps. Any paint will work for this technique. The side of the sheet with veins is covered generously with paint, and then this side needs to be applied to the paper. After a few seconds, carefully remove the sheet. Using this technique, you can make a painting “Autumn in the Forest” with your child.
Drawing with a leaf
- Vegetable prints. Having cut the vegetable into two parts, you need to cover its surface with paint of a suitable color, and then make an imprint on paper.
Teaching a child to draw with pencils
When introducing a child to pencils, it is very important to make the right choice. The first pencils should not be very small and thin; it is best to give preference to triangular pencils, on which the baby’s fingers are located in the correct position.
Note! As the child masters this subject of drawing, new techniques can be taught. But first he must learn to draw dots, lines and hatching.
We teach children 3-4 years old to draw with paints
Drawing with paints for children 3-4 years old is a very exciting activity. It is better to choose watercolor or gouache for it, because they are safe and easy to wash from clothes. It is best to purchase a sippy cup and soft brushes of different sizes.
First of all, when starting to work with paints, you need to teach your child to hold the brush correctly, wet it in water and pick up paint. You can invite your child to move a dry brush to practice the degree of pressure and clarity of movements.
Drawing lesson on the topic “Portrait of Mom” in preparatory groups of preschool educational institutions
It is better to start working with one color and simple shapes. You can ask your child to draw lines, waves, a circle, and then paint it along the contour.
When drawings in one color are mastered, you can add a second color. Gradually, the three-year-old will learn not to mix colors, wash the brush in time, and not go beyond the outline of the picture.
At three years old, the baby’s paintings are still quite chaotic and the similarity with objects is still minimal, but if you encourage the child, then over time the baby’s hand will get used to it, and the drawings will become more realistic.
Important! Under no circumstances should you scold a child for soiled clothes or spilled water.
How to teach a child to draw step by step
When teaching your child how to draw step by step, it is important to voice the plot. Fairy tales or poems are perfect for this.
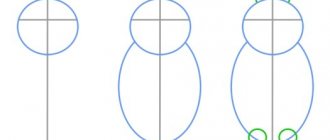
During classes, the simplest lines and shapes are drawn, and then gradually modified in front of the baby’s eyes. So, from a square you get a house, from a triangle you get a roof, and from a circle you get the sun in the sky.
Note! The child quickly gets bored with monotonous and monotonous activities, so parents should constantly show new techniques and suggest ideas for consolidating step-by-step drawing skills.
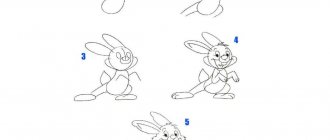
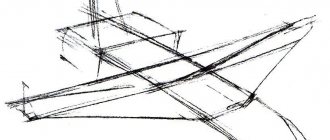
Step-by-step drawing for 4-year-old children takes on more complex shapes and themes. Parents, using various teaching materials, can select topics that interest their child. For example, teach how to draw a car or an airplane.
"Plane step by step"
Image techniques
To understand how to teach a child to draw at 3 years old, you need to consider drawing techniques. From a variety of options, you can choose the most effective ones for your baby.
Poking technique
- Poking drawing. The adult selects the plot of the template that needs to be supplemented. It is recommended to choose a semi-dry, hard bristle brush with gouache paint. A felt-tip pen will also work. You can color a snowman, animals, plants. This technique will help you learn how to color.
- Dipping. For this method it is better to choose paints. The child holds the brush diagonally closer to the table (in the vertical poke technique) and leaves brush marks. These could be tracks of an animal, lights on a Christmas tree, patterns on clothes. You can print a black and white picture or draw it yourself.
- Fingerprints. Apply a little paint to a white sheet and show how to paint with your fingers. You should be careful when choosing paints, because babies’ skin is very delicate and susceptible to allergies and irritations. You should choose gouache and watercolor.
- Drawing with lines. This is a more complex stage that needs to be introduced after studying the first three techniques described above.
Examples of custom drawing
The methods can be adapted for younger and older children.
Drawing on sand/semolina with a finger/stick.
All kids like this method. It develops fine motor skills and tactile sensitivity. If possible, build something like a light cube - a box with a transparent lid with a light bulb inside. Drawing on a thin layer of sand on such a box is very entertaining.
Coloring crafts made from salt dough.
After modeling, you may end up with various figures that your child will be happy to paint. If he still doesn’t understand well that mixing all the colors in a row will only result in “dirt,” give him one jar of paint at a time. Then, when the drawing on the figure dries, take out the next color.
Drawing with crayons on stones.
If you go to the sea or to a rocky beach in the summer, be sure to take a box of crayons with you. While you are sunbathing, your baby will have something to do - coloring rock candy.
Drawing with colored ice.
This activity is especially relevant for hot summer days. Freeze ice cubes by adding colorful paints to the water (regular watercolor will do). Place your child on a piece of Whatman paper and give him a container of colored ice. Having coped with the task of removing the cold cubes, he will move them around the paper until they melt.
Use of available materials.
Draw with everything you can get your hands on! (Well, or almost everyone...) Study the result, comment, discuss with your child. You can dip glass balls in paint and roll them inside the box: let the child tilt the box to the sides and follow the multi-colored trace. You can use a fork to draw a lion's mane, spruce paws, or hedgehog needles. And so on!
If your son is passionate about cars, dip the wheels in paint and let him “drive” his vehicle on a piece of whatman paper. And you help him draw a road, trees along the road, a traffic light and a pedestrian crossing.
Drawing as part of the game.
Combine drawing with other activities: appliqué, paper crafts, and natural materials. Maybe you have fabric paints at home? Buy a white T-shirt and let your child design it himself! You can print his palms on a T-shirt - not only will it be a drawing activity, but it will also be a memory for many years.
Workspace organization
The workplace should both attract and teach organization.
- First you need to take care of the child's health. The table and chair included must be adjusted to the height of the child. The back is rigid for correct posture. During work, you need to monitor his body position, carefully guide him without knocking him out of his work.
- Interesting design. It’s always nice when your child’s desk matches the interior of the room, but you shouldn’t forget about visual perception. The workplace should attract the little one.
- Before drawing with children 2-3 years old, you need to prepare a table. It is advisable to do this in front of a child. Carefully laid out paints and pencils will teach him order. After classes you need to clean everything up. Again, you can come up with a game that will teach your child to keep order, then in the future during school lessons he will keep his workplace clean.
Development of a 3-4 year old child: at home or in a specialized center?
The best thing you can give your child is your time and attention. Developing a child at home, in games and conversations with mother is an ideal option.
But not all women have the opportunity to sit at home with a child and limit themselves only to the role of mother; they must study and work, improve in their profession. Therefore, many women go to work early, and children are raised by grandmothers and nannies at best, and cartoons at worst.
Moreover, as we have already discussed above, at 3-4 years old, a child, in addition to his mother, already really needs new acquaintances, as well as new places and situations in which he can show his curiosity, independence, imagination - all those qualities that rapidly develop in childhood. at this age.
So, in what cases will a child benefit from classes at a children’s center?
- If you don’t have enough time for games and activities with your child, but you want him to develop comprehensively, keep up with his peers, and spend his time interestingly and usefully.
- If the child is alone in the family, there are no families with small children in your environment and the child has no one to communicate with.
- If, in addition to home development, you want to give your child something else: new acquaintances, impressions, skills, etc.
How to teach a 3 year old child to draw
The first image should interest the child so that next time he starts drawing again. To teach a 3-year-old child to draw, you can use one of the techniques.
Hatching on coloring books
- The coloring technique will help your child choose the right colors. You need to help him not go beyond the line by coloring two or three objects yourself. You need to start with simple coloring books: a house, a car made of shapes, a flower.
- Technique of improvised means. You can try drawing with toy vehicles or threads. You can lay out patterns with them and then paint them.
- Drawings that develop mathematical skills: lines, ovals, circles. These can be provided as templates. For example, a drawing of a boy with colorful balls.
Educational song in English for a child - learning the language with children
How to draw with children from 2 to 3 years old
Lyubov Mishustina
How to draw with children from 2 to 3 years old
We adults don’t pay much attention to children’s kalya-malya and try to push the child to depict real objects. We want children to start depicting something real as quickly as possible: a circle, a square, a triangle, a cloud, houses, grass. We don’t even suspect that with such desires and advice we are blocking the development in children of the ability to speak figurative language, the ability to draw .
To begin with, I want to highlight the significant differences between the drawings of adults and children.
In their drawings, adults depict reality, a real object. Children under 7-8 years old convey their feelings from an object and express their mental world outside. The similarity is not interesting to the child; he draws his impression of the object.
Typically, these are tactile, motor and visual impressions.
Let's take a close look at the first children's drawings of kala-malya. This is a very important period! our children’s drawing is blocked . And then, as a rule, they grow into adults who do not know how to draw or draw in a formulaic manner (sun, flowers, house, grass)
.
The period of kala-malya or doodle drawing has its own names : chaotic doodles, circular doodles, developed doodles.
1. Chaotic doodles
Up to a year old, the baby picks up a pencil and starts poking it at a piece of paper, rejoicing that it leaves marks. These are the first doodle drawings. At this moment, the child can look around, at his mother, and continue to poke. He makes chaotic scribbles.
The child makes an important discovery for himself: he can leave traces in this world!
If you give the child a piece of paper and a pencil during this period, he will draw the pencil over the piece of paper with interest, not respecting the boundaries. At this stage, he has not yet developed visual-motor coordination (eye-hand)
: the eyes do not follow what the hand is doing, but the hand acts as it turns out.
drawing tool : a soft pencil or felt-tip pen, finger paints, and if your child is still actively exploring the world through his mouth, then a natural dye, such as carrot or beet juice. It is enough to give just one copy, and not a scattering of pencils and markers and a whole album. This will help your child focus on leaving marks rather than trying to taste everything.
And it’s important that mom gives feedback: “Wow, how great!”
,
“How much and beautifully you
drew !” - so that the baby gets the experience of a positive reaction to his actions. Especially for leaving traces.
Any smearing of anything during this period (often porridge on the table, vegetables, pasta)
– part of the experience of leaving traces. Therefore, we carefully respond to such actions, without criticism or negative emotional reactions. We simply help the child finish his food and go do other things so that lunch or dinner does not turn into developmental activities.
So, at this stage the child gains the experience that leaving marks is a very, very good thing!
Chaotic scribbles are a fairly short period; children very soon move on to the next stage: circular scribbles.
2. Circular doodles.
The child poked and poked at the piece of paper, then he made an important discovery:
“I can control my movement! I’ll take you wherever I want!”
This second discovery in drawing is closely related to mental development. Marina Ozerova writes that circular scribbles approximately coincide with the time when the child begins to spin.
The child is very happy that he can draw . And he immediately invents several movements: hooks, straight lines, circles, different lines. And he begins to actively work on them. At this time, the baby can still show his power in few places; we feed him, dress him, and make decisions for him. And here he is the master of the movement! And there is already hand-eye coordination. The higher the child’s mental development, the more lines he invents! Children who have neurological problems will have very noticeable changes at this stage, as their hand-eye coordination develops later.
And it is at this stage that parents are tempted to start teaching their child how to correctly draw a square-circle , sun-house. This way you can block the process of development of this activity for a long time.
Firstly, displaying ready-made templates leads to blocking the development of imaginative thinking, and in the future - to template drawing .
Secondly, children read their mother’s feedback as: “You don’t know how, I know how to do it right, but you do it wrong.”
.
There is nothing worse in children's than grading.
Some parents condescendingly accept such kalya-malya for their children, but still worry that there is no figurative drawing similar to the real subject .
When in my classes children are afraid to draw (at the age of 4-5 they may refuse to do this because they are afraid that they will not succeed), we return to the stage of doodle drawing , where children rediscover the opportunity to leave marks and manage their movements on paper, without fear of evaluation and fear that it will not work out, since Aunt Natasha gave the task to draw kala-malya .
At this stage, mom again gives one sheet of paper and only two felt-tip pens, pencils, and jars of paint. Let me remind you that this is important so that the child can focus on the very act of mastering his movements on the sheet.
Here it is important to admire different lines: “Oh, what a circle, what a curl, what a thick line!”
etc. We don’t give our associations:
“Is this a bunny, a bear, a car, etc.?”
.
We don’t show a template and don’t teach. After the child has shown you his kalya-malya, you can say, “Draw some more!”
.
3. Developed doodles
the 3rd stage of doodle drawing from 2 to 3 years old. This is a blessed time.
“The leaf also obeys me! I have power over space!”
During this period, the child runs around a lot, he masters the space. Felt-tip pens run across the piece of paper. The child masters the space-sheet, feels its edge and takes this into account in his graphic actions.
Developed doodles are freedom! Drawing is closely connected with the body, with physical movement. Give your child the opportunity to move a lot.
Developed doodles are a stage of interpretation of one’s drawings, a transition to fine drawing . to see meaning in formless images . At 2.5-3 years, according to Maria Osorina, a revolution takes place. The child discovers that his lines, dots, and circles resemble something. They can be something and mean something to him. All these circles and spots become elements of a graphic language, with the help of which the child begins to depict people, animals, and even abstract ideas.
Many experts note that the shyness of adults, the fear of expressing themselves, begins here. The child has already grown up. Adults want even more to see something specific appear in his drawings, and often evaluate the drawing, but for the child this is an evaluation of himself. The baby is already developing self-esteem; he forms it from the feedback of significant adults.
It would be good to accept children's drawings the same way we accept a child - unconditionally. Drawing must be a joy for him! And even doodles should be hung on the wall, admired and shown with pride to friends and acquaintances.
At this stage, the mother can give several pens, pencils, crayons and sheets of different shapes: round, small, large, triangular, oval. We introduce the child to a brush and paints: gouache, watercolor. And it is at this stage that the child brings you a drawing and says : “Look, the car is driving, it’s raining, mosquitoes are flying, etc.”
.
At this stage, it is important not to give your associations: “Is this a wolf, a hedgehog, a hare?”
.We also don’t give evaluations:
“It looks like, well done!”
.You can say:
“I like your hare so much!”
What else is important? During the period of chaotic and circular scribbles, give the child plenty to play with materials: touch, smear, clap, draw on his body .
So, a child from about 1 year to 3 years goes through several stages of pre-fine drawing :
Footprints
Power over the movement
Finding meaning in a drawing
The desire to depict something
Marina Ozerova in her book reminds that a child draws a feeling and attitude towards an object. In the process of developing imaginative thinking, it is important to let the child create his own drawings.
If we provide ready-made templates, images, objects, then the preschooler’s thinking does not generate its own images; we help the child form template thinking.
Drawing is not just a popular activity. This is a way of self-expression without words, a story about experiences that are still difficult to comprehend, a direct transfer of one’s state through artistic means.
In a child under 6-7 years of age, speech is not developed so well that he can formulate and clearly express what he feels. Drawing gives children a chance to express their state, attitude towards something, relive a pleasant event or get rid of negative emotions.
Drawing is associated with the child’s mental functions: imagination, perception, speech and thinking. It develops these functions and correlates them with each other, helping the child organize his ideas about the world. We must remember that in drawing a child uses experience acquired in other activities. The better a child plays and actively explores the world around him, the better he draws (this does not mean that he correctly depicts objects, creates them similar, but it means that he goes through the qualitative stages of development of a child’s drawing and masters a figurative language).
I wish your children to have fun drawing !
Interesting drawing ideas
Interesting image options can give the child more knowledge. Choosing the right coloring book is the responsibility of the parent.
You can make your own coloring in the form of the seasons, combining all the image techniques.
- autumn: dipping technique for colorful leaves;
- winter: poke technique for the New Year tree. A winter landscape provides many ideas (a snowman for understanding shapes, sports equipment for introducing activities);
- spring: dipping technique for drawing buds and first leaves;
- summer: understanding shapes (ice cream), drawing with a poke (flowers).
Examples of finished works, photo gallery
Here are several finished works with topics interesting for kids:
- "Winter Fun"
Children learn to convey the features of the depicted object using an imprint with crumpled paper. The guys draw the desired image (Snow Maiden) using a brush. As a material, you can use blue cardboard, a container with white gouache, slightly diluted with water, medium-sized lumps of crumpled paper, gouache, brushes, jars of water.
Examples of work with photography
The teacher invites the children to draw a friend for the snow woman in an unusual way - with crumpled paper.
Next, the teacher shows how crumpled paper is lowered into a saucer with white paint and placed several times at the bottom of the cardboard, depicting a round ball. Then draw a small ball in the same way. When the paint dries, you need to finish painting the snow woman’s eyes, carrot nose, and twig hands.
- "Defender of the Fatherland Day»
The guys create a drawing for the holiday using a brush on a wet sheet of paper. Next comes an introduction to a new technique of drawing on a damp sheet of paper. They choose a beautiful paint color to create the desired look. The materials used are paper, watercolors, a brush, a container of water, and napkins.
The teacher invites the children to draw fireworks in honor of the holiday. First, you need to apply water to the landscape sheet with a wide brush. Then put watercolor paint on a thin brush and touch it to a sheet of paper in several places. The dots will begin to spread out. The empty spaces need to be filled with spreading dots of other colors.
A copybook for mathematics classes in preschool age
Note! Make sure that children rinse the brush thoroughly in water.
What topic to choose
Parents often have questions about how best to draw: painting objects step by step or first seeing the finished result. It is difficult for a child to select exact colors for objects, so it is better to initially demonstrate how, for example, a flower should look, and then complete the drawing step by step.
Note! The topic must relate to real objects. No need to start with coloring pages of non-existent cartoon characters. You can even show off the item for the image first.
Drawing with fingers and palms
Children may be interested in hand painting. Using this technique you can depict flowers and the sun. The method is very easy, since no additional items are needed for the lesson.
For your information! There are special finger coloring books on sale.
Picture of palms
Accessories
What supplies you need for class depends on what you plan to draw with. And you can do this in different ways:
- fingers;
- palms;
- tassels;
- pencils;
- felt-tip pens;
- cotton swabs;
- cotton wool
You can use coloring books or just landscape sheets.
To make drawing for children as effective as possible, use a variety of objects and forms of lessons. For example, you can show your child several creative techniques using colored pencils, and the next day reinforce these techniques by drawing with crayons on the asphalt, etc. Children 4-5 years old may not like the monotony of drawing with felt-tip pens or pencils, so it is important to periodically change the methods training.
Should I send my child to a drawing class?
The optimal age for a child to study in a circle is 4-6 years. Your baby's social communication skills should develop gradually.
Important! A sudden introduction to a group of guys can be stressful for him. There is no need to rush into learning; the basic basics can be learned at home.
Recommendations from psychologists and teachers
Psychologists note the importance of feedback between adults and children. Drawing not only gives certain skills, but also brings parents and baby closer together. Teachers advise starting with coloring books so that the child remembers the object itself. It is still difficult for him to depict a flower that he saw on the street once. Simple lines can also be the goal of drawing for children 2-3 years old.
The first “picture” for the baby is a step towards a complex activity. It is useful to develop drawing skills to improve mental abilities. When choosing basic techniques, you need to choose the most suitable and interesting one for the child. Don’t forget about personal contact with the baby, then drawing will not just be a lesson, but will develop into a hobby.
Educational activities for children 3-4 years old in the SandCity sand painting studio
We offer you developmental programs for children 3-4 years old, in which your child will get to know the world around him in a fun way, learn to recognize, express and control emotions, develop imagination, motor skills, and coordination.
What are the features of our classes?
- The cross-cutting motif of all our activities, both developmental and creative, is sand. Playing with sand calms, relaxes, helps relieve psycho-emotional stress, and throw out negative emotions in a creative form. It is working with sand that distinguishes our programs from all others and gives the child something that is difficult to get at home.
- We use psychological and pedagogical knowledge and techniques when constructing classes for better perception, understanding and assimilation of the material, in accordance with the age and level of development of the child.
- We do not necessarily strive to teach, teach a child everything at once: English, mathematics, counting... At this age, the brain is still forming, and it faces completely different tasks. The emotional sphere is actively developing. We organize classes in such a way that each child can take as much as he currently needs. Gently, through play, fascinating fairy tales on the sand, we introduce the child to the world, to the people around him, to how everything works, and most importantly, to himself. At 3-4 years old, children learn about the whole world, and assimilate all the acquired knowledge about the world, precisely through play as the most understandable form for them. After all, play is the leading activity of this age.
- We know how children aged 3-4 years strive for independence, how inquisitive and active they are, and we encourage the development of these qualities in every possible way.
- We approach each little guest individually, taking into account the degree of his development - emotional and physical, so that the development process proceeds comfortably and in a timely manner. Therefore, our groups are divided not so much by age, but by the child’s level of preparation.
- We employ professional teachers and psychologists who regularly undergo training and constantly improve their skills.
- Our classes are held in mini groups, which allows us to take into account the individual characteristics of each child and pay attention to each one.
Step-by-step instructions for drawing the selected plot
- The name of the topic and step-by-step instructions for drawing the selected plot - “Migratory and sedentary birds”
The lesson in the middle group is carried out using colored pencils. The child will learn how to draw a bird using an oval and a circle. Initially, children get acquainted with the distinctive features of an owl, which contributes to the development of imagination.
Instructions on how to correctly depict the selected plot
The material used is a subject picture depicting an owl; halves of album sheets, simple and colored pencils.
"It's dark in the forest,
Everyone has been sleeping for a long time.
One owl doesn't sleep
Sits on a branch
Looks in all directions
How it will fly!”
Note! You should look at and study the image of an owl with your children. The teacher should tell that an owl is a large bird with huge eyes. At night she hunts mice and during the day she sleeps.
Next, the guys will start doing the work. To do this, you need to draw a circle (head) with a simple pencil, and draw an oval at the bottom, narrowed downwards. On the head draw large eyes, a beak, and ears. At the bottom of the oval are the paws and the branch on which the owl is sitting. When the owl is ready, you need to paint it over with an orange, yellow or brown pencil.
Drawing technique in the middle group according to the Federal State Educational Standard
Through lightness, airiness or softness and smoothness, sharpness and aggressiveness, you can tell about the character of the hero, his attitude to the world around him. Pencil, sanguine, charcoal, pastel, ink are excellent means for expressing your vision of the beauty of the world around you.
Drawing in the middle group according to the Federal State Educational Standard helps the child relieve stress. Classes are organized as a game of transformation, where a child and an adult become either actors or spectators. To make artistic activities accessible to every child, it is necessary to use movements, music, sounds, and touch.
Important! High-quality lesson planning will lead to the establishment of emotional contacts between children, between adults and children.
Options for individual and collective drawings in different techniques (including non-traditional)
The development of the creative abilities of preschool children with the creation of individual or collective drawings is aimed at introducing non-traditional types of visual techniques (“finger painting”, “palm painting”, “poking with a hard semi-dry brush”, “printing”, “drawing on semolina or sand”, etc. .).