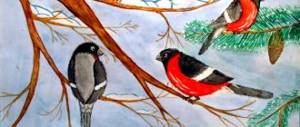
The simplest scheme
Drawing a small fluffy ball will not cause you any difficulties. But if you are faced with the task of drawing this nimble animal for the first time, we suggest you start with the simplest lesson.
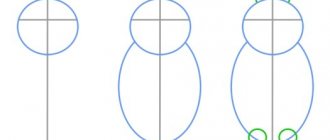
The simplest diagram of a hare drawing
Everyone can cope with the scheme proposed below. Let's try to portray a bunny that will make anyone smile.
Take a pencil and look at the instructions in detail:
- Draw a circle. Divide it into two equal parts. These are sketches of the future face. Add an oval body to the head.
- We place the eyes and nose on the muzzle. Add legs to the body. The bunny is missing only ears, a small tail and front paws.
- Erase the auxiliary lines and outline the contours. The hare drawing is ready.
Practice with this bunny as an example and move on to the next lesson. You can add Santa Claus and Snow Maiden to this bunny. And if you add a Christmas tree, you get a New Year's picture.
How to draw a fluffy hare with a pencil step by step
A small fluffy ball with long ears - this animal evokes only tenderness in everyone. But at the same time he is quite nimble and elusive. How to draw a hare if it is constantly on the move, running somewhere and hiding from people?
Everything is very simple - step-by-step diagrams with its image will help you easily cope with the task. Even if you have never held pencils and paints in your hands, if you have never seen a real live bunny, you will really enjoy the exciting process of drawing. After all, it lifts your spirits and helps you take your mind off worries.
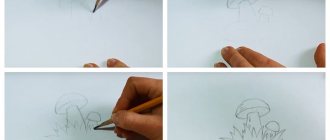
Let's start the lesson with such a positive, cheerful hero with a drum. He can become a decoration for any holiday, and his mischievous smile involuntarily makes you smile back. The diagram makes it clear how to draw a hare step by step, but if you have any questions or doubts, we’ll look at it in more detail.
- We draw a circle, divide it into two equal parts, this will be the future face of the animal. The ellipse is his torso.
- Add legs, nose and eyes.
- Our bunny lacks long ears, a small tail, a cute face and an apron of paws.
- We trace all the strokes to get the complete image.
- All that remains is to erase the extra lines and the drawing is ready.
- To make the fluffy look even more beautiful, we suggest painting it with bright colors.
This cute little bunny is loved by both kids and adults. It is a symbol of many gifts, cards, and souvenirs. Hundreds of children's poems have been written about him, and adult songs have been sung. And of course, fairy tales and cartoons could not do without his participation.
In them, the hero sometimes appears as a coward, defenseless and helpless, and sometimes he is cunning, cheerful and mischievous. He deftly leads large animals by the nose, constantly escaping their clutches. You should definitely try to portray such a smart and funny cartoon character.
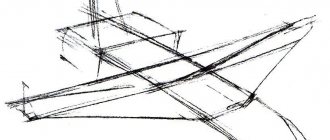
For example, going on a trip on a skateboard with a flower in hand.
If you look at how to draw a hare with a pencil according to the following diagram, you can understand that the process comes down to learning how to beautifully depict circles and ovals. It is from them that a small hare is produced, which, as if frightened of something, hid under a bush, quietly pressing its ears. I just want to take him in my arms under my protection, warm him and gently hug him.
Which bunny will you like the most? Cute smiling face? A mischievous creature standing on its hind legs? Or a furry animal, preparing to jump, to gallop far into the forest?
You can choose anyone, or try yourself as an artist and draw all three interesting pictures.
The following diagram shows how to draw and color with a simple pencil, while getting real works of art. The animal on it seems to be alive and is about to jump into your arms to be stroked on its soft back.
Looking at this step-by-step instructions for drawing a hare, no one will say that it was performed by a simple person, without special creative skills and abilities. And everyone can add such a wonderful image to their collection of paintings.
And this is a simple step-by-step guide for creating a drawing in a hurry. It is quite easy to depict such a bunny and the drawing is done with almost continuous lines. Looking closely, you can see that all he lacks is a wide, radiant smile.
Here you should use your imagination and figure out on your own how to draw such a cheerful facial expression on the hare that will delight and amuse everyone around.
If the idea achieves its goal, then you can safely give an “A” for the drawing lesson. *when copying material, please be sure to indicate an active link to the source https://mirpozitiva.ru/
Cute bunny for kids
The next drawing of a hare is no different in complexity from the previous one. We used this principle to draw a cat. We suggest using this sample if you want to depict a cute bunny on paper. Let's prepare:
- paper;
- marker;
- multi-colored markers.
Let's start drawing:
- The cute bunny drawing will start with the eyes. Draw two circles. At the bottom of the figure we draw an additional line. In the resulting upper part we draw two small circles for highlights. Paint the top part of the sketches.
- Below the eyes add a triangular nose and a smile. For a smile, draw a vertical line from the nose, and an arc under it.
- Let's start sketching out the contours of the head. From the middle of the top we draw a line to the left. We stop opposite the spout and draw two slightly curved triangles. So, cheeks are formed. Draw fur on the top of the head and from there repeat drawing the right side of the head. We connect the drawn sides with a long arc.
- We draw ears. From the top of the head we draw a long line, make it round at the end and return to the starting point. One ear is ready, it looks like a teardrop, but without a sharp end. Add a similar element inside, but smaller.
- The second ear will be bent. To get such an ear, you need to draw a triangle with rounded corners. We bring the final part to the first line, but do not touch it. We finish drawing a small line that connects the ear to the head. Add an ear in the middle.
- We draw the torso. Draw two lines from the head on both sides. Draw the hind legs underneath them. Their shape is similar to a triangle or wide droplets.
- The front paws will be hidden. Therefore, to draw them, it is enough to draw one arc on each side from the muzzle to the hind paw.
- We connect the lower legs with an arc, forming a tummy. You can draw circles on the paws. And add a horizontal line on the tummy to make the bunny plump.
- Draw the outlines with a thick marker. You can start coloring the picture.
Here's how to draw a cute bunny, easy and simple.
You can also draw a cute bunny.
Hare in pencil
We continue to look at the cute bunnies. In this lesson, megamaster.info will tell you how to draw a bunny with a pencil step by step for children. To work we will need:
- a simple pencil;
- eraser;
- sheet;
- markers.
Let's move on to step-by-step explanations:
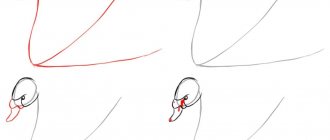
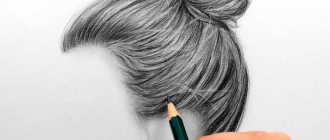
- Let's start drawing with the ears of the future bunny. Draw a long line and round it at the end. Let's draw the line back. At the top we draw the top of the head. From it we draw another ear and add wool to the top of the head.
- Let's start designing the face. Like the previous bunny, this one will have round eyes. Add eyebrows above them, and draw oval highlights in the eyes. The bunny's nose will have the same oval shape. Below it we draw a mouth using two arcs. Inside the mouth, add two teeth. Shade the space between the teeth and mouth with black.
- Finish drawing the head by adding a line at the bottom. Don't make the bunny's head round. It will look better in an oval shape.
- We step back a few centimeters from the bottom of the head and draw large hind legs. This part can also be shaped into an oval. Connect them at the bottom with a small line.
- Draw an arc on your tummy and place a circle under it. It turned out to be a plump tummy.
- Draw the upper legs. They will keep our ears open. We draw three fingers on each ear and add them from the outside in an arc.
- Decorate the paws with heel and toe marks. If everything is ready, you can start coloring.
- Color the hare's front legs black. Paint over your eyes. Decorate the tummy and edges of the ears in gray. Draw a line on the belly with a black felt-tip pen. Color the marks on the paws pink. To make the bunny look cuter, you can add a few hearts around it.
The instructions on how to draw such a hare are finished. Let's move on to other interesting options.
cartoon hare
Often a hare is drawn in a stylized form, artificially enlarging its head, ears or eyes. This makes the image recognizable and at the same time interesting, unusual, and vibrant.
Drawing a cartoon hare has much in common with the image of an ordinary hare. First you need to think over the image of your hero and arrange it on a sheet of paper. Then you need to outline his head, body and paws. Already at this stage you need to draw in a stylized manner. In other words, if your hare has a small body and a very large head, then this is how you should immediately depict it.
Then you need to work on your picture in more detail - draw eyes, nose, cheeks, mouth, mustache. Draw ears on the head, which, by the way, can also be stylized, for example, very long or, conversely, short. You also need to clarify the shape of the paws, and perhaps, if this is included in the idea of the picture, draw clothes and shoes for the hare.
After this, you need to look at the resulting image of a stylized, cartoon hare and decide whether everything is good in it or whether some other touches or edits need to be made. After this, you need to carefully erase the auxiliary construction lines, and then boldly begin coloring. Rest assured, no one will have such a cool hare!
We recommend watching:
- How to draw a fox with paints step by step?
- How to draw a raccoon with a pencil
- How to draw a person's nose?
- How to draw a squirrel with a pencil
- How to draw a robot
- How to draw a birch?
Hare with carrot
Continuing the topic of these animals, we suggest depicting a hare holding a carrot in its paws. We will draw with a simple pencil. By following the instructions, the smallest novice artist can handle the job.
How to draw a bunny with a pencil:
- In the middle of a sheet of paper we draw a small circle. Below we draw a semicircle of identical size, complement it with arcuate lines that are drawn in different directions. Next, we complete the semi-oval downwards of the depicted figure.
- Add an arc downwards to the lines shown. In the lower left corner we separate part of the perimeter. We got the outline of a nose with an open mouth and one tooth, like a hare.
- Starting from the top of the nose, draw the beginning of the cheeks with a pencil. We complement the resulting picture with oval shapes, draw circles in the middle and paint over them.
- Stepping back down, we sketch one front leg. We divide it into three parts with vertical sticks. From the left edge of the foot, at an angle, we begin to draw large-sized carrots, and at the end we draw out the tops of the vegetable.
- In the middle of the carrot we display a second hand, which seems to support the root vegetable. We divide the carrots into several parts with dashes, but the dashes should not reach the edge.
- Starting by hand, we draw out the hare's hind leg. We draw out part of the foot under the carrots. We supplement them with three small ovals, as shown in our picture.
- From the edge of the cheeks, upward, we begin to draw the silhouette of the hare's head. Not reaching the middle of the eye on the left side we draw one ear, then we finish drawing the second. We supplement the image with eyebrows and draw fur. In the ears we draw a figure that follows the contour.
- Draw part of the mouth with a felt-tip pen. We color the eyes. We outline the entire perimeter of the drawing and all the lines.
At this stage, drawing the hare is finished. By following all the instructions, a novice artist can handle the drawing quite well. And if you can’t draw this or that part the first time, you can always erase the pencil with an eraser and repeat the procedure.
Cheerful bunny
Having depicted a hare with a carrot, you should not stop there, but, on the contrary, you need to consolidate the newly acquired skills. Therefore, we suggest you learn how to draw a hare with a pencil step by step for preschool children. The drawing is very simple. Your main task is to follow the step-by-step instructions and then you will get a beautiful bunny.
Let's start the creative process:
- On a sheet of paper near the middle we draw a small drop. From there, in a downward direction, we begin to draw the cheeks; they look like an uneven oval. This can be seen in the picture.
- We add a line to the nose, from which two lines diverge in different directions. We draw an arc from the bottom of this sketch. We draw an arc slightly below the sketch and draw a circle on the nose.
- From the left edge of the nose, we begin to depict the eyes; in our case, they are in the form of elongated ovals. In the middle of the peephole we draw an identical figure, but smaller. We complement the silhouette with eyelashes.
- Now, let's add eyebrows to the muzzle. Let's draw a semicircle above the muzzle with wavy areas near the cheeks. At the top we draw the bunny's ears, as shown in the picture. We complement them with identical figures, but smaller in size.
- A little below the middle of the drawn head, draw an oblique line up, round it and point it down. We also round the bottom and get carrots. We supplement the vegetable with tops.
- We draw a mustache on the hare's face. Draw a foot on the right side, as done in the picture. We depict the second paw and draw many lines on the carrot. Add fur between the legs that hold the carrots.
- We depict the torso, hind legs and panties. Draw the silhouette of a hare's tail. We decorate the pants with circles.
- Next, shade part of the eyes. Color the nose black. We sketch the body in gray. Leave the fur and eyebrows white. Paint some of the ears pink. Let's paint the pants blue. Let's make the circles on the shorts yellow. Naturally, we will color the carrots orange and the tops green.
That's it, the bunny is ready. By following our instructions, you can draw a beautiful animal in just a few minutes of free time. And since all the options are easy, even a novice artist can handle the job.
We also recommend learning how to draw a bird or a dog.
How to easily draw a hare with a pencil step by step
How to easily draw a hare with a pencil step by step - for children and adults. Let's learn to draw a beautiful hare with a pencil step by step together with your child. Find out how to quickly and easily learn to draw a beautiful bunny.
Many children and adults want to learn how to draw bunnies, squirrels, and a variety of animals, for this we suggest you step by step understand the drawing of a hare.
To learn how to draw a hare you don’t need a lot of skill, you just need to imagine the bunny you want to draw in front of you and start drawing.
To make it easy for you to draw, we will tell you how to draw a bunny in an easy and simple way.
Take paper and pencil, look at the drawing of the bunny you are about to draw.
The bunny is located on the entire sheet of paper, in the middle of the sheet is the bunny’s body, on the left is the bunny’s head, on the right is his tail.
Draw the bunny's body in the middle of the sheet, in the form of a large oval; on the left, draw the bunny's head, it will be in the form of a small oval, just above the body and intersects with a large oval, that is, with the hare's body.
On the right, in the large oval, draw a circle - this will then be the hare’s hind paw.
Now draw the bunny’s ears, they are located along the bunny’s body, long, with pointed ends on the ears.
Draw the bunny's paws in the form of ovals; they are located in the lower part of the drawing, under the large oval.
At the right end of the large oval, draw a small circle - this will be the bunny's tail.
Next, draw the bunny’s eye, it should be drawn in the form of an oval with pointed ends, draw the eye itself in black. Draw the bunny's nose in black.
Erase the extra lines in the bunny drawing and draw the front and back legs.
Look what a beautiful bunny you have made. You can paint the bunny in any color you like.
Now let's try to draw another bunny and a little differently
Look carefully at the picture of the bunny. The bunny is located on the entire sheet of paper, most of the sheet is occupied by the bunny's body. The head of a bunny is drawn on the left, the tail on the right.
Take a sheet of paper, a pencil and visually place the future drawing on the sheet of paper.
You will start drawing a bunny from the head, so look right away where you need to place the head of your future bunny.
Look at the shape of the bunny's head, it looks like an oval, slightly uneven. Draw a bunny's head on the left side of a piece of paper, in the form of an uneven oval, and draw the bunny's nose on the bottom. Look carefully at how the bunny's nose is drawn.
Now draw the bunny's ears, the ears should be drawn up, erect, with rounded ends at the ends. Draw the bunny's eye, in the form of an oval, the top of the eye will be rounded, and the bottom of the eye will be slightly pointed down. Everything you need to complete in the drawing is highlighted in black.
Draw the bunny's ear, color the bunny's eye, the eye should be black, there should be a small white circle inside the eye. Everything that needs to be completed is drawn in black in the drawing.
Now draw the bunny’s body, it should be drawn almost over the entire sheet, in the center in the form of an oval. In the picture, everything that needs to be completed is highlighted in black.
Now draw the bunny’s legs, the front legs are fully visible, and the back legs are partially visible. Draw a small tail for the bunny, it should be drawn on the right side.
Draw the antennae for the bunny, in the form of a small hatch, all over the bunny, apply a small hatch. Hatching will give the bunny a beautiful shape, fluffiness and outline.
Look what a beautiful bunny you have made. The bunny can be painted or left as is.
Courses for the development of intelligence
We also have interesting courses that will perfectly pump up your brain and improve your intelligence, memory, thinking, and concentration:
Development of memory and attention in a child 5-10 years old
The course includes 30 lessons with useful tips and exercises for children's development. Each lesson contains useful advice, several interesting exercises, an assignment for the lesson and an additional bonus at the end: an educational mini-game from our partner. Course duration: 30 days. The course is useful not only for children, but also for their parents.
Secrets of brain fitness, training memory, attention, thinking, counting
If you want to speed up your brain, improve its functioning, improve your memory, attention, concentration, develop more creativity, perform exciting exercises, train in a playful way and solve interesting problems, then sign up! 30 days of powerful brain fitness are guaranteed to you:)
Super memory in 30 days
As soon as you sign up for this course, you will begin a powerful 30-day training in the development of super-memory and brain pumping.
Within 30 days after subscribing, you will receive interesting exercises and educational games in your email that you can apply in your life.
We will learn to remember everything that may be needed in work or personal life: learn to remember texts, sequences of words, numbers, images, events that happened during the day, week, month, and even road maps.
Money and the Millionaire Mindset
Why are there problems with money? In this course we will answer this question in detail, look deep into the problem, and consider our relationship with money from psychological, economic and emotional points of view. From the course you will learn what you need to do to solve all your financial problems, start saving money and invest it in the future.
Speed reading in 30 days
Would you like to quickly read books, articles, newsletters, etc. that interest you? If your answer is “yes,” then our course will help you develop speed reading and synchronize both hemispheres of the brain.
With synchronized, joint work of both hemispheres, the brain begins to work many times faster, which opens up much more possibilities. Attention , concentration , speed of perception are enhanced many times over! Using the speed reading techniques from our course, you can kill two birds with one stone:
- Learn to read very quickly
- Improve attention and concentration, as they are extremely important when reading quickly
- Read a book a day and finish your work faster
We speed up mental arithmetic, NOT mental arithmetic
Secret and popular techniques and life hacks, suitable even for a child. From the course you will not only learn dozens of techniques for simplified and quick multiplication, addition, multiplication, division, and calculating percentages, but you will also practice them in special tasks and educational games! Mental arithmetic also requires a lot of attention and concentration, which are actively trained when solving interesting problems.
Conclusion
Learn to draw, because you can always learn to draw, at any age. Teach your children to draw. We wish you good luck.
cepia.ru