Applications
Eights with flowers
A symbolic figure eight decorated with flowers will be both a postcard and a gift picture.
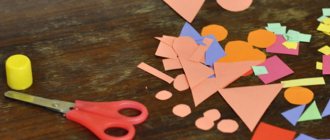
Cut out the figure eights in advance. Also cut out flowers and butterflies of different sizes and colors from colored paper.
Here you can
Master class on how to make a 3D card with tulips for mom from colored paper and cardboard
Now a more complex and time-consuming gift: in front of you is a three-dimensional 3D postcard. This is what it looks like from the front.
And when you turn around, a fan of tulips opens.
Let's take:
- blue cardboard,
- colored paper,
- pencil,
- ruler,
- glue stick,
- scissors,
- tape.
Take blue cardboard, fold it in half and measure 15 cm from the beginning. Place a ruler and draw with scissors to leave a mark. We fold the cardboard in half and we get a very smooth and beautiful base without creases or bends.
Cut out three thin green strips and glue them to the front of the cardboard.
Making a template for flowers. To do this, take a sheet of paper, fold it in half and draw half a drop from the fold and draw a tip from the edge, cut it out and you get a tulip.
You need to prepare 1 tulip of red and white colors. And three yellow parts to get a voluminous flower.
Fold all three parts of the tulip in half. Glue its sides together.
For the volumetric part inside the postcard, take green paper: 2 strips 10 cm wide, 2 strips 7.5 cm, 2 strips 5 cm.
We fold both strips of the same width like an accordion and glue the edges into one strip. It should turn into a rainbow for us.
By analogy above, we make tulips for each accordion, 4-5 pieces.
Now glue the bottom of the tulip onto the fold.
Then we bend it. Glue the remaining flowers. It turns out to be a flowering bush.
By analogy, we make the remaining accordions with flowers.
Now open the postcard and take a thin accordion. Apply glue to one edge. Stepping back 3 cm from the bottom edge of the base and about 3 mm from the fold, first glue one side of the accordion.
We take the middle strip, also smear one edge and glue it at a distance of 3 cm from the first strip and 3 mm from the fold, and fix it. We fix the third accordion.
Then, holding it with your fingers, smear the top strip with glue, then the middle and small ones and cover the card.
Open the postcard - this is what happened.
Now glue the tulips to the front side and decorate with a bow.
You can sign and date it at the bottom.
Felt crafts
Baskets with felt flowers
Felt is a soft synthetic material that can be used for appliques. Flowers made from felt or colored paper are suitable as decorations. Rhinestones made of colored plastic can now be found on sale; they already come with an adhesive backing, so attaching them to the center of the flowers and to the basket itself will not be difficult.
Making DIY crafts for Mother's Day in elementary school
Next, I want to offer you work options for older children, namely for students in grades 1-3 .
A very interesting and creative craft in the shape of a fish, made using the technique of appliqué and trimming. Look how lovely it is.
Fish
You will need: a white sheet of cardboard, a red sheet of cardboard, bright tinted or colored paper, a pencil and eraser, glue.
Work process:
1. Take a white sheet of cardboard and draw a fish on it. Cut it out.
2. Make fins and a tail from red cardboard: draw and cut out.
3. Cut thin strips from tinted paper. These will be scales.
4. Now fold each strip in half and connect, securing with glue. You will get “droplets”.
5. Glue these “scales” following the drawn line.
6. Fill the entire body of the fish, gluing each next edge under the previous one.
7. Take the paper from which the muzzle will be made. It can be peach, red or white. Cut it into small squares. And using the end of a pencil, crumple them.
8. Then glue all the parts.
9. When filling out the muzzle, make sure that there is no empty space between the paper.
10. After the work has been done, glue the fins and tail. The gift is ready.
You can also make a vase from a bottle and flowers from any available material.
Or, for example, make such a sweet composition. It is done simply.
And for those who like to work with threads, offer to do some handicrafts and make a real box for storing jewelry.
If mom is a fashionista, then she will definitely like the next work in the form of a stylish handbag.
Here is another version of a homemade vase. Everything is as simple as shelling pears.
Or, for example, girls can sew needle beds. Always a necessary thing in every home.
For lovers of beading, an option with a bracelet. Here's what it looks like along with the diagram.
I also found a cool idea with a pattern on a candle. I think it will be very nice to receive such a gift and then use it.
Take baking paper and draw a design on it. Just remember that it will be transferred to the candle in a mirror image.
Then attach the drawing to a thick candle and fix it. Next, treat the candle with hot air, such as a hairdryer. Beautiful candles are ready.
And don’t forget about everyone’s favorite postcards.
And try to make a unique vase from a simple jar.
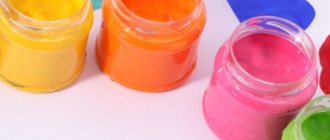
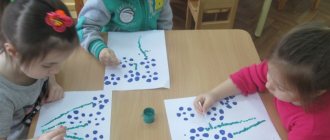
Working with finger paints
Finger paints are non-toxic and completely safe for children. Even if the baby decides to taste and lick his finger there will be no harm to health.
Postcard painted with finger paints
Children really like to draw simply with their own hands without using brushes. This develops their tactile senses and skills.
Questions for children based on the drawings they have drawn on the topic “Portrait of a Mother”
At the end of the lesson, the teacher can ask the children questions to reinforce the material:
- “Children, what did you draw?”
- “What did you use to paint your mother’s portrait?”
- “Did you like drawing the portrait?”
When creating a drawing, kids should imagine the world around them. And thematic lessons play an important role in this. Drawing on the theme “Portrait of Mom” is an excellent choice for developing imagination and increasing children’s interest. The main thing is to praise the young artists at the end of the lesson, even if they didn’t get everything right.
Volumetric flowers made of corrugated paper
Tulips made of corrugated paper and disposable spoons
You can make a whole bouquet of such tulips and strengthen them along with the leaves in a small flower pot. Or you can make one tulip in a pot for each mother.
For this craft we need:
- Plastic spoons - at the rate of 4 spoons per flower.
- Red and green corrugated paper - 0.5-1 meter for each flower, 1 meter is enough for green.
- Transparent tape.
Wrap each spoon in red paper.
Wrap the leg of the spoon in green paper and secure with tape.
Making interesting crafts from paper and cardboard with middle school children
The kids in the middle group are already 4-5 years old. These are quite skillful and smart children who will happily make things. They are more patient and can sit in one place longer. This means that crafts need to be made more difficult.
Interesting ideas for making compositions from plain colored napkins. To do this, cut them into small squares and roll them into balls. All that remains is to draw the composition and paste it over with pieces like these.
- Postcards from napkins “Mimosa sprigs”
Here is another option with this plant.
- Yellow mimosa
- First lilac
In general, as you can see, napkin compositions are practically quilling, but simpler and lighter. In my humble opinion and experience.
With the kids we make cards from corrugated paper. It is ideal for creating lush flowers. They look like real ones and you even want to smell them.
Below is a template on how to cut out the buds correctly. We make dandelion, cloves, chrysanthemum and chamomile.
And then you can immediately put them into action.
- Blooming buds
You can also simply cut out the buds and stick them on a cardboard card. Inside we indicate congratulations for your loved one.
Dresses and skirts have symbolized femininity since ancient times. Instead of flowers, you can glue a dress to the cards. Fold the dress like origami. Look at the diagram below and try it.
And look, it turns out very cute and beautiful. And most importantly - original!
- Craft “Cintz Dresses”
Making dresses doesn't have to be in origami style. Here is just an applique of a bodice and a fan skirt.
- Mom's favorite dress
- Summer sundress
Gifts made from ordinary table napkins
In addition to their main purpose, paper napkins are an excellent material for creativity. Soft and flexible, they wrinkle well. And the variety of flowers allows you to make bouquets of roses, mimosas, and daisies.
Bouquet of mimosa from table napkins
Ordinary table napkins are very flexible; they can be used to make voluminous small flowers or small lumps.
Take yellow and green napkins.
Flowers made of thread and wire frame
Take a wire that bends well and holds its shape. Make a flower frame out of it.
Start with the petals. Fix five circles in the middle of the flower. Now put out a stem with leaves.
Wrap the wire frame with thin knitting threads. Such flowers can be placed in a vase or used as a decorative element.
We looked at just a few options for crafts that you can use to please mothers on this bright holiday.
Now you know several ways to make a homemade gift for Mother's Day. Which of the proposed options did you like best?
Floral arrangements made from double-sided colored paper and other materials
Magic double-layer flowers flowers made of colored paper
These seemingly complex flowers are made very simply. Moreover, when making crafts, you don’t have to glue a lot. It is enough to fasten the necessary parts with a piece of tape.
For work we need:
- Colored double-sided paper, for example white and purple - 2 leaves per flower.
- Green colored double-sided paper - 1 sheet will yield three stems.
- Scotch.
Fold the sheet in half.
Set aside 2 cm from the free edge and draw a light line.
From the fold side, cut a sheet of colored paper into strips to a drawn line no more than 2 mm wide.
First do this from purple paper, then from white.
Move the edges of the workpiece to the right by 3 cm and secure the left edge with tape.
Let's prepare the stem. To do this, divide the paper horizontally into three equal parts. You need to start twisting the stem from the diagonal.
Now let's start twisting the flower.
The lighter part should remain at the top of the flower. The darker part is below.
Secure the white and purple paper to the stem with tape. Spread the petals.
Flowers made from cotton swabs
Cotton swabs are perfect for our children's creativity. The more you show your imagination and involve kids in making gifts for mothers and grandmothers, the more interesting it will be for them.
https://www.youtube.com/watch?v=imuDCCq9jww
This is the kind of beautiful unusual flower you should end up with.
For work we need:
- Cotton swabs on plastic stems - 2-3 large packages.
- Foam balls for the base - 1 ball for each flower.
- A container in which to dilute paints.
- Paints - you can take regular gouache in different compatible colors. For example, pink and light blue. Or yellow and orange.
- Wooden skewers for canapés are the stem.
Each stick must be cut diagonally to create a sharp edge.
We insert each half of a cotton swab into a foam ball.
You should end up with a hedgehog made from cotton swabs like this.
Dilute a small amount of paint with water into a plate or other container. The solution should be bright but not thick.
Dip our hedgehog into the paint and leave the cotton end in the paint for a second.
We paint the wooden stem green with gouache.
Mother's Day Crafts for Kindergarten Kids
We’ll start with products that can be used not only by older children, but also by little ones. I dedicate this section to kindergarten. You can create and craft from any material, be it plasticine, paper, etc.
Bouquet of multi-colored palms (for the younger group)
To do such soulful work you will need plain white A4 paper, paints, water and brushes.
Now make blanks on a white sheet, just draw green stems and “tie” them with a blue ribbon. With your child, paint his palms with any color. Next, help him make prints on the branches. That's all, the gorgeous bouquet is ready!
Also invite the kids to simply make a gift. Here's what might come of this idea.
You can also make greeting cards with younger preschoolers.
Card with balloons
Choose a photo of your son or daughter and cut it out. Inflate small balloons with your child and tie them with multi-colored woolen threads. Leave long ends. Glue colored paper slightly smaller than white onto a white sheet of paper. Next, glue the photo and balloons. This gift looks very impressive!
Postcard “Colorful buttons”
Well, this is the simplest option. Ask your child to draw the stems or print them out on paper in advance. Then choose multi-colored buttons, maybe of different sizes, and glue them. At the back, help me write a congratulation.
With the kids in the middle group , you can create these charming butterflies.
First, paint the paper with different colors from light to dark. While the base is drying from colored paper, fold the butterflies according to the diagram below.
Well, then glue them onto the dried base and complete everything with a twig and leaves, which can also be made from paper or drawn.
Interesting work that requires artistic skills. Ask the children to draw a portrait of their mother. And then make frames together.
For senior and preparatory groups, the options are a little more complicated.
For example, you can make ekibans like this. The stand will be plastic bottle caps. The tree itself is a wooden popsicle stick. Cut the foliage out of paper in the shape of hearts of different sizes. Glue them together and then glue them onto a stick.
A beautiful bouquet is made from ordinary cotton pads. Plus use the quilling technique for decoration.
In this option, you will have to try and cut out the baskets. Make flowers together in any way known to you. We have already talked about how you can make tulips. If you haven’t read the article, be sure to check it out here.
Of course, flowers are a common gift. Try creating a homemade bouquet.
Flower vase
You will need: green paper, napkins or corrugated paper, scissors, glue.
Manufacturing process:
1. Take a sheet of green paper and fold it in half. Step back about 3 cm from the bottom and draw a horizontal line with a pencil. At the top, draw parallel lines at intervals of 1-1.5 cm.
2. The resulting parallel lines must be cut to a horizontal line not reaching 3 cm from the edge.
3. Unfold the sheet with the cuts.
4. Turn the sheet over to the other side and fold it not exactly edge to edge, but at a distance of 1 cm.
5. After this, coat with glue and glue.
6. When the paper sticks well, roll the workpiece into a tube.
7. The result is a stable vase with petals.
8. Make flowers from a napkin or corrugated paper, as shown in the photo.
9. Glue the finished flowers to the stems.
10. You can decorate the resulting bouquet to your liking, for example by gluing sequins or tying it with a satin ribbon.
You can also use the idea of decorating pebbles. Paint them with paint, glue felt hearts on top and the souvenir is ready.
Or plasticine, beloved by all children. It will help you create whole pictures.
And I also liked these beads. Mom will definitely be delighted!
Plasticine products
Plasticine can now be found in different qualities and colors. I really like plasticine, which dries in the air. It does not stick to hands and clothes, and the finished product will become very dense over time. Another advantage of this plasticine is the choice of colors.
Bouquet of plasticine on paper
On a sheet of paper we make a bouquet of thin tubes. We divide the plasticine into equal pieces and roll them into small flagella. We roll these flagella into a spiral - these will be our flowers. Place a ball of green plasticine in the center.
As an option, you can make a beautiful mimosa from plasticine balls.
Master class on making cards for Mother's Day + templates
Of course, in addition to giving flowers, they always give cards. Usually they are made in schools and kindergartens. I found a video story in which the author talks and shows the process of making a greeting card using children's hands. I liked this idea, so I saved it and hasten to share it with you.
Well, as promised, I’m sending you a couple of templates for creating postcards yourself. Print them out for your kids and they will be happy to color them!
DIY flowers made from colored paper ribbons
These ribbons are sold as a set. But making the blanks yourself is not difficult. You can instruct your parents at home to cut double-sided colored paper into 1 cm thick ribbons. Children lay out flowers twisted into spirals on the paper. The ribbons are attached to the paper using regular glue.
Rolled paper appliques
Fabric applique
It is always more pleasant to work if you know that your work will not be repeated. The same can be said about fabric applications. When choosing pieces of shreds, we combine different colors.
When choosing fabric, pay attention to the fact that it is well attached with glue to the base (cardboard or very thick paper).
For blanks, you can use templates or come up with and draw the plot of the picture yourself. Mom will be happy!
You can give your mother an unusual gift. A fabric photo frame and place a photo of you and your mom together.
You can buy a ready-made kit to make a photo frame. You can also choose the fabric yourself and cut out the blanks.
Video: Creative activities with children DIY photo frame
Baskets with flowers
Paper baskets with flowers
As baskets, you can use either colored paper itself or ready-made small flower pots for seedlings. To make the baskets look more aesthetically pleasing, they should be wrapped in corrugated soft paper or colored paper.
Instead of flowers, you can make small trees with flowers using this technology.
Paper card “Dress for Mom”
To make all the details look beautiful and neat, it is better to print the blanks for the dress using ready-made templates. Then the older group will quickly cope with making the postcard. But if this is not possible, you can draw parts of the clothing yourself.
Required:
- a sheet of thick cardboard;
- A4 paper;
- narrow satin ribbon;
- rhinestones, beads for decoration;
- pencil, scissors;
- toothpick;
- quilling paper;
- ruler, PVA glue.
Progress:
- Fold the card base in half.
- Cut out the details of the dress according to the template. When working with children, we use thicker paper or cardboard.
- Fold the skirt accordion-style along the lines to give it volume.
- Mix white and blue gouache to create a beautiful blue. Color the top and bottom of the dress.
- To make it more attractive, we put white gouache on a cotton swab and create a polka dot pattern.
- Glue the skirt to the base of the card, applying glue only to the belt, and then attach the top.
- We cut a piece of ribbon, form it into a bow and glue it onto the craft, and then decorate the top.
- We wrap yellow quilling paper around a toothpick to make a stamen.
- Cut a strip of white paper from an A4 sheet into strips and glue the tip to the yellow blank. Gradually wrap it in a circle and secure it with glue.
- We straighten the petals on the daisies. And we record them on a postcard. We decorate with green leaves using the quilling technique or do them differently.
- We cut out the hat according to the template, decorate it with ribbon and beads and glue it above the dress. If desired, we add other details.
Fact!
As a template, you can use not only a printed version on white paper, but also clippings of a finished dress from a fashion magazine. Or use a music book or an old newspaper. An older preparatory group will do a great job with these crafts. You can already trust them to work with thin and easily torn paper.