Wandering around the Internet, sometimes you are simply amazed at how rich human imagination is, how diverse people’s interests are, and what talents are hidden in them. The interesting techniques for making crafts are amazing. For example, cutting from corrugated paper allows you to create unique works of art with your own hands.
After completing a basic master class, you will become familiar with an interesting method and will be able to create yourself:
- Paintings
- Topiary (crimped paper tree)
- Volumetric figures
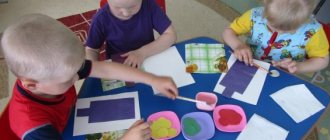
Parents will teach this exciting process to the child, and the teacher will teach the whole class.
What you need for work
The trimming method is very easy to implement. You will need:
- Multi-colored rolls of corrugated paper (see photo)
- Scissors
- PVA glue
- A wooden stick with one blunt end or a regular ballpoint pen
- To make a painting, use a sketch you like (for example, as in the photo), or children’s drawings
If you create a sculpture or topiary, you will need plasticine.
To make the master class enjoyable, stock up on imagination and patience.
Basics of technology
Trimming, what is it? This is the production of three-dimensional paintings or figures by gluing small twisted balls or tubes of paper to a surface. Glue with glue or plasticine. Such works differ from other types of applique in their airy result; it can be combined with other decorative elements, and it resembles a mixture of applique and quilling.
The napkin trimming technique allows you to create a contour, three-dimensional, multi-layered or planar image. Work done using this technique looks elegant and airy. Thus, you can make not only paintings, but also photo frames, postcards, decorate vases and glasses, pots, and topiary crowns. Anniversaries and holidays for children are decorated with large decorative numbers made using the trimming method. This kind of entertainment can keep children busy, as the napkins wrinkle very well and are soft to the touch. Invite them to create themed decorations for the 8th of March holidays, make snowflakes and snowmen, Christmas trees for the New Year, and heroes for fairy tales.
Even for beginners, this technique is very simple and inexpensive, and the results of the work will delight children and inspire craftswomen to new ideas when creating interior decorative elements. Thanks to the imagination of many needlewomen, many creative activities for little children have evolved into real works of art.
Related article: Crochet yoke for a children's dress: patterns with photos and videos
To create a flat image you will need scissors, glue, a toothpick or match and napkins of various colors. You can glue it onto a printed finished drawing or draw a sketch.
If you work with children, you can choose a drawing from any coloring book. It will be interesting for a child to paste over his favorite fairy tale or cartoon character. The main thing is that for the youngest beginners, the drawing has fewer details; the process is quite labor-intensive and in the first steps the child will need to help cut out a large number of blanks for rolling, learn to twist and crumple napkins, and carefully work with glue. We will show you how to make such fakes using a simple example.
Making blanks
Before you engage directly in creativity, you need to learn how to make end tubes. Let's go through this master class in detail. The technique for creating blanks is as follows:
- From a roll of corrugated paper, cut a narrow strip (see photo) about 1 cm wide.
- We cut the cut strip into squares (width - 1 cm).
- We place the blunt end of the ball rod (wooden stick) in the center of the square obtained from paper and squeeze it tightly with our fingers. As a result of the manipulations, you get a cross-cut tube, as in the photo.
Here is such a simple master class. And having prepared the workpiece using the described method, we proceed to the trimming process.
Flat image
Trimming will allow you to turn any drawing into a unique masterpiece. The technique of creating a picture from paper consists of several stages. Apply a layer of PVA glue to the sketch. Carefully glue the end tube to the surface of the sheet (as shown in the photo).
This should be done slowly, placing the paper blanks as closely as possible to each other.
The described master class leads to a picturesque result, and you get a colorful canvas, for example, as in the photo.
Other trimming methods are possible. There is a method in which the outline is first pasted over with tubes, and then the middle of the picture is filled. Or the glue is applied not to the surface of the design, but to the workpiece itself.
As a recommendation, we recommend using PVA glue with a sharp tip for trimming.
Easy lesson
The technique of trimming a flat painting begins with selecting a pattern. They draw it themselves or take it ready-made from any coloring book, after gluing it onto thick paper. We select the desired colors of paper and make blanks from them. To do this, cut the rolls of paper into strips without unrolling them, and from these strips cut them into squares with a side of about 1-2 cm.
Related article: How to sew a Japanese robe-kimono with your own hands: pattern and history of creating the dress
When there are quite a lot of squares, apply PVA glue to part of the drawing, screw the squares tightly onto the end of the stick and place them on the strip greased with glue at a right angle. We take out the stick and work on the subsequent trims. Place one after the other tightly along the glue line. You can also fill in the background of the picture to create entire landscapes. Trimming a flat picture is suitable for activities with children aged 5 years and older.
Fairy garden
If you have successfully completed the previous master class, then we will consider three-dimensional trimming and create a topiary using corrugated paper.
This technique is more labor-intensive, but the effect produced is worth your effort.
Decide right away which trees your topiary will be made of - traditional green or magical multi-colored. Depending on this, take colored paper.
A man-made tree consists of a stand, trunk and crown.
An ordinary round New Year's toy, or a children's ball, or a ball you made yourself from plasticine, a lump of newspaper and wrapped in thread, will be suitable as a crown. The diameter of the crown depends on what size you want to make the topiary.
Instead of a trunk, take an ordinary pencil and strengthen it in the future crown (see photo).
Make a tree stand from a plastic cup or flower pot. Fill the container with plaster, paraffin (fill with plasticine) and install the pencil-barrel with the crown up.
After the plaster has hardened, you have a semi-finished product in your hands, which is time to turn into topiary.
To be more convincing, cover the crown with green paint and the trunk with brown, and start trimming. Please note that this method recommends starting pasting with corrugated paper from the bottom (see photo).
After you have “greened” the entire top, do not forget that the “surface of the ground” in the pot should also be covered with blanks made from end tubes. And, having mastered this master class, you will create a topiary that will delight everyone around you with its naturalness. To create unusual trees, use brightly colored paper.
Gluing methods
You can trim not only with the help of small squares, you can also use circles, multi-layered, crumpled or slightly cut into rays to make realistic flowers, for example. Napkin blanks can simply be rolled into small balls and glued directly with your hands. Then all that remains is to apply glue to the drawing and distribute the lumps so that there are no empty spaces left.
Related article: DIY paper vase: modular origami for children with video
You can glue napkins not only with glue, but also with plasticine. Moreover, these could be plasticine figures or just the same paintings. If you stick plasticine onto a picture, you don’t have to worry about the glue drying out.
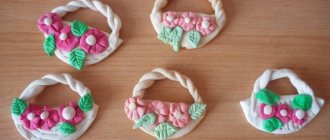
From plasticine you can make a base figurine of some fruit, animal or plant. This is how cool toys and souvenirs are created.
For example, you can roll up a base from a block and use large green squares, stick it tightly inside with a stick, add eyes for toys and we have a cheerful cactus.
To make an animal, you don't need to have complex sculpting skills. It is enough to prepare the body, roll it into a ball and add triangles, this will be the head with ears and add ball feet. We trim with the desired colors, add a twisted paper tail and the tiger cub is ready.
Now, in order to create interesting and beautiful fakes, you don’t have to be an experienced craftswoman or know how to draw or sculpt. We offer simple diagrams for printing:
Volumetric figures
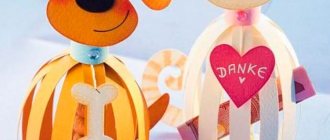
The technique of trimming three-dimensional objects allows you to make not only topiary, but also interesting sculptures.
In this case, the master class also exists in several versions.
A children's rubber or plastic toy is taken as a base, which is then sequentially pasted over with blanks of multi-colored paper. You need to act in sequence from bottom to top (this is exactly what you did when creating topiary).
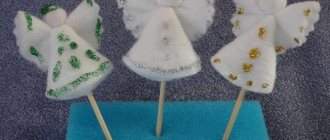
Plasticine is often used to corrugate a three-dimensional figure. A blank is pre-molded from it.
And the end tubes are simply pressed into the elastic mass (without using glue). This method is considered simpler, which in no way detracts from its advantages.
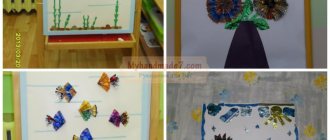
This is the simplest example. The charming creature resulting from your actions, as in the photo, will surely bring a smile to many and cause a good mood. And, using your unlimited creativity and acquired skills, you will soon be able to boast of a whole gallery of cute characters.
DIY miracles
If you have mastered all the ways of creating crafts from corrugated paper, then you have rightfully won the title of “cutting master”. By enjoying the process of creation, you make the entire world around you better.
Infect your children, friends and acquaintances with your example. After all, a common hobby makes people closer. Especially when it's so interesting. And by spending free time with your children, you will learn to understand each other and, perhaps, keep memories of such happy moments for the rest of your life.