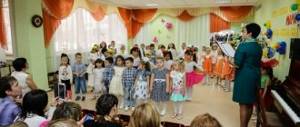
Hello!
Very soon a wonderful, good holiday will come - Mother's Day - which means you need to think about how best to please your mothers. In today's article we will look mainly at master classes dedicated to making cards with children. But adult readers will also be able to learn something new and interesting for themselves. In addition, you can please mothers and grandmothers with other little things, such as souvenirs or crafts.
As you know, postcards can be created from different materials. However, they do not have to be folding. It could be just a piece of paper or cardboard with a congratulation and decor written on it. Or maybe a complex volumetric composition.
What exactly you will do is up to you to decide. I just provide material for inspiration and introduce you to new techniques that will help you implement your ideas.
Even if something doesn't work out the first time, that's okay. You shouldn’t focus your child’s attention on this, or even scold him. It is better to provide all possible assistance if necessary. Especially considering that some lessons will require quite complex tools (for example, a stapler or hole punch). So, I suggest we start.
Postcard with a drawing and applique for mom
We present to your attention a very touching card for Mother's Day, made using the technique of drawing and appliqué. We make the base by folding a thick sheet of paper in half. Cut a heart-shaped hole on the front of the card. Decorate it with green paper around the edge. Cut out four hearts from multi-colored paper.
Make the base and cut out four hearts from paper
Glue the hearts onto the card. Cut out the word “mother” from paper. Glue each letter onto the hearts. Glue strings to the hearts so that they look like balloons. We decorate the craft with paper butterflies.
Glue letters, strings and butterflies
On the inside of the card opposite the hole we draw an image of mother and baby with a heart.
Mom and baby with heart
We decorate the image of mother and baby with flowers and butterflies. We write a congratulation for mom at the bottom of the card.
We are writing congratulations for mom
Our postcard is ready! It turned out to be very bright and festive on the outside and touching on the inside. A great gift for your beloved mother!
Postcard as a gift for your beloved mother
Birthday card for mom from her 9-10 year old daughter
At the age of 10, girls already have enough skill so that their cards for mom are not templates, but have an individual character. Girls, think about it, what does your mother personally like? Surprises? Flowers? Cake? Travel? Here's an idea for a postcard!
Then the card should be special, with a twist!
A beautiful paper applique so that the postcard has a whole clearing of your mother’s favorite roses, poppies or lilies of the valley. MK by colors here.
Here is another beautiful flower for a postcard.
And a beautiful aster can also be placed in a pot.
Why not make the card three-dimensional? Let your gift resemble a delicious piece of cake!
Here is a color printable template.
Make cuts along the solid, bold lines of the cake. These are, firstly, 4 vertical lines. Secondly, the candle line: carefully make a round cut.
Along the dotted lines, you need to make folds inside the card, that is, working with the side of the part on which the image is located, bend the folds towards you. Once the folds are ready, bend them so that the tiers of the cake are at right angles to each other and the candles are straight.
Now we need to glue the card cover. You need to apply glue not to the cover itself, but to the card, without smearing the part on which the cake is drawn: after all, it should bend inside the card, so it cannot be glued to the cover.
When everything is ready, carefully fold the card in half, folding each fold inward.
And black and white, which will give you the opportunity to decorate the cake in your own way.
Give mom the whole world! And don't skimp! Draw or paste photographs of the sights of the country where your mother dreams of visiting. Add a couple of flowers, ribbons, bows, lace or buttons.
As you can see, there are a lot of ideas. In fact, there are even more of them. And they directly depend on what your mom wants to receive as a gift!
I also can’t help but share a wonderful idea with a paper cat. Look how voluminous and interesting it is.
Mother's Day card with palms and flowers
Another wonderful card for Mother's Day is made in the form of open children's hands. We trace the palm and cut out the palm on the fold of white paper according to the template. Let's unfold it. We should have two palms folded together. Glue the palms onto the purple background. We cut out the palms from purple paper, stepping back half a centimeter from the edge of the white paper.
Cut out and glue the palms
Cut out a double heart from red paper and fold it like an accordion. Glue it on the crook of your palms.
Cut and glue the heart
Decorate the card with paper flowers.
Glue the flowers
All that remains is to glue a paper greeting at the bottom. We will make the most tender and touching card for our beloved Mother. Little palms will warm mother's heart even on the most inclement days.
Mother's Day card with palms and heart
Technology lesson notes for 1st grade “Postcard for Mom”
MBOU "Secondary school No. 13" Velikie Luki, Pskov region
Technology lesson in 1st grade,
postcard for March 8 “Flowers for Mom”
Primary school teacher Elena Ivanovna Paramonova
Velikiye Luki, 2016-2020 academic year
Lesson objectives:
- Making a greeting card for mom using technology
volumetric application.
- Expanding children's knowledge about the March 8 holiday.
- Improving skills and abilities to work with colored pencils, scissors and curly scissors, paper and glue.
- Nurturing love and respect for mother, desire to please
her with his gift.
- Instilling accuracy and attentiveness in work.
Tasks:
- Introduce children to appliqué techniques.
- Tell us about the holiday of March 8th.
- Develop fine motor skills and creative activity.
- Reinforce knowledge of safety rules at work.
- Practice skills in working with paper, pencils, and scissors.
Equipment:
Photo of spring flowers, sample postcard (applique), 20x14 colored cardboard, butterfly and basket templates on white paper, blank paper flower petals, yellow and green paper, scissors, glue, colored pencils.
Progress of the lesson
- Organizational moment (3 min)
- Activation of basic knowledge (2 min)
- History of the postcard(3min)
- Practical part (25 min)
- Job analysis(5 min)
- Summing up (2 min)
Organizing time
Today we will make a card for mom.
To make it, we need tools, and which ones you will learn from the riddles:
“Look, they opened their mouths. You can put paper in it. The paper in their mouth will split into pieces" (scissors)
“Near the river in the meadow they took a rainbow-arc. They straightened it out, straightened it out and put it in a box” (colored pencils)
“I am an important subject for school. To make a paper cube, an airplane, a cardboard house, an applique for an album, don’t feel sorry for me. I am sticky, viscous...” (glue)
So, today we will work with simple and curly scissors, colored pencils, and glue. Let's remember the basic rules of safe work:
-when cutting with scissors, they should be directed with the ends away from you
- when cutting, do not put your other hand under the blades
-do not hold the scissors with the ends up
- scissors can only be passed with the rings facing forward
- scissors can only be used while sitting
- scissors must not be left open or placed on an uneven surface
-do not leave the glue open, always close the cap tightly
See if you have everything ready for class. On the right side of your table (for right-handed people) there should be tools: pencils, glue, scissors. On the left side are materials.
Activation of reference knowledge
The sun plays like a ray,
And the snow keeps melting and melting.
The birds had no time to sleep -
This has come to us...(Spring)!
That's right, spring. Spring is the most beautiful and long-awaited time of the year. In spring, the sun becomes brighter and warms more strongly. In spring, all nature wakes up. And in the spring we celebrate the most tender, warm, bright and joyful holiday - March 8th. The holiday of our grandmothers and mothers. Thanks to a woman - a mother, we were all born. Mom is the closest, dearest person on Earth. It is no coincidence that we celebrate Mother's Day in the spring. The sun and mother warm us, spring and mother caress us
We are grateful to our mothers all our lives for their care, kindness and affection.
No holiday is complete without gifts. And the most valuable is a gift made with your own hands. Today we will make a gift for our mothers (grandmothers). What do all women on Earth love? Of course, flowers. And since it’s a spring holiday, then the flowers should be spring. What are the first spring flowers?
Let's get acquainted with spring flowers: snowdrop, crocus, daffodil, tulip, mimosa, lily of the valley.
We will make a postcard using snowdrop appliqué.
Let's prepare our hands for work: (performing finger exercises)
We'll play a little
We clap our hands together (clap our hands and fists alternately)
We warm up our fingers -
We compress and unclench them (we compress and unclench our fists)
And now we are musicians
Let's play the piano (we tap our fingers on the desk, like keys)
We played and smiled
And they returned to work.
Practical part
Each of you has an envelope on your desk. What's in it? All the details necessary for our postcard: colored cardboard, a template with a picture of a flower, green rectangles - 5 pieces, yellow paper, a butterfly and basket template.
-Take a basket and color it with a brown and black pencil.
-Now glue the picture of the basket onto colored cardboard.
-It's time to make leaves. It is necessary to mark the folds of the petals so that they become more voluminous. Fold them in half and use curly scissors to try cutting out the leaves.
-Spread glue on the middle of the leaf and glue it to the basket and we will glue flowers on them. We cut out the flowers and put them in pairs. The result is a voluminous flower. In the center of our snowdrop we cut out and glue a small yellow circle.
— There should be 5-7 flowers. Glue a painted butterfly to the handle of the basket. We glue it only to the middle of the body. to get volume.
- Now your postcard is ready. And you can safely congratulate the one for whom it is intended.
Analysis of works
Please pick it up and show everyone what kind of cards you have made. Well done! Let's hang the finished works on the board and admire them.
Everyone completed the task and worked diligently and carefully. I think it would be nice to give such a card.
Summarizing
-What new did you learn in today's lesson?
-What have you learned?
-How do you evaluate your work in class?
-What do you remember most?
Now please clean up your work area. The scraps should be thrown into the trash bin, and the attendants will collect the glue and scissors.
The postcard must be placed very carefully between the books so that it does not wrinkle.
The lesson is over.
Paper card “Dress for Mom”
For example, you can make an interesting craft that will emphasize the femininity and delicate taste of the mother - for this we use the silhouette of a fashionable dress or other clothing as a decoration for the postcard. To make this design element look more original, we make it in the scrapbooking style from newspaper pages.
So, what will you need? A newspaper (book, magazine) page with writing on both sides. You can use a sheet from a music notebook. Cardboard template of the silhouette of blouses, skirts and other women's clothing. If we are making a dress or skirt, we draw them with folds, which will then help give the model volume. It is better to draw the dress separately - the top and the skirt. Bows, beads, rhinestones and other small decorative elements. A sheet of thick white (or milky yellow) paper, a pencil, a ruler, glue and scissors.
Print and cut out the dress templates.
Dress template
First of all, we trace the clothing template onto the written page. Outlining the skirt, we mark the points where the fold lines should go, and then connect them using a ruler.
Fold lines
Let's cut out our product.
Cutting out the dress
We make folds along the lines.
Bend
We add volume to the skirt: using a ruler, we form folds so that some of them go inside - like on pleated fabric.
Making folds
If such a craft is made in kindergarten, we show the kids a master class on creating folds - they themselves will not cope with such a task.
Pleated paper skirt
Carefully fold a sheet of white paper in half. We glue our clothes to the title page of the future postcard.
Adding skirt and top
Now let's start decorating our clothes.
Green decoration
We decorate it with various details - bows, rhinestones, beads, pieces of braid.
Red decoration for a postcard
You can create various compositions: glue on several tops or make one dress - as your imagination dictates.
Beautiful tops for a postcard
Card with top and skirt.
Mother's Day card with blue rhinestones
Using the same technology, you can make a postcard in a different style - just cut out elements of clothing from suitable paper - for example, bright colorful colors.
Card for mom in the form of a dress
Mother's Day - DIY card for 1st grade
Rest assured, hand-made holiday cards will delight your beloved mother - after all, this is not just a master class card, it is a real man-made miracle that keeps a piece of the soul.
Mother's Day card in the form of a dress
There is another option for making a card in the form of a dress for Mother's Day. For such a postcard we will need colored and thin papyrus paper. Fold colored paper in half and cut out a dress from it on the fold. You can glue the dress in two parts.
Cutting out the dress
We fold the papyrus paper like an accordion and glue it in the center in the area of the skirt.
Glue the accordion
We bend the second half of the accordion.
Bend the accordion
We fix the second half of the accordion. We should get a multi-layered fluffy skirt.
Multilayer fluffy skirt
We decorate the upper part of the skirt with a shiny paper belt. We straighten the skirt of the dress and give it volume. Inside we write words of love and congratulations on Mother's Day.
Paper belt
Here are some different beautiful dresses you can make for your beloved mothers. For every mother you can choose her favorite color!
Postcards - dresses for mom
Card with apron for Mother's Day
A very impressive Mother's Day card with an apron using scrapbooking techniques or many layers of different materials. We glue the materials onto the base according to the sample. We use a ribbon to decorate the frame inside the card and the apron.
Glue several layers of paper and ribbon
We use ribbons and ribbon to decorate the upper part of the apron. The postcard is ready! You can paste a congratulatory inscription, a photograph, pictures with your mother’s favorite things - the flight of imagination for the scrapbooking technique is not limited.
Card with apron for Mother's Day
Postcard Heart for mom using quilling technique
At the very beginning, we were already familiar with this style, and I decided to show many other ideas that are beautiful in their own way and may lead you to a new original gift for your mother. The first one will be shown in a video from the YouTube channel. Express your feelings and make this heart out of paper and glue.
Here are a couple more ideas.
Mother's Day card “Scrapbooking with flowers”
A stunningly beautiful Mother's Day card can be made using the popular scrapbooking technique. We make the base of the card by folding a sheet of cardboard in half. Glue a vintage style background with stitches and roses to the front side. Roll up the edges a little.
Vintage style background
We make three rectangular blanks from old wallpaper and white mesh. The edges of the workpieces should not be smooth and “torn”.
Three rectangular blanks
We glue our blanks onto the front side of the postcard.
Glue the blanks
Glue a round openwork napkin on top.
Glue the blanks and napkin
Glue paper flowers, leaves, ribbons and monograms onto a napkin. Decorative elements for scrapbooking can be found in special sets.
Making a postcard
Glue the congratulatory inscription “To Mommy”. We complement the card with rhinestones.
Congratulatory inscription and rhinestones
This is such a tender and beautiful card for Mother’s Day!
Mother's Day card in vintage style
Craft postcard for school children
Sometimes it’s worth trying a little to get a worthy gift for your mother from your daughter or son.
Bouquet
I described the applique as a bouquet. But in fact there is only one tulip. Only it is decorated like a bouquet: it has a nice wrapper and decorative elements.
How to make this craft:
- For one tulip you need to print 5 identical blanks.
- Bend 4 of them in half.
- Fix all 4 blanks with a stapler to the fifth along the fold line.
- Straighten to add volume.
- A round openwork napkin is folded into an envelope.
- Fold the elongated leaves in half.
- Twist thin strips of paper into a spiral.
- Cut out the “stem”.
- Glue the envelope to the base.
- Place the stem and leaves in it. On top there is a flower and serpentine.
This craft is perfect for a kid who is in 1st grade.
heart
This is a wonderful gift for a mother from her 12 year old daughter. We have already made a similar heart. Take a look at the article to see how you can beautifully decorate such a gift.
Pot of flowers
At the age of 11, a child will be able to cope with such an installation on his own.
- To make a pot, you need to print the template and cut out the blank. The template enlarges by clicking. You can attach the sheet to the monitor and trace the template, enlarging it to the desired size, using scaling in the browser
- If you glue 3 sides together, it will look like an envelope. We will place the bouquet in it, which we will make now.
- In order to get a beautiful bouquet, you can go in two ways. On a cardboard whose height is equal to the height of the pot and another 2-3 cm, glue:
- Beautiful flowers cut out from magazines.
- Or drawn by yourself.
- Place this cardboard in a pot so that the flowers are visible from above.
With or without inscriptions, mothers will definitely like such pictures. Author of the master class.
More video master classes on interesting crafts
Volumetric postcard - stairs
Postcard - waterfall
Card for Mother's Day "flowers made of corrugated paper"
A Mother's Day card with voluminous flowers made of corrugated paper will be very impressive. To make it we need two squares of purple corrugated paper. Fold the squares in half. We should end up with two rectangles of folded paper.
Two rectangles
We wrap one of the rectangles into a tube. We wrap the tube with the second rectangle. We secure the paper with a thread at the bottom. Unfold the top of the paper. We will get a blooming rosebud.
Paper bud
Take a strip of green corrugated paper. We wrap it around the bottom of the bud.
Rolling green paper
Roll the paper until a long stem is formed.
Paper stem
Cut out a leaf from another piece of green paper. Glue the leaf to the stem. The paper rose is ready!
Paper rose
Using this pattern we make several colors. We put them in a napkin.
Place flowers in a napkin
We tie a napkin with flowers with bright braid. We fold a sheet of cardboard in half - this is the base of the postcard. We glue our bouquet to the outside. Mother's Day card is ready!
Mother's Day card with paper flowers
Mother's Day card with roses
You can make a card for mom with a heart and roses. To make it we will need thick colored paper, glue, pencil and scissors.
Craft materials
Roll up the red paper. We make notches on the roll with a pencil every centimeter along the entire length. We cut the roll into notches. We should get paper curls. We fix their ends with glue.
Cutting the roll
We fold the green paper in half - this is the future basis of the postcard. Glue a pink heart onto it. Fill the heart with chopped bud curls. We form green leaves from folded green paper. A Mother's Day card with a heart and buds is ready!
Mother's Day card with heart and buds
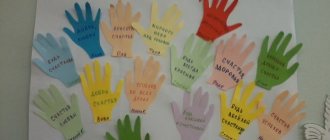
Happy Mother's Day: DIY postcard for November 24
Our hands and feet, or rather their prints, can be an excellent tool for creating an original postcard for your mother or grandmother. With the help of colored paper, paints and scissors, you can come up with a bright craft. take notes and bookmark the article.
Card for mom with a voluminous paper tulip
A very beautiful card for mom can be made from paper. A special decoration of the card is a multi-layered tulip. To make a multi-layer tulip, fold a pink sheet of paper into an accordion shape. On the fold of the accordion we draw half a tulip.
Fold the paper like an accordion
We cut out blanks from paper according to the sample.
Making the base of the postcard and blanks
We glue the tulip blanks together, forming a three-dimensional bud.
Glue together the tulip blanks
We make the packaging of the bouquet from a circle, the edges of which are bent towards the center. Glue the petals and flower to the top of the circle.
Fold the “package”, glue the petals and flower
We place the bouquet on a cardboard base folded in half.
Card for mom with a voluminous paper tulip
Card-panel with flowers made of corrugated paper for Mother's Day
For Mother's Day, you can make a very beautiful panel card decorated with flowers from corrugated paper. The basis of the craft will be a circle cut out of cardboard or thick paper. Decorate the circle with green leaves.
Glue the leaves onto the base
Cut out a wavy piece from yellow corrugated paper.
Yellow paper blank
Roll the paper into a bud. Fix with glue.
Paper bud
We wrap the bud with a strip of green corrugated paper. We should now have a flower stem.
Flower stalk
We make seven such flowers and glue them to the base. On the back of the craft you can place a congratulations on Mother's Day and even her photo. It will make a very beautiful and memorable gift.
Gift for Mother's Day
Making a postcard using the cutting technique + congratulation templates
Paper napkins are a great material for Mother's Day crafts. Kids love both the texture of soft paper and the ease of working with it. Such creativity promotes the development of fine motor skills and helps to acquire patience and perseverance.
We need materials:
- Paper napkins - two contrasting colors
- Red cardboard
- Yellow paper A4
- White A4 sheet
- Satin ribbon
- Double sided tape
Tools:
- Glue stick
- Scissors
- Simple pencil
We work with the support in the photo.
Draw a heart on the back of the cardboard. Cut it out with scissors. Turn it over and trace a handprint on the back of the heart.
Cut the napkin into 4 strips of equal width. We turn each of them into a set of squares. Roll the squares into small balls, without pressing hard. This way we will maintain the volume of the glomerulus.
Lubricate the palm print with glue. Press light-colored balls onto it. Using scissors, pinch off a piece of ribbon and glue it to the top of the card to make a loop. We cover the entire space of the heart with darker pellets. We try to ensure that the balls fit tightly to each other.
If desired, the final touch is a flower. We will cut out the middle of it from yellow paper, and the petals from plain white paper.
We will paste a congratulation message on the back of the craft. Print our template with different wishes.
Or leave a simple white cloud - made from a piece of paper. Let your child write congratulations on it by hand. Although “I love you, mommy!” and your name is already enough to touch your mother’s heart.
Mother's Day card with foamiran flowers
The basis of the postcard will be a sheet of soft peach-colored cardboard folded in half. Decorate the front side of the card with blue paper and braid. We make a heart out of sequins, inside which we write the dearest word - “mother”.
Designing the front side of the postcard
We cut out petals from yellow foamiran (foam rubber) and paint them. We will get interesting and natural halftones if we paint the petals by rubbing crushed pastel chalk into them.
Rub in pastel chalk
Foamiran begins to change under the influence of high temperature. We heat the petals on an iron. While the petal is hot, twist it and bend it in the middle, trying to give it a natural look.
Heat the petals and give them shape
Cut out a flower cup from green foamiran. Heat it on the iron and shape it into a cup.
Cup of foamiran
Wrap the wire with green tape or duct tape. We should now have a stem.
Making a stem
We begin to form a bud from the petals, wrapping them around the stem and fixing them with glue.
Bud of petals
We make a hole in the sepal, insert the stem into it and fix it with glue at the base of the bud. We make three such flowers.
Flowers from foamiran
We glue large roses from the petals.
Large rose petals
We cut out leaves from green foamiran. We make veins on them using the same principle - heat them on an iron and apply them to a relief surface (you can use a real sheet). We make small nicks at the ends.
Foamiran leaves
Let's put our composition together. Glue the buds on the stem and green leaves onto the card.
Glue buds and leaves
Glue large roses. Inside we write warm wishes for our beloved mother. We made a very tender and beautiful card for Mother's Day!
Mother's Day card with foamiran flowers
Lesson summary on fine arts for Mother's Day, grade 3
Abstract of an art lesson (grades 3-4): Postcard for your beloved mother
Author: Olga Aleksandrovna Voitovich Position, place of work: Art teacher, State Budgetary Educational Institution Secondary School No. 418, Kronstadt district of St. Petersburg Description: This methodological development of the lesson will be useful for fine arts teachers, additional teachers education of artistic and aesthetic orientation, primary school teachers. Goals: - Improve drawing skills. — Contribute to the creation of a greeting card for mom or grandmother using mixed media (watercolor + wax crayons + applique). Objectives: 1. Educational:
- introduce the variety of artistic solutions for postcards;
— consolidate skills in watercolor and appliqué techniques; — show the artistic possibilities of materials when working with wax crayons (candles). 2. Developmental:
- develop imagination, fantasy, artistic taste, sense of composition and harmony of color combinations;
— promote the development of creative and cognitive activity; — promote the formation of practical skills in working with a specific material (watercolor, wax crayons). 3. Educational:
- to evoke positive emotions from artistic activity, interest in fine arts;
- develop a positive attitude towards family traditions and holidays; — stimulate positive personal education of students; — awaken the desire to make a gift for a loved one with your own hands. Lesson type: Integrated. Forms, teaching methods: Frontal, story, conversation, visual teaching methods. Person-oriented technologies, health-saving technologies. Universal learning activities: Subject-specific learning activities:
- must know what a postcard is, what its main purpose is, and have an idea of the various techniques for making postcards.
— learn how to create a greeting card. — know the stages of working on a postcard using mixed media. - be able to use the proposed art materials. Personal UUD:
- be able to observe and fantasize when creating figurative forms;
- be able to cooperate with comrades in the process of joint activities; - be able to discuss and analyze one’s own artistic activity and the work of classmates from the standpoint of the creative tasks of a given topic, in terms of content and means of expression. Meta-subject UUD: Cognitive UUD:
- master the skill of creative vision from the position of an artist, i.e.
the ability to compare, analyze, highlight the main thing, generalize and draw conclusions as a result of the joint work of the whole class; - strive to master new knowledge and skills, to achieve higher and more original creative results. - learns to work in pairs Communicative UUD:
- be able to formulate your thoughts in oral speech, listen and understand the speech of others;
— to develop the ability to express one’s thoughts in a value judgment. Regulatory UUD:
- determine and formulate the purpose of the activity in the lesson;
- distinguish a correctly completed task from an incorrect one; - be able to plan, control and evaluate educational activities in accordance with the assigned task, - find options for solving various artistic and creative problems; - be able to rationally organize independent creative activity; - be able to organize a place of study. Main content of the topic, concepts, terms: Author's card, mixed media, gift, Mother's Day. Interdisciplinary connections: Technology, literature, the world around us, music. Educational resources: — Presentation “Postcard for your beloved mother.” — Types of postcards — Samples of ready-made postcards. — Master class: “Do-it-yourself Mother’s Day card step by step with photos, grades 3-4” /blogs/blog68765/master-klas-otkrytka-ko-dnyu-materi-35372.html
During the classes.
1. Organizational stage. The teacher organizes a situation of students’ self-assessment of readiness for the upcoming activity. Greeting from the teacher. “Let’s start our lesson. We will study fine arts, develop creativity and imagination.” Of course, not everyone can become a real artist, but learning to draw and understand the art of painting is accessible to everyone. Do you want to learn how to draw? I will help you with this. There are so many colors in the world! How much beauty! You too will learn to draw beautifully. What a blessing it is to create beautiful things! You just need to show some effort! Today in class I will need your attention, support and help. And you will also need the help of your desk neighbor. Let's check your readiness for the lesson. Let's look at each other, smile and wish you a good mood and excellent results! 2. Updating knowledge. Who is the parable dedicated to? Slide 2.
MOTHER is the first word... (Words from the song) Why do you think I showed you the parable, and we remembered the words from the song “Mom?
Slide 3.
Mother's Day is an international holiday in honor of mothers.
It is celebrated in England, America, Canada, China... and in each country on its own day. When is this wonderful holiday celebrated in Russia? Slide 4.
In Russia, the holiday is celebrated for the 20th time (since 1998).
How do you celebrate it in your family? Slide 5.
Mom’s lessons for life!
What roles does a mother perform when raising a child? Sample answers from students: teaches us to take our first steps, reads us fairy tales, teaches us order, instills healthy eating lessons... Didactic game (chain by chain) Tell us what is the most important thing your mother does for you? Slide 6.
This holiday is also for our beloved grandmothers.
My grandmother will tell a fairy tale and make a sweet pie, and give me a little yarn so that I can run with the cat! This is what our grandmothers are like! Didactic game (in a chain). What do your grandmothers do best? Slide 7.
What to give?
(work in pairs) Gift options are written on the card. We choose the appropriate options. An armchair, a pillow, a teapot, a bouquet of flowers, a helicopter, sweets, a cake, a vacation package to a sanatorium, a book, a postcard, a robot. The best gift for every grandmother is the attention of her grandchildren. Our mothers and grandmothers deserve that we congratulate them and give them a gift. Have you guessed what gift we will give today? Who will try to name the topic of the lesson? 3. Problematization. Determining the topic of the lesson. Slide 8. Lesson topic:
Postcard for your beloved mother.
A postcard is a universal gift and the easiest way to express your attention. Postcards appeared about 150-200 years ago and were simply cards called an open letter. Assignment: The envelope contains options for modern and vintage postcards. I give this envelope to one student so that he can take it out and show it to everyone. On the slide in front of you are postcards made by yourself, they are called author's. Such cards are made in a single copy for a specific person and are made with love. The person who gave the card treats you with respect and appreciates your attitude. Author's postcards are completely different from those you can buy in a store. A handmade postcard acts as an independent gift that will delight you for a long time. Various techniques were used to make these cards. Let's try to define the techniques: - quilling, - origami, - applique from napkins, - applique from cotton pads, - painted postcard using mixed media (colored pencils + plasticine). Let's try to formulate the purpose of today's lesson? Slide 9. Purpose of the lesson:
1) Improve drawing skills.
2) Create a greeting card for your mom or grandma. What is the most popular motif depicted on postcards? (flowers) 4. Solving a learning problem. What is your favorite flower? Slide 10.
What flowers will we draw today?
Poem by S.Ya. Marshak: Poets of all centuries sing about her. There is nothing more tender and beautiful in the world than this bundle of scarlet petals, opened in a fragrant bowl. You guessed it! Yes! These are roses. Showing a spiral in a blooming rose. Let's try to draw such a spiral rose in the air. Demonstration of postcard options. Slide 11. Stages of working on a postcard: Stage 1. Draw roses.
1) On the flower blanks, draw spiral roses using wax chalk 2) Pick up the color and paint the roses
Slide 12. Stage 2. Draw the leaves.
1) On the leaf blanks, use wax crayons to outline the outline and draw the veins of the leaves.
2) We select green color and color the leaves. Slide 13. Stage 3. Compose the composition.
1) Lay out a composition of roses and leaves.
2) We find a good option by moving individual parts of the composition. Slide 14. Stage 4. Making a postcard.
1) Glue on roses and leaves.
2) Paste congratulations for your beloved mother or grandmother inside the card. Physical exercise. Slide 15. (hands on elbows, fists clenched)
Our delicate flowers open their petals
(open fingers)
The breeze breathes slightly, the petals sway
(move your fingers)
Our scarlet flowers close their petals (clench your fingers into fists) shake your head
(rotate your hands)
Quietly fall asleep .
5. Independent creative work of students. Independent creative task:
Create a postcard for your beloved mother or grandmother using mixed media.
I wish you creative success in your upcoming work! The teacher corrects the performance of the creative task. 6. Self-esteem. The postcards are ready. Let's evaluate the resulting postcard. It's time to summarize the lesson. All the guys did it, each one got a unique postcard that will serve as a wonderful gift for the upcoming holiday. It is difficult to choose the most beautiful and successful one. 7. Summary. Reflection of activity. Slide 16.
Reflection.
I learned... The most difficult thing for me was... The most interesting thing for me was... What I liked most was... 8. Homework. Homework:
Congratulate your mother or grandmother and give a card. Thank you all for your joint activities, I look forward to seeing you again!
Presentation on the topic: Postcard for your beloved mother
We recommend watching:
Scenario for Mother's Day for primary schoolchildren of the 4th grade. Summary of an English lesson in the 4th grade with a presentation on the topic: Mother's Day Class hour with a presentation, grades 3 - 4. International Mother's Day Scenario for extracurricular activities for Mother's Day, 3rd grade
Similar articles:
Class hour for Mother's Day, 4th grade
Quilling card for Mother's Day
A delicate and elegant card for Mother's Day is made using the quilling or paper rolling technique.
Quilling card for Mother's Day
To make this card you will need special paper strips for quilling. They are twisted using a wooden or iron stick, giving them the shape of curls.
Cards with flowers using quilling technique
This card is made with voluminous flowers and an accordion bouquet. You can make any inscription: “Happy Birthday”, “March 8” or “Mother’s Day”.
Postcard with a voluminous bouquet
Primary school Mother's Day card with templates
If you are tired of everything ordinary and want something creative and cool, then your first job will be just like that. Mommy will definitely be happy with such an envelope with wishes. It looks very stylish and attractive. And children will make it with great pleasure under the guidance of a teacher or even a teacher of a senior or preparatory group.
And by the way, such a charm can be given for other holidays, for example, March 8 or a birthday. So, take the idea as a basis and create something weird.
Source
We will need:
- A4 paper or thin sheet of cardboard
- scissors
- felt-tip pens
- ruler
- simple pencil
Subsequence:
1. Take a sheet and lay it horizontally, fold it in half and cut along the fold line with scissors.
2. Then draw out the sheet as shown in the photo to create a template for a hero or character.
3. Thus, you can now draw any face you want, in this case a puppy. And of course the paws, look at the picture, there is absolutely nothing difficult.
4. Now cut along the marked lines.
5. The result is such a long little dog. Which can be folded in half to make a mini-envelope.
6. And the paws will clamp it. Draw a heart in the center.
7. You can add a couple more touches to the paws, draw claws. And of course, diagonal lines to accurately form an envelope.
8. Inside the envelope, draw lines and label the words.
9. Such a handsome guy came out. Everything is original and simple! Have fun!
For older children who are in grades 3-4, I can offer work in the form of trimming. I hope you know what we are talking about. Well, if not, then look at the photo instructions, all the steps are shown and you will figure out how such a masterpiece is made. The card is presented in the form of a heart and a palm, give your love and care.
Card with carnations for Mother's Day
You can draw a Mother's Day card. For example, you can depict bright holiday carnations. First, we make a pencil sketch.
Drawing with carnations in pencil
Then paint with watercolors.
Card with carnations as a gift for Mother's Day
On a postcard you can draw a bouquet of luxurious pink tulips for your mother.
Drawing of tulips for mom
Children's voluminous cards for Mother's Day
A very cute and kind card for Mother's Day is a card with a picture of a mother and baby flamingos. In addition to the idea itself, this card has a very interesting execution technique - a combination of a drawing with a three-dimensional appliqué.
On a folded sheet of paper we draw the outlines of the birds. After the paint has dried, glue the pompom. For the flamingo mother - a larger pompom, and for the two babies - very small pompoms. The meaning of these cards is to convey the joy of motherhood to all living beings.
Mother's Day card flamingos with babies
Using the same technique, you can make a “hen and chicks” postcard;
Postcard "hen with chicks"
or a “penguins” postcard. Don't forget to put a congratulatory inscription on the card for your mother.
Penguins Mother's Day Card
Young talents can try to draw their mother’s portrait on a postcard.
"Mom" drawing
The main thing is that a Mother’s Day card for children becomes not just a craft, but a way of expressing their warmest feelings.
Spectacular cards for mother from daughter
This is a more difficult task. But she also looks very presentable. To make them you will need materials that can be found in a craft store. For the first card you will need small roses - a boutonniere. Wrap them in craft paper and tie them with a ribbon.
All that remains is to glue the bouquet and make an inscription.
Detailed video - master class on a postcard: I really liked the last postcard with handles on magnets, an interesting idea and easy to do if you have a magnet.
And don't forget to write your congratulations on your card! Options for congratulatory poems about mom here
Did you like the collection? Want to check out other crafts for this holiday? More crafts for Mother's Day here
And tell us about what you made with your little one! Tell us about your crafts. And to your friends about our site with ideas!