Holiday symbols
The symbols of Victory Day are considered to be
- number "9"
- cloves Florists consider carnations to be a male flower. This is a symbol of courage, courage, victory. In many pre-Christian cultures, the carnation was a male amulet flower.
- tulip. The flower symbolizes pride and happiness, glory
- firework. The first victorious salute of 30 salvos was fired on the evening of May 9, 1945. Since then, the tradition of holding fireworks in honor of Victory Day has remained unchanged.
- a five-pointed red star - the heraldic symbol of the Soviet Army. An image of a star in gold tones is often used for postcards.
- dove - a bird carrying peace on its wings
- thematic images related to the period of the Great Patriotic War
- song "Victory Day"
- triangle letters
- Eternal flame
- modern symbol - St. George's ribbon
Postcards using Isothread technique
Isothread is a type of art in which an image is created by embroidering with threads on some solid base, most often cardboard. This technique is also called string graphics.
YOU WILL NEED IT
Read the basic techniques of thread graphics in review articles about Isothread and String Art.
Even a child can embroider a red star on thick paper for Victory Day! We make a laurel branch using the Quilling technique.
Snezhanna Kazachkova tells all the secrets of making this card in her master class.
There are other options for embroidering a star, thanks to which the card will look much more interesting:
This video tutorial shows another version of star embroidery:
The eternal flame is an unchanging attribute of Victory, symbolizing the eternal memory of the dead.
Having mastered the basic skills, you can make a more complex postcard:
It is embroidered according to this pattern:
How to make a carnation for a greeting card?
Carnations for a greeting card for May 9th
A postcard with a bouquet of scarlet carnations and words of gratitude will warm the heart of your recipient for a long time
Below are two options for creating a paper carnation.
Option 1
Necessary materials:
- Three-layer red napkin
- Scissors
- Threads
Important: one napkin can produce 8 flowers with a diameter of 7 cm
- Take a napkin and carefully tear off thin strips (up to 5 mm) from each edge along the perimeter of the napkin
- Fold the resulting square with “shaggy” edges in half and make a fold. Tear the square into two parts along the fold line. You should end up with 8 identical rectangles
- Fold each rectangle into an accordion shape. Secure in the center using any available method: using thread, wire or paper strip
- Gently layer each layer of napkin, lifting the resulting petals upward, forming a flower
The main stages of forming a carnation from a napkin
Option #2
Necessary materials:
- Corrugated/crepe or colored double-sided flower paper, preferably in red shades
- Green colored paper for the stem and leaves
- Thick colored cardboard for background
- Glue or stapler
- Regular or curly scissors
Materials and tools for creating a postcard for May 9
How to make:
- Cut out circles from paper. The diameter of the circle depends on the size of the postcard and may vary.
If you are using
- colored paper - you will need 3-4 circles
- corrugated paper - 5-6 circles
The splendor of the finished flower depends on the number of circles and the thickness of the paper.
Postcard for May 9: paper blanks for carnations
- Place a drop of glue in the center of one of the paper circles, place the next circle on it, and press lightly to glue it together. Glue all the circles together in a similar manner. Or you can take a simpler route and fasten the circles using a regular stationery stapler
- Fold the glued stack in half. You will get a semicircle. Fold the semicircle in half again
A blank paper carnation fastened with a stapler
- Make cuts using sharp scissors. Direction of cuts: from edge to center
How to make cuts correctly
- Unfold the workpiece. This will give you a blooming flower. You will get a half-opened bud if you leave the workpiece folded
Finished paper carnation (blooming flower)
- Cut out a stem with a cup and a leaf from green paper
Base leaf, stems and paper carnations for a postcard for May 9
Volume leaves for applique
- Place the stem and flower on the base sheet to create the desired composition
- Glue the parts to the base sheet. Gently fluff the paper petals to form a flower head. Your carnation is ready. This way you can create a bouquet of 3-5 flowers
How to make a bouquet of paper carnations for a card
How to make a postcard for Victory Day from paper and cardboard? (step-by-step instruction)
The next master class is also intended for preschool children. To make this postcard, the guys will need a little more perseverance and patience. But the result is worth the effort.
Materials for work:
- Ruler;
- Scissors;
- Decorative paper with ornament – 2 sheets;
- Colored paper and cardboard;
- Landscape sheet A4;
- George Ribbon;
- Glue;
- Stapler.
Stages:
We cut out a 15x15 cm square from decorative paper and place it on a landscape sheet, as shown in the photo. We trace along the contour.
We draw the square into three stripes 5 cm wide.
And cut it out. We fold each strip into an accordion along the long side (for convenience, you can also cut it into strips 1 cm wide).
Turn the square of decorative paper over to the reverse side. Stepping back 2 cm from the edges, draw another smaller square inside it (and then cut it out). This is what should happen at the intermediate stage.
On another square of decorative paper of a different color (again 15x15 cm) we glue our accordions. Then we will place the resulting frame on them. This way the postcard will be voluminous.
We cut out a tank and an airplane from green and blue cardboard, adding details to them as we wish. Glue it onto the card base. Additionally, you can draw something, for example, fireworks, as in the photo below.
Glue the frame and decorate it as you wish. Finally, using a stapler, we attach the St. George ribbon.
Once again, I repeat that it is not necessary to tie yourself to one material. For example, very interesting postcards can be made using plasticine printing technique, take a look.
Many people have probably heard about such a phenomenon as thread graphics, or the isothread technique. This also produces a very interesting result.
In the following craft, a lot of materials are used: paper, paints, napkins, and cardboard.
By the way, beautiful delicate flowers come out of napkins - carnations.
A little volume - and the postcard looks much more interesting.
In general, everything is limited only by your imagination. Shall we go further?
DIY postcards for veterans for May 9th for children
Making a wonderful card using paper carnations and a few additional elements, such as a St. George ribbon, is quite simple. But this card looks very festive and solemn
An example of a children's card for May 9 “Flowers of Victory”
An example of a children's card for May 9 “Flowers of Victory” with a congratulatory text
How to make tulips using origami technique for a greeting card for May 9?
Step 1. Make a basic origami model - a triangle. Refer to the diagram and explanations in the figure
Step 2. Start folding the bud
Step 3. Form the petals of the future tulip
Step 4. Design of the finished flower using the origami technique
You can use green cocktail straws as a stem. The leaves of the plant can be made from green paper.
How to make a three-dimensional star for the design of a greeting card, template?
- Print the template in color or black and white. You can print the b/w version directly on colored paper
Color and black and white template for 3D star
- Cut out the star and carefully press the fold lines with the sharp tip of a toothpick. Fold the lines using the diagram below as a guide.
How to make a three-dimensional star for a postcard and an example of how to design a postcard with a star
Beautiful three-dimensional version of 3D postcards
I suggest you, together with a blogger, make such a three-dimensional beauty, it will look as if it were 3 D.
You can make such a card quite delicate and attractive using the trimming technique. It is quite simple, I showed you in more detail using the example of valentines. Remember, if not, then go here and watch.
We will need:
- stems made of colored paper in the form of strips
- squares of pink, white and blue colors
- glue
- pencil
- pen refill
- scissors
Stages of work:
1. Fold a sheet of white paper in half.
2. Glue rectangular red paper onto one half. After the leaves and stem.
3. Place the square on the pen rod and glue it in this order.
4. Gentle and beautiful at the same time.
I really liked this option.
You can even make it from pasta.
Or using felt or foamiran.
Using colored paper and a suitable background, you can make something that resembles a 3D painting.
Step by step it looks something like this, first make chamomile petals.
Apply the desired background to one half of the base.
And then you decorate it to suit your style and design.
Take a closer look at this view, we also learned how to make flowers like this in the last article.
And here the author used cotton wool instead of snow, and the result was truly an imitation of blossoming snowdrops.
You can use satin ribbons, it looks amazingly light and cute.
DIY postcards for May 9 “Star”
The photo below shows examples of the design of “Star” postcards
The postcard may be accompanied by a congratulatory text. For example, with these poetic lines:
On the great day, on Victory Day, We want to wish you: More happiness, more laughter and less fighting. More peace in your home And, of course, don’t get sick. More sun, more colors And your soul does not grow old!
An example of a postcard design for May 9 with a star
An example of a postcard design for May 9 with a star
How to make a dove using origami technique to decorate a “Dove of Peace” postcard?
A step-by-step diagram with explanations will help you create an elegant paper dove that will decorate both a holiday card and a themed craft.
Present in the shape of a three-dimensional star with a template and instructions
On the YouTube channel you will always find what you are looking for, for example, I liked this story, it will definitely suit someone.
I suggest you create a quick version based on a ready-made model. To do this, print out this sample, and then glue it to a sheet of paper and decorate it with rhinestones at your discretion; you can even use cereal and any other items.
By the way, you can glue these two options together and you will get a voluminous beauty, it will be stylish and effective.
I also saw this idea, maybe you will like this look more.
Here, for the sake of variety, the author laid out a sprig of lilac.
Look what a great idea. Repeat all necessary steps with the blogger.
DIY triangle postcard for May 9th
Triangle letters are also symbols of a bygone war. How much happiness and hope they brought! How they were expected in every home!
The postcard, stylized as a triangle letter, will become a symbol of the fact that the modern generation remembers the exploits of the victorious heroes.
- Before you start creating a card, think about what your letter will contain. The text of the letter may consist of poetic lines, words of gratitude, etc. Write the text (it’s better if you do it yourself) and only then proceed to design the triangle
- Place the paper with the written text, filled side up, and fold one of the corners of the paper in half. This way the text will be inside the folded sheet
How to fold a triangle letter
- Make a double triangle by folding the resulting large triangle in half
How to fold a triangle letter
- Fold the bottom corners of the rectangular part of the letter up
How to fold a triangle letter
- Tuck the resulting wedge into a triangular pocket
How to fold a triangle letter
- Decorate the triangle letter with decorative elements
Examples of triangle letter design
We give mothers and grandmothers cards with wishes for March 8
Have you ever taught poems to your female relatives and dedicated them to them? So this very moment has come, you can not only tell, but also present it beautifully and originally in the form of a small present.
We will need:
- cardboard
- colored paper
- glue
- scissors
Stages of work:
1. Cut out flower templates with the children.
2. Then you have to make a vase, here you also need to take a model as a basis or draw it yourself. Don't forget to fold the sheet in half and only draw and cut out on one side.
3. On the other side you can write a poem or glue a calendar. It depends on who it is intended for, because if it is for a work colleague, then it is better for them to do it with a calendar, for a mother or aunt with wishes, for a grandmother with advice, etc.
4. Then finish the job by decorating the card with flowers.
5. You can also come up with something inside, for example, write a poem.
6. Quite unusual and original, and most importantly, accessible to everyone.
If you want to please with daisies, the middle can be made from buttons.
Or make a souvenir out of hearts; fold each heart in half. And then glue one of the sides onto the sheet.
It looks simply superb.
Here is a tree from this opera too.
Using flower blanks, you can easily do something like the following.
Here are the stages of this work, enjoy it for your health.
Take this unusual stencil and make a butterfly.
DIY light postcards for May 9th
The version of the postcard proposed below is very light and very symbolic. A fireworks display created by children's hands is not only a tribute to memory, but also an invisible connection between generations
1. Take a sheet of watercolor paper. Using a regular paraffin candle, draw lines and strokes on the sheet in a random order. Paint the leaf with multi-colored watercolors. Let the watercolor dry
Easy card for May 9th for the little ones
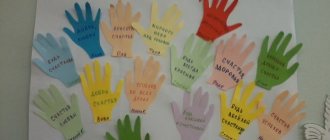
2. Trace the palm with open fingers and cut it out. Prepare a blue background (evening sky) and small squares of bright colored paper
Easy card for May 9th for the little ones
3. Glue a multi-colored palm to the base. Crumple each of the squares into a colored ball
Easy card for May 9th for the little ones
4. Using paper balls, make fireworks lights and decorate the card with decorative elements
Easy card for May 9th for the little ones
Greeting card for kindergarten and primary school
This card can be made with children who have already learned to use scissors.
We will need:
- cardboard: white, green and red;
- colored paper: black and orange;
- a simple pencil;
- scissors;
- ruler;
- glue stick;
- multi-colored pens or markers.
Stages of work:
- We bend green cardboard in half.
2. Unfold and glue a sheet of white cardboard to it.
3. If the cardboard sheets are different sizes, trim the edges of the card with scissors.
4. Draw a star at the top of the card. Carefully cut out.
5. Draw a star on cardboard (red). It will be slightly smaller in size than on the postcard. The red star will be voluminous, so the template is presented below.
6. Cut it out and bend it along the dotted lines, and also fold the gray ears. As a result, we get such a voluminous star.
7. Glue the red star to the inside right side of the card.
8. Now you need to cut out three strips of black and two strips of orange colored paper. Each is about 5 mm. width. Next, glue them to the bottom of the card, in a checkerboard pattern. We cut off the excess edges.
9. On the outside of the card we will write the congratulation “Happy February 23!”
We suggest cutting out numbers from red cardboard and gluing them to the card.
This is the greeting card we got. If you wish, you can write a beautiful poem inside it.
Here are more options for a postcard with a three-dimensional star:
How do you like this performance?
Here are some more interesting examples of pictures for younger children:
Airplane made of colored cardboard:
Tank - this postcard is not difficult to make, and dad or grandfather will be very pleased to receive it as a gift
This craft made from matches is also very beautiful:
In fact, making this card is very simple, but it turns out very cool. For this you need matches, cardboard base, glue, scissors and regular postcards (or printed on a printer) with the theme of February 23rd.
- Now we need to draw a square measuring 14*14 cm on paper and then divide it into 9 equal squares and glue matches on them, as shown in the picture, when the workpiece is dry, you can coat it with varnish. The base requires approximately 3 boxes of matches.
2. Then glue stickers or postcards
This is how beautiful it turns out:
Postcard application for May 9
All of the above thematic images are used for the applique postcard.
Postcard application for May 9: design option
Postcard application for May 9: design option
DIY postcards for May 9th templates
To create postcards, you can use elements of thematic coloring books
Do-it-yourself postcards for May 9, templates Do-it-yourself postcards for May 9, templates
Postcards using scrapbooking technique
Postcards and albums made using the Scrapbooking technique are decorated with photographs, newspaper clippings, notes, drawings and other memorabilia, thus conveying a story or story.
Using Scrapbooking techniques and elements, you can make original postcards for Victory Day with your own hands, because this day holds the stories of millions of people...
You can see the detailed process of creating various scrap cards here.
Before starting work, you need to decide what decoration elements you have available. Perhaps you have old, unused May 9 greeting cards lying around, or you have the opportunity to print out elements to decorate the card.
Strict postcard...
…Darling…
...and retro
A red star can be cut out of cardboard or felt, or a three-dimensional star can be glued together from paper and combined with other elements:
Star with leaves...
...roses...
...Ribbon of St. George...
...and other decor
Even a small wooden airplane clothespin can be used to decorate a card. Everything is very simple and original!
St. George's ribbon made of any materials (fabric, paper) in combination with clippings, floral elements, aged paper will always add brightness and symbolism to the author's postcard:
You can also use a ribbon with the colors of the Russian flag:
You can “scrape” using glue or sew elements of your story onto a postcard (using a sewing machine or by hand):
Battle maps, military documents such as the “Act of Unconditional Surrender” and others will all draw children's attention to our history when creating a holiday card:
How and from what materials to make such a postcard is clearly shown in his master class MASTER FOREVER :
You can see how to artificially age military documents or maps in the master class Ideas for creativity DIY HANDMADE CRAFTS :
Decorative elements can be anything that reminds us of the Great Patriotic War and Victory Day: camouflage fabric, stars for shoulder straps, small cartridge cases, patriotic poems, old military letters or artificially aged notes.
In his master class, Podarki.ru shows how to make a scrap card with a gift using camouflage fabric:
Images of soldiers or military equipment will very organically complement the postcard for May 9:
Or photos of war heroes, perhaps your close relatives, grandparents...
Don’t forget that May 9 is a holiday, so your postcard can be decorated with joyful moments of Victory Day
DIY postcards for May 9th scrapbooking
A fashionable trend in handicrafts—scrapbooking—allows you to create individual and very beautiful things. A little imagination, printed photos or documents from the war years, a few decorative elements and a wonderful postcard is ready
Postcards for May 9th with your own hands scrapbooking: design option Postcards for May 9th with your own hands scrapbooking: design option
The video at the end of the article will tell you not only the secrets of working in the scrapbooking technique, but also several ideas for creating a small masterpiece