An application on the theme of dishes will introduce children in kindergarten to everyday kitchen items and teach them how to set the table for tea. Kindergarten students will make a service with their own hands and decorate a panel with it. The next master class will clearly show how to create dishes in the applique style yourself.
Paper applications
Children in the younger group will decorate paper mugs cut out from templates at their discretion. Geometric shapes or stickers are suitable for this. As a result, a single-color blank will be transformed into a beautiful piece of service.
For a cup of tea, purchase the following materials and tools:
- cardboard;
- colored paper;
- beads;
- stencil for base and handle;
- glue;
- scissors.
Description of work:
- Cut out the base of the cup from cardboard (the shape resembles a cupcake - a trapezoid with a rounded top).
- Cut out the handle and glue it to the base from the inside out.
- Cut colored paper into strips of equal width.
- Changing the direction of inclination of the scissors (angle to the right or left), cut the strips into triangles.
- Glue the figures to the mug, marking the sides.
- If desired, decorate the “container” with beads.
In the older group, children make a composition from a cup and a teapot.
To work you will need:
- base for application (colored cardboard, thick paper);
- paper of different tones;
- openwork paper napkin for table setting;
- glue;
- hole puncher;
- scissors.
Step-by-step instruction:
- Cut out two identical ovals for the cup from colored paper.
- Bend one oval in half lengthwise (saucer), the second - across (cup).
- Cut two circles - a large one for the base of the teapot, a small one for the lid.
- Fold the smaller circle in half to make a lid.
- Cut the napkin into two parts.
- Assemble all the elements together: glue a napkin to the bottom of the sheet, stick a saucer, cup, base and lid on top.
- Build a handle and spout from the remaining semicircular scraps.
- Using a hole punch, make circles for the lid and decoration.
- Decorate the teapot and cup.
In the preparatory group, students will cope with more complex compositions. The dishes will be decorated with patterns, berries or elements of traditional painting (Khokhloma, Gzhel). The applique is done in stages: first, the silhouettes of the dishes are cut out and glued onto the base, and then small colored elements are glued.
It is recommended to combine the appliqué technique with drawing. An example of such a combined work is a samovar painted to look like Khokhloma.
Applique tableware - master class
Let's make an application on the theme “Dishes”.
Here, of course, a variety of approaches and goals are possible. I plan to work not with kids, but with grades 1-2. The people are already adults, the tasks will be difficult.
Let's start with painting one teapot - here is the coloring:
The task is to come up with a beautiful pattern. And something typical for dishes - flowers, berries or a geometric pattern. This explanation is definitely necessary, since students, having received the task of painting dishes, begin to look for inspiration in the environment - and this, as you understand, is tables on the walls and textbooks on desks. This is modern life. So try to keep your children from painting letters, numbers and graphs.
But now - the teapot is painted and you need to cut it along the contour. Here we repeat the methods of cutting a hole in paper and train our intelligence - the spout, although it is separated in the picture by a line from the body of the kettle, cannot be cut off, but what about the lid? The lid is removable! But there is no need to cut it off either.
The next task is a cup. It needs to be painted in the same style as the teapot. This is one service.
The goal is to copy the drawing with a change in scale. You can make a border around the edge of the saucer. Drawing tea in a cup is also not an easy task.
Cutting out a cup is also a tricky business - there is a hole in the handle and a saucer - some thoughtlessly cut off this saucer. But we act consciously and measure and think seven times before cutting.
I invite students to draw the sugar bowl themselves. The shape is approximately like that of a teapot, only without a handle and spout. But don't think it's easy - it's symmetrical! So you will have to work hard, measuring equal distances to the sides of the sugar bowl on both sides of the axis. But here it is ready and painted in the same style as the rest of the dishes.
Now it’s time to draw up a still life - we’ve reached the Utensils appliqué stated in the title of the article.
We mark the edge of the table and arrange the dishes. Here, again, it is necessary to immediately clarify that the dishes do NOT stand on the edge, but are freely distributed - closer and further from the viewer - across the area of the tabletop.
My composition turned out to be beautiful, but... but here’s the problem - the cup’s handle is turned towards the teapot. It's not a big deal, but it's illogical.
Here - the applique of the dishes can be said to be completed. But the picture looks a little sad. Okay, let’s start developing the imagination: add more dishes and food to the table according to your understanding.
I drew, cut and glued a spoon, a bowl of fruit and another cup of tea. The table immediately became richer. A! The tablecloth needs to be laid. The goal is to evenly distribute the pattern across the surface of the table.
Probably, it would be possible to extract even more benefits from the topic “Applique Crockery” for the development of children’s hands and eyes, but - the bell is already ringing! And the students were tired - after all, they worked so hard setting the table.
Tags: paper applique for children, applique with finishing touches, crafts, dishes
Application using plasticine
For MK prepare:
- plasticine;
- modeling board;
- stacks (knife for cutting pieces of material);
- images of a cup and teapot;
- dense base (cardboard from a box, chipboard);
- scissors;
- glue.
Step-by-step instruction:
- Print and cut out the image of the dishes.
- Tear off a small piece from a block of plasticine and knead it.
- Roll into balls.
- Glue the plasticine lumps along the lines of the image so that they fit tightly one to the other.
- Sculpt the inner pattern of the dish.
- Fill the remaining empty space with plasticine balls.
- Glue the finished dishes to the base.
Working with coffee beans and rhinestones
According to the outline picture, coffee beans are glued tightly to each other in the form of a tea pair. The result is an original and fragrant kitchen decor. Remember that grains do not stick well to PVA. For crafts, it is better to use rubber or hot glue.
The difference between applications on the topic “Vegetables” with children from kindergarten and school
Vegetable applications are aimed at developing children's thinking and the ability to use glue and paper. Thanks to applique activities, children expand their perception in the field of knowledge of figures.
Junior group
At 3-4 years old, appliqué lessons help the child learn to use stationery items. This is how imaginative thinking develops and skills in working with available tools are improved. Educational institutions provide 2 or 3 such classes per week. Crafts lessons help children remember what shapes are and how to make them.
Classes should be educational and interesting for preschoolers.
With younger children, short-term teaching techniques are carried out for 15-20 minutes. But with older groups it will take longer, since their tasks are more difficult.
Such activities to study appliqué techniques should be carried out in a playful way. That is, the teacher must pretend to play with the children, thereby attracting their attention and teaching.
Since children do not know how to use scissors and this is dangerous, they are given pre-cut shapes, which they glue together using regular glue. The teacher shows exactly where to stick it and, thus, the child receives the first basics of appliqué. After the teacher’s explanations, the children glue the figures together and paint their creations using felt-tip pens or pencils.
Senior group
In the elementary and older groups, children remember and learn new shapes, and also learn the theme of flowers. Thanks to such activities, they can cut paper into strips, and hand motor skills immediately develop. They also learn to associate color with an object. That is, paper of a certain color can become a vegetable that has that color.
Children from the older group begin to conduct classes with appliqué on a plate or pan. The teacher shows the children a ready-made object and the children must repeat it using previously given multi-colored figures, felt-tip pens, paper plates themselves, glue and scissors. In order for the child not to lose interest in the task, you need to constantly encourage him, praise and help.
Despite all the skills listed above that a child receives from such activities, it also helps to develop the brain itself. Because when working with paper, bending it in different directions, both sides of the brain hemispheres are activated.
A child can also be taught to perform Applications using the breaking technique, i.e. The necessary shapes should not be cut out, but rather torn. You can also teach children how to cut out double paper, so that their cut out shapes will turn out beautiful and symmetrical.
If they complete a whole project themselves, they will not only learn to combine colors as they like, but will also be able to create some compositions themselves.
Pupils
Thanks to such activities, children - schoolchildren who already distinguish colors and know how to glue paper - can learn to more accurately cut out shapes in the form of individual objects or even entire components.
They can cut using different cutting techniques. For example, folding a sheet in half or even folding it into an accordion.
The classes gradually become more difficult. That is, first children improve their initial skills and then learn to create entire compositions.
Everyone thinks that appliqué is just cutting out figures from paper. No, you can also work with fabric appliques, which is much more interesting for children. This kind of work can be done by the Little Creator at home, under the supervision of mom or dad. Parents should prepare a workspace for the child and a basket for the created vegetables in advance. The child can attach cut-out vegetables to the prepared material, and if he is very small, he can use Velcro. For a good mood while working, you can turn on pleasant music. To get the craftsman interested, you can make some fairy-tale characters out of vegetables.
Thanks to such activities, your child will grow up talented and capable because in childhood children learn very quickly and remember everything.
Fabric applications
Fabric appliqués will decorate a teapot warmer, a mug cover, or a panel. The elements are sewn to the fabric using a sewing machine using a tight stitch.
It is difficult for preschoolers to master this direction of application, but mothers can handle it. However, there is also work for children: fabric elements are cut out like paper ones using stencils. Cotton fabric is easily glued onto a cardboard base with PVA glue (press and smooth the glued element with a rag).
Volumetric applique Fruits made of colored paper for the older group of kindergarten
Paper crafts for middle-senior kindergarten children
Master class with step-by-step photos “Volume application “Fruit plate””
Author: Svetlana Vladimirovna Buzmakova, teacher at the kindergarten No. 88, Berezniki, Perm Territory Goal: Creating a plate of fruit using the 3D appliqué technique. Objectives: 1. Develop the skills and abilities of creating three-dimensional appliqué. 2. Develop the child’s fine motor skills. 3. Develop the child’s creative abilities through the creation of applications. 4. Strengthen the technical skills of cutting and gluing parts. 5. Instill the skills of perseverance and accuracy Description: The master class will be of interest to educators, additional education teachers, and all attentive and interested parents. The work can be completed by children of the middle or senior group. All children and adults love fruits. They are not only tasty, but also very healthy. How beautiful it is, the summer garden, always rich in fruits. There is a whole row of slender cherries - the berries burn like rubies. A plum tree also grows nearby, and is beautiful with its juicy fruits. The aroma of pears and apples, everyone would be happy to eat one. Oh yes pear! What a wonder! And blush and beautiful. The pear begs: “Eat me, Vanyusha.” Our dear apple, ours, in bulk. It will grow in our garden, I will go for it in the fall. Purple plum, Ours is a garden plum, Tasty, tender, Very healthy. We can also make jam from ripe plums! Grapes, grapes, Many berries in a row Grew on a branch - Lunch, kids! Now we will make a beautiful plate of fruit.
For this we will need: 1. Colored paper; 2. Paper plate; 3. Glue; 4. Scissors.
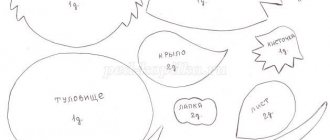
We are preparing templates for apples, pears, grapes, plums and leaves for them. Take a sheet of A5 paper and fold it in half and in half again. We trace the fruit patterns.
If children are small and cannot yet carefully trace the template, then it is better to make the blanks yourself. For each fruit we need 4 parts.
We fold each piece in half.
Apply glue to one of the halves and glue them together so that the other halves remain free. Glue the 4 halves of the pear together.
We do the same with all other fruits. Cut out the details.
Fold in half.
Glue the halves together.
We unfold all the fruits, making them voluminous. Cut out leaves from green paper.
Place the fruit on a plate, adding green leaves.
We put a beautiful plate on the table. Bon appetit. We sat down at the table, put on our aprons, and we will eat fruit - delicious food.
We recommend watching:
Do-it-yourself voluminous applique for kindergarten from colored paper. Apple Volumetric applique with origami elements for children of the middle and senior group of kindergarten Do-it-yourself summer volumetric applique for kindergarten. Senior preparatory group Composition of Fruits using quilling technique. Master class with step-by-step photos
Similar articles:
DIY paper pig
