October
Lesson 12. Drawing “Golden Autumn”
Program content.
Teach children to depict autumn. Practice drawing a tree, trunk, thin branches, autumn foliage. Strengthen technical skills in painting with paints (dip the brush with all its bristles into a jar of paint, remove an extra drop on the edge of the jar, rinse the brush well in water before adding another paint, blot it on a soft cloth or paper napkin, etc.). Lead children to figurative transmission of phenomena. Foster independence and creativity. Induce a feeling of joy from bright, beautiful drawings.
Lesson 13. Modeling “Mushrooms”
Program content.
Strengthen children's ability to sculpt familiar objects, using previously learned sculpting techniques (rolling clay with straight and circular movements, flattening with palms, sculpting with fingers) to refine the shape. Lead to a figurative assessment of work.
Lesson 14. Drawing “Fairytale tree”
Program content.
Teach children to create a fairy-tale image in a drawing. Practice the ability to convey the correct structure of a tree. Learn to paint. Develop imagination, creativity, speech.
Lesson 15. Application “Decoration of a handkerchief”
Program content.
Teach children to identify the corners and sides of a square. Reinforce knowledge of round, square and triangular shapes. Practice choosing color combinations. Learn to transform shapes by cutting a square into triangles, a circle into semicircles. Develop compositional skills and color perception.
Program content.
Teach children to make a simple pattern from elements of folk ornament on a strip of paper. Develop color perception, figurative ideas, creativity, imagination.
Lesson 17. Modeling “Treats for dolls”
Program content.
To develop children's imaginative ideas and the ability to choose the content of an image. Learn to sculpt a selected object using previously learned techniques. Continue to develop the ability to work accurately. To cultivate the desire to do something for others, to develop the ability to combine the results of one’s activities with the work of peers.
Lesson 18. Application “Boats float on the river”
(“Fishing boats went to sea”, “Yachts on the lake”)
Program content.
Teach children to create images of objects by cutting off the corners of rectangles. Strengthen the ability to create a beautiful composition and carefully paste images.
Lesson 19. Modeling “Fish”
Program content.
To consolidate knowledge of techniques for making oval-shaped objects (rolling with straight movements of the palms, sculpting with fingers). Reinforce the techniques of pulling and flattening while conveying the characteristic features of the fish. Teach children to use a stack to represent the scales covering the body of a fish.
Lesson 20. Drawing with paints “Simple and golden eggs”
Program content.
To consolidate knowledge of the oval shape, the concepts of “blunt” and “sharp”. Continue teaching the technique of drawing an oval shape. Train children in the ability to carefully paint over drawings. Lead to figurative expression of content. Develop imagination.
Lesson 21. Modeling “Make whatever toy you want as a gift to a friend (brother, sister)”
Program content.
Continue to develop imagery, imagination and creativity. To consolidate the ability to use a variety of sculpting techniques learned earlier when creating an image. Cultivate attention to other children, a desire to take care of them.
The main software tasks for appliqué in this group are aimed at teaching children the ability to correctly cut out shapes, use scissors, squeezing and unclenching levers to get an even cut along a straight or oblique line, and round the corners of quadrangular-shaped blanks when depicting round and oval-shaped objects.In connection with the expansion of the child’s knowledge about such properties of objects as shape, structure, size, and their spatial arrangement on paper, application tasks become more complicated. This concerns the design of objects, solving more complex compositional and coloristic problems in the design of works. The teacher teaches children to more accurately cut and paste simple shapes, based on a square, rectangle, or triangle. They can be used when composing ornamental compositions to decorate a scarf, plate, rug, path, and also display objects such as cubes, scarves, scarves, etc. Then the children are taught to cut out individual parts and assemble more complex objects from them (house, birdhouse, gate), and also combine them with each other in size (the house is large, and next to it is a gate, they are lower than the house).
In applications, children should be able to combine compositions by color, by methods of spatial arrangement on the surface of a sheet of paper of a certain format, which makes it possible to perform tasks of a different nature (subject, thematic and ornamental), differentiate specific tasks for each of them in the process of thinking about the future image, its cutting and pasting.
Before teaching preschoolers how to cut with scissors, it is necessary to strengthen their ability to lay out and paste ready-made shapes using the example of creating patterns from geometric or plant elements (one or two lessons at the beginning of the school year). So, you can invite the children to decorate a scarf or an apron for a doll with patterns, giving them the opportunity to independently choose a blank according to shape, color, select elements for decoration, and arrange them in their own way by color and location. If the baby has chosen a white square to decorate it in the form of a scarf, then he can take small colored squares and place them in the corners of the main workpiece. Alternating red and blue shapes will look good between the squares. When a child takes a stripe - a red scarf - for decoration, the teacher helps him rhythmically repeat the squares placed on the corner along the entire length, combining green and yellow tones (white and black; black and green).
To make such a choice, you must have in advance options for blanks and individual elements of different colors and sizes to compare them when creating an ornament. The teacher helps children in choosing a background, a pattern, varying figures in number, shape, color, and rhythm. The figure shows options for applications of varying degrees of difficulty. Children independently combine squares of various sizes and colors, as well as triangles and circles, based on the proposed motives.
Decoration with patterns of scarves, scarves, plates
At the beginning of the lesson, the teacher gives verbal instructions. For example, if a child has chosen a scarf (square base) for the exercise, then he is asked to use a combination of large and small elements (squares of a different color) or complement the pattern with triangles. To decorate a scarf (triangle), it is better to take circles and attach triangles between them. And children can decorate round plates and trays with an ornament of small circles, alternating them by color, or build another patterned composition from them.
When children master the techniques of laying out and gluing forms, their attention is focused on the techniques of using scissors when cutting out elements for appliqué. This process requires significant effort, attention and will. To make it easier, the teacher initially trains the child in cutting narrow strips across with uniform movements of scissors, performing a game task: cutting out tickets for playing “theater”, “circus”, checks for playing “shop”, coupons for playing “hospital”, travel tickets for playing “bus”, etc. The game form of cutting results increases the child’s interest in this process; in a relaxed play environment, he more easily learns how to use a new tool, adapts his movements to learn how to operate scissors. Children should definitely be given well-designed scissors so that their arms move easily and do not create additional difficulties.
The teacher observes the work of each child, provides him with timely assistance, encourages his efforts, supports the desire to learn how to correctly, beautifully cut out shapes (so that their contours are smooth and not frayed).
As an exercise for the hands, it is necessary to give the children tasks that require the completion of several identical cuttings. In this case, the movements are consolidated and improved. For this purpose, you can use ornamental structures, as well as object images consisting of several homogeneous parts. For example, when cutting out windows of a two- or three-story house, take a strip of paper of a certain length and width and cut it crosswise into several parts at an equal distance from each other. They are glued onto a rectangle, observing the rhythm of the arrangement: at designated intervals in one, two or three rows (corresponding to the number of floors of the house).
In the same way, appliqués are made for bus or trolleybus windows, as well as for a festive garland of flags. Here you need to alternate the shapes by color and create a bright sound for the decoration. Therefore, the teacher prepares multi-colored stripes in advance, and the children choose the brightest ones that they like and learn to alternate them when gluing them onto a background like a garland or on a stand using flagpoles of different heights, or on sticks, etc. The possibility of interpreting the content of the application is emphasized when the wording of the task: “Holiday flags”, “The flags that we saw in the square”, “A festive garland of multi-colored flags”.
Different types of flags
In subsequent appliqué classes, children are taught to cut out a rectangular shape more accurately and differentiate between a rectangle, a square, and a strip. The basis for cutting out these shapes is a strip of paper of different lengths and widths. Thus, a rectangle is obtained by cutting a strip of 3x12 cm into two parts, and dividing each of them in half again allows you to get two squares, which are then glued to decorate the end of a towel or scarf.
You can change the size of the elements or give them different positions, for example, place large and small squares placed on the corner in a row, alternating them also by color (red and green figures on a white towel background; blue and orange; red and yellow). This task requires the child to comply with the following conditions: cut out several identical shapes, independently adjust their number depending on the construction of the pattern, combine elements by size and color. Providing independence in choosing the background color and blanks for parts of the decoration allows children to take a creative approach to creating an ornament and use different options for its interpretation.
To consolidate the ability to depict squares and make various combinations out of them, appliqués are grouped from individual parts like a mosaic. Each child is given multi-colored strips of the same size, from which he receives squares, and combines them in the form of patterns or object images on backgrounds of different shapes and colors. Children complete such mosaics independently in their free time. To do this, a separate corner is organized in the group room - an area where the materials necessary for work are placed. Their color and diversity encourage the child to create a panel for a doll’s corner, decorate an apron or dress with a pattern, prepare a greeting card for a holiday, etc.
Mosaic applique of multi-colored squares
From a square, by cutting it in half diagonally with a continuous movement of scissors, two triangles are obtained. Typically, children learn this technique quite easily and quickly. But, despite this, it must be reinforced in several lessons, maintaining the preschooler’s interest in the image process and its result. This is achieved by selecting interesting tasks: “Kerchiefs for nesting dolls”, “Huts in the forest”, “Christmas tree”.
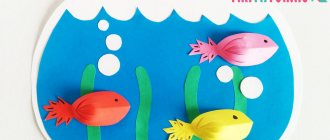
Along with homogeneous parts, combinations of rectangular, square, and triangular shapes are also used in applications. This is how fish are cut out and pasted, combining a square (body) placed on a corner and a triangle (tail) or two triangles - a large one and a smaller one. To achieve greater resemblance to the image of a fish, additionally glue on large eyes, stripes or scales of colored paper. You can make an especially elegant applique on the theme “Aquarium”, where on a blue or blue plane children place large and small fish with a triangular or square body in yellow, red, orange, gray in combination with green algae, pebbles at the bottom, etc. To obtain such a composition, the teacher prepares a background with pasted silhouettes of algae, stones, shells, and the children glue fish of different colors and sizes between them. Here, each child can show his creative activity: change the direction of movement of the fish in his own way, make them larger, smaller, use decorative stickers (stripes, circles-scales).
Techniques for cutting triangles and fish variants from squares and triangles
Fishes in an aquarium
November
Lesson 22. Drawing according to plan
Program content.
Teach children to independently choose the theme of their drawing, bring their plans to completion, hold a pencil correctly, and paint over small parts of the drawing. Develop creativity and imagination.
Lesson 23. Application “A big house was built in our village”
Program content.
Strengthen the ability to cut a strip of paper in a straight line, cut off corners, and compose an image from parts. Learn how to create an applique image of a large house. Develop a sense of proportions and rhythm. Reinforce techniques for careful gluing. Teach children to see an image when looking at work.
Lesson 24. Modeling “Plums and Lemons”
Program content.
Continue to enrich children's understanding of oval-shaped objects and their depiction in modeling. Reinforce techniques for sculpting oval-shaped objects of different sizes and colors. Develop aesthetic perception.
(Option. Drawing “Decorate the skirt of the Dymkovo young lady”)
Program content.
Strengthen children's ability to decorate a piece of clothing using lines, strokes, dots, circles and other familiar elements; decorate clothes cut out of paper with decorated stripes. Learn to select colors according to the color of the sweater. Develop aesthetic perception, independence, initiative.
Lesson 26. Application “How we all picked a full basket of mushrooms together”
(Collective composition)
Program content.
Teach children to cut the corners of a square, rounding them. Strengthen the ability to hold scissors correctly, cut with them, and carefully glue parts of the image into the applique. Lead to a figurative solution, a figurative vision of the results of work, to their evaluation.
Lesson 27. Modeling “Different fish”
Program content.
Learn to convey the distinctive features of different fish that have the same shape, but slightly different from each other in proportions. Reinforce previously learned modeling techniques.
Lesson 28. Drawing “Little Dwarf”
Program content.
Teach children to convey in a drawing the image of a little man - a forest gnome, making up an image from simple parts: a round head, a cone-shaped shirt, a triangular cap, straight arms, while observing the ratio in size in a simplified form. Strengthen the ability to draw with paints and a brush. Provide a figurative assessment of finished work.
Lesson 29. Modeling “Duck” (Based on a Dymkovo toy)
Program content.
Introduce children to Dymkovo toys (ducks, birds, goats, etc.), pay attention to the beauty of the continuous streamlined shape, specific coloring, painting. Develop aesthetic feelings. Learn to convey the relative size of parts of a duck. Reinforce the techniques of smearing, smoothing, flattening (duck beak).
Lesson 30. Drawing “Fish swim in an aquarium”
Program content.
Teach children to depict fish swimming in different directions; correctly convey their shape, tail, fins. Strengthen the ability to draw with a brush and paints, using strokes of a different nature. Foster independence and creativity. Learn to mark expressive images.
Lesson 31. Modeling according to the plan “Make whatever vegetables or fruits you want for the game of shop”
(Option: Modeling “Make what you want beautiful”)
Program content.
Teach children to choose the content of their work from a range of certain subjects. Foster independence and activity. Strengthen the ability to convey the shape of vegetables and fruits using a variety of sculpting techniques. Develop imagination.
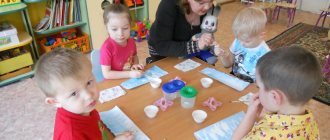
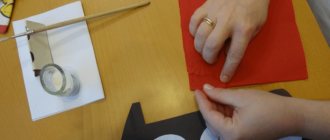
Lesson notes on application. Group: average. Educator: Koryakina Natalya Leonidovna. Topic: “Decorating a handkerchief.” Type: on the topic - according to plan. Type: decorative. Goal: Development of children's constructive abilities. Objectives: Improve knowledge of round, square and triangular shapes. Exercise children in identifying the corners, sides of a square and a circle. Learn to transform shapes by cutting a square into triangles, a circle into semicircles. Teach children to use scissors carefully. Develop the ability to correlate your actions with the actions of an adult. Materials for the lesson: Ready-made circles, squares, glue, tassels, oilcloths, napkins, work samples, carrots. Preliminary work: Examination of decorative items with a simple pattern. Vocabulary work: activation of adjectives - neat, wonderful, beautiful, white, elegant. Problematic question: How to help the bunny make elegant scarves? Progress of the lesson: Teacher: - Guys, today I came to the group, and there was a bunny sitting on a chair. And he told me that his bunnie friends invited him to his birthday. He decided to give them these handkerchiefs. — Are the scarves fancy? (no, not elegant) What needs to be done to make them bright, elegant, and festive? (decorate them). - Do you hear, bunny, the scarves need to be decorated with different patterns, then they will immediately become elegant and festive. Guys, how can you help the bunny make fancy scarves? (help decorate). - Please go to the tables (children sit at the tables). - What shape is this figure? (square). What is it called? (square) And this one? (circle). - How do they differ from each other? (a square has corners, but a circle does not; the circle rolls, but the square does not). - Indeed, a square has corners and has four sides, but a circle has no corners and only one side (hand examination). - Guys, look carefully at how you can cut a square to make two triangles. You need to cut the square diagonally from corner to corner. And the circle can be cut in half (in diameter) to get two semicircles. - Who will come to the board and show us how to cut a square? - Who will show you how to cut a circle? (showing children) - Guys, I have decorated scarves, look how different they are. This handkerchief has a circle in the middle, and triangles in the corners, and this handkerchief has a square in the middle, and half circles in the corners. — Before we start cutting out and decorating scarves, let's train our fingers. FINGER GYMNASTICS. To visit the big finger Came straight to the house Index and middle, Nameless and last Little finger of the little ones Knocked on the threshold Together fingers are friends You can’t live without each other. - Now, using scissors, we’ll cut the circles in half, and the squares from corner to corner - diagonally. Don't forget to take the scissors correctly and make a slight movement in the air several times: open, close the blade (children cut). Let's try! - Decorate your handkerchief with triangles, squares, circles and half circles, but do not glue them, otherwise you suddenly want to change something in it. (The teacher approaches the children and examines the patterns). - Now take the tassels, put a little glue on them and glue the cut out shapes to the handkerchiefs to make a pattern. Glue carefully, carefully, so that the work turns out beautiful and elegant (children glue). - Look how we worked together, what wonderful work you did. Let's look at them together? What an interesting job Arina did. Everything is glued very neatly. Just a wonderful scarf. (consider all works). — Bunny, I would like to thank you for your help in decorating the scarves. Now he will happily go to the bunnies’ birthday party. What kind of scarves did you make? (elegant, beautiful, wonderful). — What was difficult for you to do in class today? And you? And you? - Guys, it’s time for the bunny to leave, he really enjoyed his visit to us and he’s giving you a carrot.
Summary of GCD for application in the middle group “Decorating a napkin”
Municipal autonomous preschool educational institution "Kindergarten of a general developmental type with priority implementation of activities for the artistic, aesthetic and social - personal development of children No. 21 "Iskorka""
Summary of direct educational activities
Application “Decoration of a napkin” for children of the middle group
Target:
Continue teaching children to create object images based on the model.
Program content:
Tasks:
-teach children to arrange shapes beautifully on a square sheet of paper;
-develop the ability to create patterns and decorative compositions from geometric shapes;
-develop the ability to cut out symmetrical objects from paper folded in half;
- to form aesthetic perception and creative abilities;
Preliminary work:
Looking at illustrations of decorative items with simple patterns.
Materials and equipment
: doll, toy tea set, sample, scissors, square sheet of white paper size 16*16, strips of different colors size 6*3 (for each child), PVA glue, glue brush, napkin, plastic stand for making appliques (for each child).
MOVE GCD
Organizing time.
Psychological mood
(establishing emotional contact)
Children stand in a circle
Educator: Hello, golden sun! Hello, blue sky! Hello, free breeze, Hello, little oak tree! We live in the same region - I greet you all!
II
. Main part
Educator:
(knock on the door, the teacher comes out and comes in with a doll in his hands) Guys, today the doll Katya came to visit us, let's say hello to her. She asks us to help her, today is her birthday
Do you like the birthday party? What happens on this day?
Children:
On this day, guests come to us and give gifts. Well, we try to prepare a lot, a lot of delicious things (sweets, cakes, pies, chocolates). We cover the table with an elegant tablecloth, place beautiful dishes, and lay out napkins for each guest.
Educator: So the doll Katya has prepared a treat of various sweets, arranged beautiful dishes, but there are no napkins on the table. Let us help, we will make a lot of beautiful napkins for her, this will be our birthday present for her.
Looking at a napkin
(sample).
Educator: What shape is the napkin?
Children: Square napkin
Educator: What geometric shapes is it decorated with? How are they located?
Children: decorated with squares of different colors, but in all corners there are squares of the same color, as well as with circles, from which a flower is made in the center of a large square.
Educator: How do these two figures differ from each other?
Children: a square has corners, but a circle does not; the circle rolls, but the square does not
Educator: Indeed, a square has corners and has four sides, but a circle has no corners and only one side (hand examination).
Explanation and demonstration.
The teacher shows how to cut strips into squares: bend the strip in half and cut along the fold. How to cut corners on a square. Reminds me of the gluing rules
Educator: First, let's lay out the figures. We put glue on the entire brush, then we remove the excess on the edge of the jar. We coat the figure with glue, always on oilcloth, starting from the middle, gradually moving to the edges. Put the brush down, take the figure with both hands and put it on the place where it was lying, press it with a cloth, blotting off the excess glue
Educator: Guys, before we start decorating the napkins, let's show Katya the Doll how we stretch our fingers and relax before work.
We help our Katya, we wash handkerchiefs,
That's it, that's it! We will wash the handkerchiefs. We will rinse the handkerchiefs, our daughters will help the mother,
Just like that, my sons help too. We will continue to help, we will squeeze them out. This way and that way, we will squeeze them out. The little daughters will hang handkerchiefs on a string. Just like that, my sons help too. The sun will shine, the children will rest. This way and this way, the children will rest. And the iron will smooth out our multi-colored scarf. This way and this way, this is how we iron the scarf. We will take our multi-colored handkerchief by the corner. And now, and now we will dance for you!
Independent work of children
.
Children fold the strips in half, cut along the line, and paste them onto the sheet. The teacher makes sure that the children hold the scissors correctly. If necessary, reminds and corrects the position of the fingers holding the scissors. Reminds you of careful gluing.
III.Reflection _
Educator: What wonderful, beautiful napkins we made. Bright, elegant, beautiful. What geometric shapes did you use in your work? Did you enjoy today's lesson?
What great fellows you all are! Katya thanks us for our help, we were just in time before the guests arrived. Let's give these napkins to Katya and tell her our wishes. The teacher displays all the work on the board, notes the beautiful combination of colors, and the children examine the work.
On the topic: methodological developments, presentations and notes
Integrated lesson on ecology and applications in the middle group “Journey to the spring forest”
Goal: Continue to acquaint children with the characteristic signs of spring: increasing daylight hours, melting snow, swelling of buds, the appearance of flowers, the return of migratory birds, changes in the life of wild animals...
Summary of an integrated lesson on the formation of elementary mathematical concepts and applications in the middle group for children with visual impairments. Topic: “Orientation in space and on a plane”
Orientation in space and on a plane. Purpose: To train children in correctly determining the spatial arrangement of objects relative to themselves. Objectives: To educate observant...
This material gives an expanded idea of application in middle preschool age...
Maria Negaychuk
Lesson on applique “Let’s decorate handkerchiefs”
Goal: To develop the skill of using a handkerchief
. Teach children to
Cover your mouth with a handkerchief
if anyone is
near - turn away. Continue to improve your glue use skills. Learn to paste finished images onto paper, creating a beautiful pattern.
Volumetric applique made of paper napkins with step-by-step photos for children 5 - 7 years old
Volumetric applique made from paper napkins “Tree of Mood”. Master class with step-by-step photos
Author: Galina Andreevna Garintseva, teacher, MADOU No. 21 “Iskorka”, Berdsk This master class is intended for preschool teachers and parents. This application can be used in the GCD process in such age groups as middle, senior and preparatory. In the middle group, the teacher must prepare the straws in advance, and in the older preschool age, the children prepare the straws themselves. Appointment of a master class. Application on the theme of the week, gift, group decoration, etc. Goal: Making a three-dimensional application in the process of GCD on the topic of the week. Tasks: • Orientation in space on a sheet of paper; • Develop fine motor skills of the hands; • Learn to use glue carefully; • Continue to develop color perception. • Develop aesthetic perception; • Cultivate attention, patience, perseverance, etc. Materials and tools: • Paper napkins of different colors. • A knitting needle, or a cocktail stick, or a pen refill, • A stencil with a pattern, • Cardboard, • Thick PVA glue, • Gouache, • Brushes, • Scissors
Sequencing.
Cut the napkin into 16 squares: 1. Cut the folded napkin in half along the fold line. You will get two squares, each square has two layers.
2. Fold each square in half lengthwise and cut along the fold line.
3. Fold each resulting rectangle (each rectangle has two layers) in half crosswise and cut along the fold line.
We got 16 squares. Then we take one of the squares and twist it onto a knitting needle.
We compress the twisted tube on both sides to class=”aligncenter” width=”627″ height=”470″[/img] Remove from the knitting needle.
Thus, we prepare the required number of tubes of different colors.
Draw a sketch of a picture (in this case a tree)
We make a tree crown by gluing tubes rolled into the desired shape onto thick PVA glue. Making a tree trunk.
The application is ready! The finished applique can be cut out and pasted on double-sided tape to create a beautiful picture. Or you can leave it like that and move the “mood tree” into a frame. But we got such a sunshine.
And this is the symbol of 2015! Templates for making lambs.
I wish you all good luck!
We recommend watching:
Master class “DIY Symbol of the Year” Volumetric applique made of colored paper on the theme Autumn for children 4-7 years old Volumetric applique “Autumn Sun” for children 6-7 years old Volumetric application made of paper for children 5-7 years old “Fish”. Master class with photos
Similar articles:
Paper flowers. Volumetric application of cornflowers for children
DIY paper heart
Application for children
Applique for children made of poplar fluff and feathers
Application for preschool children