lesson notes on bread and fruits
Contents
In the senior group of kindergarten, children have all the necessary skills to create applications using various techniques. They have good scissor skills. The application in the older group is distinguished by compositions with interesting storylines. Such classes will help not only consolidate acquired skills, but also develop eye contact and teach how to beautifully arrange details on a sheet of paper.
To work with children for all applications you will need:
- Scissors;
- Scissor stand;
- Glue brush;
- Napkins;
- Colored paper;
- Plasticine;
- Cereals;
- Buttons;
- Natural material;
- Simple pencil;
- Markers.
Autumn mushrooms
Autumn is a time of beautiful landscapes. If classes fall at this time of year, you can perform a mushroom composition with the guys. You can also make fruit using this technique.
This will be an application made from cereals, so for it you will need:
- Semolina and buckwheat;
- Sheets of green colored paper;
- Cardboard;
- Scissors;
- PVA glue;
- Grass and mushrooms patterns.
To complete the application, children will need:
- Trace the patterns of mushrooms on the background;
- Cut the grass;
- Apply glue to the cap;
- Fill it with buckwheat;
- Shake off loose residues;
- Also coat the leg with glue;
- Cover with semolina;
- Glue the grass.
The application is ready!
Golden spikelet
On the theme of bread, you can invite the children to make a modular application using the origami technique. Lesson notes on this topic will greatly help the teacher in the learning process. This way you can make an autumn carpet. For the application the children will need:
- Sheets of paper;
- Scissors;
- Adhesive paper.
Progress:
- Take a sheet of yellow paper, which will later become a spikelet, cut it into 20 squares with sides of 5. Cut the remaining piece into long pieces. This is the future stem.
- Place one of the squares in the shape of a diamond and bend it to form a triangle. After that, bend it again, open it and return to its previous shape. Thus, we only marked the fold lines.
- Fold the corners of the triangle as shown in the photo.
- Fold the lower ends of the figure. You should get a shape similar to a heart.
Each spikelet consists of three such modules. The upper module is obtained by folding the original one in half. The lower one is done by simply bending the tip. Attach the stem to the base of the spikelet.
Collect the remaining spikelets. They can be either part of the composition or an independent fake.
Teddy bear
Using yarn, you can make an applique of a wonderful bear in the senior group of kindergarten.
For this you will need:
- Bear stencil;
- Cardboard;
- Pencil;
- Scissors;
- Brown and gray paper;
- Glue;
- Brushes;
- Gouache.
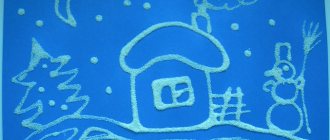
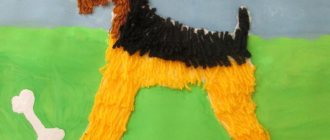
The children must independently choose a suitable background, draw or trace a stencil of a bear on it, fill in the areas with parts made of colored paper, and draw the missing elements.
Pets
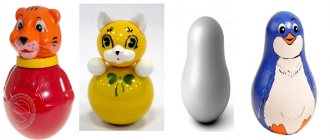
On the theme of domestic animals, you can make an applique of sheep grazing in a pasture.
For this you will need:
- Procurement of rams and sheep;
- Cotton wool;
- Napkins;
- Natural material;
- Scissors;
- PVA glue;
- Glue brush.
On a sheet of white paper, children should trace animal patterns. Color them. Cut out.
Small dense balls are rolled out of cotton wool.
Next, the cut out sheep is filled with such balls.
Next, the finished animals are glued onto the background of the pasture. You can depict any season of the year on it (winter, spring, autumn, summer).
The dried leaves are crushed.
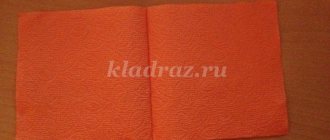
Brown napkins are used to make trunks for autumn trees.
Then they are glued to the base.
The crushed leaves are used to make tree crowns—clothing for plants.
You can make grass from spruce or pine needles.
Clouds made of cotton wool.
This is what the final product looks like:
Video on the topic of the article
dekormyhome.ru
Applique clown made of colored paper, fabric and candy wrappers
In today’s article I would like to introduce children and their parents to a funny clown - an indispensable “merry man” in the circus, which we will make with our own hands together.
This little man in the arena is able to make any spectator, both old and young, laugh, play the accordion, sing a funny song, and show many original tricks. And that’s why today’s article is on the topic of clown applique.
After reading the detailed instructions and following each step step by step, it will not be difficult for even a novice master.
Simple clown applique made from geometric shapes
This master class will involve geometric shapes, which will allow the child to develop his knowledge by studying shape and color, and diagrams and photos will help to visually understand how to make a paper craft. Little children in the junior group of kindergarten will make appliqués using the prepared parts, and children in the middle group will be able to cut out the components according to the template.
To make a clown applique, prepare:
- templates of geometric shapes;
- thick cardboard - base;
- colored paper;
- scissors;
- a tube of paper glue (PVA is fine).
Attaching the templates to colored paper, cut out:
- The juggling balls and face will consist of six different colored circles;
- Triangles of the same size (5 pieces) - pants, sleeves and cap of our hero;
- One oval shape - for the body;
- One star - on the collar;
- Another oval shape (cut into two equal parts) - shoes;
- Cut half of the oval blank into two more - for the hands.
- Next, connect all the components of our clown applique and glue it onto a cardboard sheet.
- When finishing your work, you need to use a felt-tip pen to draw in the eyes, a red nose, and let our “merry man” smile - draw the lips, raising their corners higher.
Video: Volumetric 3D application “Clown”
Fabric applique “Clown”
In this type of needlework there are many different techniques for performing crafts. In this MK we will consider the technology of making a clown applique from pieces of fabric. It will also not be difficult for children if adults help them understand the step-by-step description of the work. So, in the preparatory group, children were asked to work with an appliqué made of fabric, pieces of which will be glued to a sheet of cardboard. In addition, children's crafts will look bright and funny if the clown himself is painted. Interesting additions will be applique elements made of fabric, threads or other decorative elements. Another option for clown applique is to apply the contours of the design to a fabric base and secure the details using satin stitches. In this master class we offer several interesting ideas. Pictures can be printed on a printer and then cut out as a stencil.
- To complete the appliqué in these two ways, the preschooler first needs to copy the drawing onto a sheet of paper. Then all parts need to be numbered, starting from the bottom and in turn from bottom to top.
- Cut the pattern into its component parts and cut them out from the prepared piece of fabric.
- Determine the location of the drawing by laying out the blanks in front of you.
- Now glue the individual parts of the clown applique to a cardboard sheet or sew to fabric using a sewing machine. This will be the final stage of the craft.
Colored paper clown
- Cut out the parts suggested in the diagram from colored paper.
- Using glue, connect all the blanks: first glue the hair to the oval face, then the hat. After shaping the face, glue on a tie in the shape of a butterfly.
- Using a black felt-tip pen, draw eyes, ears, and make the clown smile.
If your child liked this master class and he admires this fun, then another idea is proposed below.
Color applique of a clown made from candy wrappers
Circus is joy, kindness, a lot of positive emotions and good mood. Who is the most fun and funny in the arena? You guessed it - a clown. Children fell in love with this character, and therefore not only in kindergarten you can get into a world where there are jokes and laughter; make a funny clown at home yourself.
Step-by-step photo instructions for the “Clown” applique
The MK presented below is done by children in the senior group of kindergarten as it is a little more complicated than the previous one.
- Prepare background material.
- Cut out a pair of boots using the template.
- Cut the corners and cut out the pants and sleeves.
- Make a face and attach a bow.
- Cut out the eyes. You can line the eyes with whole candies, the main thing is the round shape.
- Next, make a cap for the head according to the diagram.
- Glue the prepared figures onto colored background paper, draw eyelashes, smiling lips, and hair.
Our funny clown is ready.
Video: Candy Clown
In this lesson we will look at how to make a clown from scrap materials - from candy wrappers. To do this, you need to collect a lot of bright candy wrappers in advance, you will also need free time and desire.
Make a candy clown with care and please your loved ones with a new application, give moments of good mood to everyone who looks at it. So, let's start watching the video.
Templates and stencils for the “Clown” applique
Video: Making a circus out of paper
vishivashka.ru
autumn, bread, bear, fruit, mushrooms
“Bread is the head of everything” - every adult on Earth knows this saying. From an early age, parents taught their children not to throw bread on the floor or play with it. But since children are developing and want to play, why not make an applique on the theme of bread? It will be no more difficult to make than an applique on the theme of mushrooms or fruits. The children and I will make spikelets of paper and decorate them with three types of flowers. Since the children are already in the older group, we will add simple origami to this application. The information will be given in the form of a master class, so there is no need to take any class notes - just follow the simple illustrated instructions.
Necessary materials for work
- Sheets of A4 paper
- Scissors
- Adhesive paper
Application from a spikelet and flowers for older groups: master class
Spikelet:
1. Take a sheet of A4 paper, which will become a spikelet, cut out 20 squares with sides 5, 25, cut the remaining piece into three parts - this will be the stem of the spikelet:
2. We put one of the squares in a rhombus and bend it so that we get a triangle, after which we bend this triangle again. After this, we return to the previous triangle:
3. Fold the sharp corners up so that it looks like an airplane:
4. Fold the ends of our “airplane”, now it looks like a heart. Or on the vest of a clumsy bear:
The spikelet contains 3 different parts, however, they are obtained from the “heart” that we already know how to make. The upper module is obtained by folding the main module in half, and the lower module by simply bending the tip. It’s very convenient, because if a part doesn’t work out, you can always return it to its original state. We insert the stem into the base of the spikelet:
Collect the remaining spikelet. It can be not only part of the planned composition, but also an independent craft on the theme of bread or autumn:
First flower:
It will require 8 petals. It can be not only part of a bread composition, but also, for example, part of an autumn carpet of flowers.
1. Take an A4 piece of paper of a different color and carry out the same procedure to create the main part of the spikelet. Glue them onto sticky paper:
2. Glue 2 squares in the middle of the flower to make a star. If you don't like the middle, cut out a circle and glue it on.
Second flower:
It is very similar to the applications that we have already made, only you will need only 5 petals.
1. Take the third sheet of A4, cut out the same 5.25 squares.
2. Bend any one corner to the center, covering our bent corner with the opposite side.
3. The intact sides should be folded upward, then turn the petal over.
4. As in the spikelet, bend the upper corners down; soon our petal will be ready.
5. Fold the bottom corner twice, then turn the petal over and stick it on adhesive paper, do this with the rest of the petals.
Third flower:
Third and last flower. You only need 4 parts to complete it.
1. This flower took parts of the second flower and spikelet. Take a sheet of A4 of a different color. We repeat up to 3 points of the action for making the second flower. But then we bend the bottom corner and push it into the pocket.
2. Cut a sheet of green paper into thin strips and make stems for the flowers.
3. The final touch is the leaves for the flowers. And we will again need the main part - the “heart” of the spikelet. You can leave the part as is and get leaves - hearts, or bend the edges and make leaves - triangles.
4. Glue the leaves to the stems, and the composition is ready.
This flower is perfect as a piece of clothing or part of a suddenly blooming autumn tree.
If something doesn’t work out for you, don’t be upset! Even damaged applique parts can be used somewhere. A failed spikelet can become the foot of a beetle, and a flower petal can become the ear of some domestic animal. The main thing is don’t be afraid to experiment and you will succeed!
A selection of videos on the topic of the article
If you and the guys liked making a spikelet, then why don’t you try gluing or molding something else? Simple and clear step-by-step videos will help you with this:
webdiana.ru
How to make a magician's hat with your own hands
Step 1. Wrap a strip of cardboard 17-18 cm high around the head, add 2 cm for gluing and the same amount for shrinkage (I didn’t know that cardboard shrinks when it dries, so our hat doesn’t fit on the head and sits on the top of the head, it’s better than this prevent and take into account in advance).
This is important: The strip must be cut across the corrugation lines so that it does not break, but bends evenly.
Glue the strip into a ring.
Step 2. Cut out a large circle with a diameter of 36-38 cm (the size is given taking into account shrinkage). We place a cardboard ring on it exactly in the middle and trace it exactly along the contour, without adding a single millimeter! We cut out the inner circle, without damaging it, with nail scissors.
Step 3. Cut out many strips of approximately 2 x 5 cm from plain paper (precision is not necessary, you can cut it by eye). Using these strips we connect all three parts of the hat: we glue the top joint from the outside, and the bottom from the inside. We try not to leave any gaps.
Step 4. Paint the magician's hat with gouache (a child can help you here). We painted the outside of the hat with blue gouache (it took almost the entire 20 g jar to paint the magician's hat), and painted the brim on the inside with black gouache. We didn't paint the inside of the hat so that the head wouldn't get dirty later.
Note from the site author: I will add advice from my own experience of making various attributes and games for children with my own hands. To prevent a painted hat or other item from getting dirty, you can apply varnish over the gouache with a brush. The most common varnish for woodwork will do (sold in glass bottles in hardware stores). Then a protective layer is created. The finished item does not get dirty, is stored for a long time, and can be wiped with a damp cloth. But the varnish smells strongly until it dries completely, and you won’t be able to stay in the room for 24 hours.
Step 5. Decorate the magician's hat with stars and pieces of tinsel (glue them with PVA glue). We poke holes on the sides of the crown with an awl, insert an elastic band, and secure the outside with knots. We cover the knots with a satin ribbon, which we wrap around the crown, stretch and fasten the ends with glue. The hat is ready!
lesson notes on bread and fruits
In the senior group of kindergarten, children have all the necessary skills to create applications using various techniques. They have good scissor skills. The application in the older group is distinguished by compositions with interesting storylines. Such classes will help not only consolidate acquired skills, but also develop eye contact and teach how to beautifully arrange details on a sheet of paper.
To work with children for all applications you will need:
- Scissors;
- Scissor stand;
- Glue brush;
- Napkins;
- Colored paper;
- Plasticine;
- Cereals;
- Buttons;
- Natural material;
- Simple pencil;
- Markers.
Autumn mushrooms
Autumn is a time of beautiful landscapes. If classes fall at this time of year, you can perform a mushroom composition with the guys. You can also make fruit using this technique.
This will be an application made from cereals, so for it you will need:
- Semolina and buckwheat;
- Sheets of green colored paper;
- Cardboard;
- Scissors;
- PVA glue;
- Grass and mushrooms patterns.
To complete the application, children will need:
- Trace the patterns of mushrooms on the background;
- Cut the grass;
- Apply glue to the cap;
- Fill it with buckwheat;
- Shake off loose residues;
- Also coat the leg with glue;
- Cover with semolina;
- Glue the grass.
The application is ready!
Golden spikelet
On the theme of bread, you can invite the children to make a modular application using the origami technique. Lesson notes on this topic will greatly help the teacher in the learning process. This way you can make an autumn carpet. For the application the children will need:
- Sheets of paper;
- Scissors;
- Adhesive paper.
Progress:
- Take a sheet of yellow paper, which will later become a spikelet, cut it into 20 squares with sides of 5. Cut the remaining piece into long pieces. This is the future stem.
- Place one of the squares in the shape of a diamond and bend it to form a triangle. After that, bend it again, open it and return to its previous shape. Thus, we only marked the fold lines.
- Fold the corners of the triangle as shown in the photo.
- Fold the lower ends of the figure. You should get a shape similar to a heart.
Each spikelet consists of three such modules. The upper module is obtained by folding the original one in half. The lower one is done by simply bending the tip. Attach the stem to the base of the spikelet.
Collect the remaining spikelets. They can be either part of the composition or an independent fake.
Teddy bear
Using yarn, you can make an applique of a wonderful bear in the senior group of kindergarten.
For this you will need:
- Bear stencil;
- Cardboard;
- Pencil;
- Scissors;
- Brown and gray paper;
- Glue;
- Brushes;
- Gouache.
The children must independently choose a suitable background, draw or trace a stencil of a bear on it, fill in the areas with parts made of colored paper, and draw the missing elements.
Pets
On the theme of domestic animals, you can make an applique of sheep grazing in a pasture.
For this you will need:
- Procurement of rams and sheep;
- Cotton wool;
- Napkins;
- Natural material;
- Scissors;
- PVA glue;
- Glue brush.
On a sheet of white paper, children should trace animal patterns. Color them. Cut out.
Small dense balls are rolled out of cotton wool.
Next, the cut out sheep is filled with such balls.
Next, the finished animals are glued onto the background of the pasture. You can depict any season of the year on it (winter, spring, autumn, summer).
The dried leaves are crushed.
Brown napkins are used to make trunks for autumn trees.
Then they are glued to the base.
The crushed leaves are used to make tree crowns—clothing for plants.
You can make grass from spruce or pine needles.
Clouds made of cotton wool.
This is what the final product looks like:
Video on the topic of the article
Similar articles:
knittochka.ru
Application “Clown”
A funny clown is the main “merrymaker” of the circus. He plays the harmonica, sings funny songs and performs different tricks. Why don't we make an applique of this funny clown?
Application “Clown” from geometric shapes
Classes on creating applications from geometric shapes allow the child to develop, learning new shapes and colors, and stimulate the development of imagination. For young children, it is necessary to prepare the component parts of the applique in advance, and for older children, templates will be sufficient, according to which they can independently cut out the necessary shapes.
To create a clown you will need:
- templates of geometric shapes;
- cardboard;
- colored paper;
- scissors;
- PVA glue.
From colored paper using templates you need to cut out:
- 6 multi-colored circles - this will be the face and balls for juggling;
- 5 identical triangles - pants, sleeves and clown hat;
- 1 oval - body;
- 1 star - collar;
- 1 oval cut in half - shoes;
- half of the oval, cut in half again - hands.
Now all that remains is to connect all the parts and glue them onto cardboard. Finally, use a felt-tip pen to draw eyes, a red nose and a smile on the face.
Fabric clown applique
This type of needlework is distinguished by various execution techniques. The applique can be made on cardboard by gluing fabric parts.
In addition, a clown painted with paints with additional fragments of fabric, thread and other decorative elements will be a bright and funny craft.
Another, no less interesting way to perform appliqué is to apply a pattern to the fabric by securing the parts using a satin stitch.
- To perform the appliqué in one way or another, you first need to transfer the drawing onto paper and number all the fragments in the order in which they are placed, starting with the bottom part.
- Next, the pattern should be cut into separate fragments and cut out from the fabric.
- We determine the location of the drawing by laying out the details in front of us.
- At the final stage, based on the execution method, we either glue individual fragments of the appliqué to cardboard or sew it to the fabric using a sewing machine set in the required mode.
Applique clown made of colored paper
We will need:
- colored paper;
- scissors;
- glue;
- black felt-tip pen.
- We cut out the necessary parts from colored paper according to the proposed diagram.
- Using glue, we glue all the parts together: first we glue the hair to the oval of the face, then the hat. We decorate the face and glue the butterfly.
- Using a black felt-tip pen, draw in the eyes, ears and smile of the clown.
If your baby was delighted with this fun, we suggest you pay attention to other crafts on the “Circus” theme.
womanadvice.ru