Simple option
To immediately understand the general principle of drawing this bird, let's start with a simple option. A child can easily cope with this creative process. For the work you will need a simple pencil, an album and a set of colored pencils.
First we will make a sketch with a simple pencil. During the steps, do not put too much pressure on the tool. After all, if you are new to this type of creativity, you can make a mistake, and a thin stroke is much easier to erase.
How to draw a swan with a pencil:
- Create an oval shape in the upper left corner.
Add a curved line to the top right side of this sketch. At the bottom of this segment we draw a horizontal line; it should rise slightly at the end. Starting from the junction of the vertical and horizontal, draw a diagonal line. - After completing this step, we begin drawing the details. We turn the oval into a head. Draw in the middle of the eyes and add a highlight. Add a beak consisting of two parts. We recommend depicting each part separately to get a more beautiful and detailed result.
- Next, we detail this area with the nostril and the tip of the beak. Now let's start drawing the neck. The neck is a distinctive feature of this bird, so it is advisable to be careful at this stage. You need to make sure that the neck is the right length and has a smooth curve. Having completed this stage, we add a few protruding feathers.
- Then we draw wings with visible feathers. We draw the tip of the wing in detail. And in the same way we finish the images of this part. We draw the contours of the feathers along the entire length. We depict the bottom and finish drawing the tail. The swan drawing is basically ready. But we decided to color it a little.
- Before we paint, we need to remove the extra strokes with an eraser. We color the beak with orange, yellow, red and purple. We did not touch the body, as it creates a beautiful picture, but if desired, you can add dark areas to it.
The picture is ready. See, everything is quite simple. The main thing is to follow our instructions.
You can also practice using drawings of ducks
How to draw a swan step by step with a pencil for beginners
You can choose any material. To study the construction of a bird, it is best to use graphic tools - a simple pencil, sanguine, charcoal, liner or marker. The most important thing in working on any painting is the correctly constructed elements. Therefore, this work is educational; you can safely use an eraser and simple (even suitable for printing) paper.
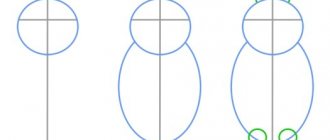
Stage 1
At the first stage, we always start by identifying the main figures. We can designate a swan in the form of two ovals - a large oval serves as the body, a small oval or circle - the head. We can immediately identify the bend of the neck. The neck should start from the back of the head. The line itself resembles a deformed S.
Stage 2
At the second stage, we begin to disassemble the details. Let's start with how to draw a swan's head. We draw the beak; it should not be long or massive; the line of the beak ends at the bird’s forehead.
Stage 3
We draw the lower part of the head; it is an almost straight line. We designate the swan's nose separately in the upper part of the beak.
Stage 4
Let's start with the neck. We follow the curve that we outlined in step 1. It is important to remember that the swan’s neck is not the same thickness - the closer to the body, the wider it becomes. We draw the bottom line of the neck under the oval of the body.
How to draw the Swan Princess
Many people watched the fairy tale about Tsar Saltan, so they decided to portray one of the main characters. Of course, you can draw a swan as in the previous drawing with a crown on its head. But we will complicate the task a little and create a masterpiece. This time we will depict the swan princess in human form.
To organize the creative process you will need a set of colored pencils, an album for creativity and a simple pencil.
If you're ready, let's start drawing:
- Closer to the right side of the sheet we draw an oval with an uneven bottom side.
In the middle of the figure we draw two eyes, a nose and lips. We complement the eyes with eyelashes. We show bangs at the top. We draw out the eyebrows, ears and part of the crown. - We finish drawing the crown and complement it with the silhouette of a star. Mark the border of the neck. In the middle of it we draw a vertical segment, supplement it with a horizontal line and roughly mark the location of the hands. To this silhouette we add the lower part of the torso.
- Focusing on the constructed auxiliary contours of the body, we draw the arms and dress in detail. Below, near the hem, we draw a wave. We depict several decorations on clothes. We add a fairly large braid to the hair. In the ear we specify an earring with a star image.
- We complement the crown with a shawl. We detail the fingers and clarify the folds on the clothes. Next, we draw the outlines of the shore and add more waves to the picture. We draw silhouettes of clouds and sky in the background. We create a glow around the upper part of the princess.
The picture is ready. If desired, color the drawing as shown in our image. This creative process, like the previous one, is quite easy, but if you are a beginning artist, follow the instructions provided.
Simple pencil example
Like the previous one, this drawing is very beautiful, but the drawing method is a little simpler. Be sure to prepare an eraser, as now we will learn how to draw a swan with a pencil.
The first thing we need to do is to draw a diagram of the body and head of our future bird. Don't press too hard on the pencil as we will have to erase some of these lines in the future.
Based on our auxiliary drawing, we will draw a head with eyes and a beak and a long neck.
Now let's work on the torso. From below it is quite smooth, and from above it is steeper, creating a small hump. The end of the body on the left side is connected by a sharp tip.
Take an eraser and erase everything unnecessary, as in the example below.
The final stage will be drawing the feathers and wings of our swan. And also the waves emanating from his body.
Beautiful pair of swans in a simple way
If you have not yet folded an origami swan along with our website megamaster.info, then be sure to do so to be convinced of the beauty of these crafts.
Now we will tell you how to draw a swan step by step with a pencil. We will, of course, make a sketch with a marker, but we recommend that you still use a simple pencil. To organize this creative process, you will also need colored pencils and an album.
Let's start drawing:
- At the top of the sheet, approximately in the middle, draw an arc. We add another similar segment to it.
On the right side we draw a beak and draw an eye. We put a dot on the beak, it will be the nostril. We complement this part with the second half of the neck. - From the right border of the neck we begin to draw the body of this bird. Having finished drawing the bottom, we begin to create the tail. This is done with a vertical zigzag segment. At the top of this line we draw a horizontal line and finish drawing the back.
- We draw the silhouette of a wing on the body. We step back to the right and depict an identical silhouette. Let's detail both parts. Immediately below the beaks we draw a heart. Now we outline all the details with a black marker. Using the same marker, we add waves under the swans.
- So we figured out how to depict a couple of swans in love with a simple pencil. All that remains is to add some color to the picture. Use a red pencil to paint over the heart. We shade the beaks with orange. We cover the water with blue and process the inner contour.
Ready. This is how you can create a real masterpiece in just a few minutes. Even a child can handle the work, not to mention an older novice artist. The main thing is to follow the steps.
Unusual pencil drawing
We have already drawn an eagle in a similar way. For those who have not studied this article, we recommend that you still read it. This will make your work much easier. For this option you only need a simple pencil and an album.
If you're ready, let's begin:
- Draw a rectangle in the middle of the sheet.
The size of the drawing depends on the size of this figure. In the upper right side of the rectangle we make the outline of the head in the form of an oval. - From the bottom we draw a long and smoothly curved neck. We draw the body from the neck, and a sharp beak from the head. At the back of the silhouette we clarify the tail. We bring out the wing from the front side. We also show the second wing. Let's detail these areas.
- Shade the entire sketch with a light layer. That is, there is no need to put pressure on the pencil. Shade everything and draw the outline of the bird in bold. Use dark strokes to cover all the shadow areas of the drawing.
- We work especially carefully on the back and head. Using a tone a little lighter than the previous one, we specify the places under the wings. Finally, we shade everything again.
The work is ready. This creative process is a little more complicated than the previous one, but with the help of this technique you can deal with chiaroscuro in the drawings.
Gouache painting
We figured out how to draw swans step by step with pencils. Now let's learn how to paint these beautiful birds. This creative process is a little difficult for beginners. But following our instructions, you can easily cope with it. To depict this picture, you will need a simple pencil, a set of gouache, brushes of different sizes and a container with clean water.
In addition to collecting the above tools and materials, you must repeat the steps as carefully as possible.
If you are ready, let's start creating a real masterpiece:
- First of all, we make a sketch.
To do this, create an arc with a long right side approximately in the middle of the sheet. Below we draw an oval with a sharp right side. - Immediately above this oval we draw a curved line for the second swan. Draw the body in the same way. In the first silhouette we depict the head. We draw the beak to the front of the head and begin to draw out the neck. Please note that as you approach the body, the neck becomes wider.
- On the nearest swan we also make the contours of the head, beak and neck. We erase all auxiliary sketches. On the first silhouette, separate the beak from the head and draw the details. We proceed identically with the image in the foreground.
- Now we outline the wings and work out the details on them. Using a horizontal line we separate the water from the sky and outline the reflection from the birds. The swan drawing is ready, now let's work it out with paints.
- We add yellow paint to the palette and in the middle of the sky we depict a solar reflection of a fairly large size. After washing the brush, mix pink gouache with a small amount of white. We cover almost the entire sky with this shade, leaving only the corners. We treat the corners with a mixture of purple and white.
- Using mixed pink we work on the upper edge of the water. Using yellow paint we make a reflection of the sun in this place. Paint the rest of the water surface with purple. In the distance we paint the reeds with blue paint. Using blue color we work out the shadow areas on the bird on the right side. We work on the feathers with purple.
- We wash the brush from dark shades, pick up yellow, add white to it and work on the most illuminated areas of this silhouette. Using pure white paint we draw the feathers in this image. We work on the details in the near background in the same way.
- We paint the top of the beak with purple and add eyes. Paint the beak orange or light brown. We use a gray tint or a mixture of black and white to clarify the shadows on the water. At the very bottom in the corners we depict reeds in a green tint.
At this stage, the painting is completed. We made sure that all our work is easy to perform, the main thing is to follow the instructions and repeat the steps after us. Only in this case will you be able to create real masterpieces, even if you are a beginner.
Organizing a drawing lesson in the senior group on the topic of domestic and migratory birds
The senior group has one drawing lesson per week. The total duration of continuous activity should not exceed 20–25 minutes; methodological manuals recommend performing physical exercises (finger, breathing, motor exercises) for 5 minutes to neutralize psychological and mental stress, as well as prevent physical fatigue in children.
Lesson structure
- Organizational part (3–5 minutes). The practical part of the lesson can be preceded by watching birds while walking, looking at pictures of birds, reading stories about birds, showing a slide show, a fragment of a film or cartoon. The introductory stage involves awakening children's interest in new information and visual activities, therefore it is necessary to include developmental conversation, surprise moments, elements of didactic and theatrical play that stimulate curiosity, cause a positive emotional reaction and involvement.
The corner contains demonstration material. dedicated to the topic of birds - Practical part - the teacher explains the sequence of creating a composition and drawing bird figures based on the diagram (3-5 minutes). Older preschoolers are given more freedom in the drawing process; the work is done from life (toy) or based on a sample (teacher's drawing or picture), the basic techniques have already been mastered, and therefore do not require additional demonstration.
- Independent work of children (15–20 minutes).
- The final part is the analysis and assessment by children of their works and the drawings of their comrades. Children are taught to formulate their point of view with reason and verbally express the aesthetic perception of creative works (3-5 minutes).
Photo gallery: drawing a bird in the senior group step by step (technological map)
Stages of drawing a sketch of a cockerel Stages of drawing a sketch of a swan Stages of drawing a sketch of a swan Stages of drawing a stork figure
Stages of drawing a sparrow figure
Stages of drawing the figure of a duck Stages of drawing the figure of a chicken
Stages of drawing a duck figure
Stages of drawing a chicken figure
Stages of drawing a sparrow figure
Stages of drawing a titmouse figure Stages of drawing a sketch of a starling
Stages of drawing the figure of a dove
Stages of drawing a peacock figure Stages of drawing a swallow figure
Ideas and teaching materials that can be used as a motivating start to the lesson
An example of an educational conversation.
Q. What spring months do you know?
- Let's look at magical pictures and come up with short stories about the signs of spring. (Children take out picture symbols from the envelope and make up a descriptive story about spring).
Using the cards, children make up a short story.
Q. Look out the window, who came to visit us? (on the curtain, children will see silhouettes of migrating and wintering birds, which are located in different groups).
— Why are the birds in different flocks?
— What do we call birds that fly to southern countries for the winter? (Migratory)
—What are the names of the birds that remain? (Wintering)
- Using cards, name the common features of all birds (beak, wings, feathers, egg)
The card contains encrypted information about the general characteristics of birds.
- Now tell us about the differences (feather color, body size, tail shape).
The card will help children tell about the distinctive features of birds
Story outline:
- What kind of bird is this?
- What parts does the body consist of, what color are these parts?
- What does it eat, where does it live?
Didactic games.
The teacher lays out bird masks on the table, guessing riddles, and the children choose the appropriate mask.
| The blackest of all migratory birds, Cleans the arable land from worms, Jumps back and forth across the arable land, And the bird’s name is... (rook). Everyone knows this bird: Its palace is on a pole, It carries worms for its chicks, It chatters all day long... (starling) Under the roof I make a nest out of lumps of clay. For the chicks I put a downy feather bed on the bottom. (martin) |
Didactic game “The fourth odd one” based on cards with images of birds.
Q. What bird won’t fly to the feeder? (The child finds a figurine of a migratory bird and removes it)
Game "Four Wheel"
Game "Enchanted Birds"
Children are shown figurines of birds and circles painted in colors corresponding to the plumage and birds.
Bird figures and circles with information about plumage color
The first option: the children are given the task of choosing for each bird a circle that matches it in color and size. The child must explain his choice.
Each bird is given an appropriate circle for it.
Second option: you need to replace a certain circle with the silhouette of a bird.
The circle with symbolic information is replaced by a bird figurine
Slide show on the topic “Wintering and migratory birds” (photo gallery)
Identification of wintering birds
Information about the bullfinch's lifestyle and nutrition
Information about titmouse lifestyle and nutrition
Identifying Migratory Birds
Information about the rook's lifestyle and nutrition
Information about the starling's lifestyle and nutrition
Didactic game "Who's the odd one out?"
Lesson notes
The outline specifies the following tasks:
- teach the skills of correct drawing of birds, forming a general idea of the structure, differences in plumage color, shape and size of body parts;
- consolidate the ability to draw geometric shapes, arrange parts of the bird’s body proportionally, correctly correlating in size;
- improve techniques for working with a pencil and brush, using different pressure and stroke direction, practice working with the entire surface and tip of the brush;
- teach realistic depictions of various poses and movements (sitting, pecking, turning the head, flapping its wings), as well as the figures of birds in flight, drawing the movement of the wings;
- teach the sequence of drawing the figure of a bird based on the diagram: draw an oblong body in the shape of a teardrop-shaped outline, including an oval for the head and a pointed tip for the tail;
- add details (beak, eyes, wings, tail, paws);
- Paint over the silhouette of the bird with paints or shade it with colored pencils, crayons, felt-tip pens.
Lesson summary on the topic “Birds fly south” (author Kleeva E. V.)
| Program content: teach children to sketch birds in motion, conveying the basic shape and main parts, without drawing the details of the plumage; practice sketching with one pencil or one paint; consolidate and expand knowledge about wintering and migratory birds; cultivate a caring attitude towards birds. Materials: album sheets tinted with blue-violet color (autumn sky, simple pencils, wax crayons; illustrations depicting birds flying south; reproduction of Stepanov’s painting “The Cranes Are Flying.” Connection with other educational areas: bird watching while walking, drawing attention to their various movements. 1. Organizational part. Finger gymnastics Visiting the big finger Put the thumbs of both hands up. Came straight to the house: Index and middle, Ring and last. Alternately, the named fingers are connected to the thumbs on both hands at the same time. The little finger itself -baby Fingers clenched into a fist, only the little fingers pointing up Knocked on the threshold Fists knocking on each other Together the fingers are friends, They can’t live without each other Rhythmic clenching of the fingers into fists Introductory conversation - Guys, let’s remember what time of year it is (Autumn Correct. And what changes occur in nature with the arrival of autumn? (Children list the signs of autumn) - Well done! Right! But today I would like to talk about birds. Let's remember what birds we have seen and know (Children's answers). Do they all stay with us for the winter? What are the names of those birds that are not afraid of the cold and stay here? What wintering birds do you know? (Sparrow, crow, tit, bullfinch, dove, owl, woodpecker, magpie) What are the names of birds that fly to warmer climes? Migratory? Yes. Right. What migratory birds do you know (ducks, swans, cranes, swallows, rooks, starlings, cuckoos). Why do you think they fly away? (It’s cold here and they have nothing to eat - That’s right. Birds flying away in winter have nothing to eat. Many migratory birds eat insects. However, with the onset of cold weather, all insects hide, so birds fly to warmer regions in search of food - Look carefully at the illustrations. Pay attention to how the birds fly. Sandpipers, herons, and ducks fly in a line, in front or in a transverse row. Geese most often fly in a school. Geese, cranes, swans and other large birds fly in an angle, or wedge. - Guys, let's have a little rest. Imagine that you are birds and repeat after me: Birds Birds jump, fly. (Waving their arms and jumping) Birds collect crumbs. “Peck” Feathers are cleaned. Beaks are cleaned. (Stroke hands, noses) Birds fly , sing, (Waving their hands) The grains are pecking. “Pecking” 2. Practical part. - Have you rested? Good! And now I suggest you draw birds flying south. Look what’s on your tables? (Children’s answers) First we will do sketch with a simple pencil, and then outline and color it with wax pencils. During the practical part, explain to the children that sketches should be drawn with light lines; they need not be finished, not finished to the end; you can leave the failed form and start another; I need to try to make more sketches. The resulting sketches are outlined with a wax pencil. 3. Independent work of children. During the lesson, the teacher analyzes the images created by the children, explains mistakes, and guides them in searching for the correct representation of form and movement. 4. Summary of the lesson. At the end of the work, the children attach the drawings to the board. Demonstration of their works by children; choose the most neat and beautiful works with the children. - Children, what did we do today? (Children's answers) Well done, you all tried your best and you did a good job. Thank you. This concludes our lesson. |