The benefits of DIY crafts for the development of schoolchildren in grades 1-5
Crafts from matchboxes are not only a pleasant pastime for a child, but also an effective way of his development.
So, the benefits of crafts:
- Speech skills improve (due to the development of fine motor skills, which have a positive effect on brain activity, students begin to use more complex phrases in everyday speech and when retelling texts provided for in the school curriculum);
- perseverance increases, which directly affects the quality of information assimilation in lessons;
- a sense of responsibility is instilled (at the age of 7-10 years, the child already consciously carries out instructions from adults, preparing to receive an assessment of the result of his work);
- creative thinking and imagination develop (helps in adult life to find ways out of even the most difficult situations);
- accuracy is trained (having gotten used to the fact that accuracy does not imply haste, the child becomes more attentive to doing homework and working at school);
- independence is instilled in schoolchildren for adult life (in particular, children begin to take responsibility for doing homework, without waiting for reminders from their parents).
Scales made of paper and boxes. Technology 3rd class
It’s quite simple to make a model of scales from paper and matchboxes, having at hand Rogovtseva’s textbook for the third grade on technology (Perspective program). Unfortunately, not all schools have these textbooks for children; basically, it is 1 textbook for the whole class and it is with the teacher. Let's look online at how to make these scales.
To make scales we will need: 2 matchboxes, a template from a technology workbook for grade 3, colored paper, colored cardboard, glue, a popsicle stick, a toothpick, a paper clip, thread.
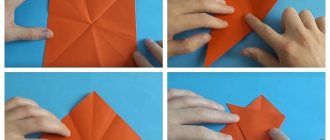
1. Transfer the sides you like for the scales and cups onto a sheet of white paper. Cut out the template. We transfer the details onto colored cardboard. We should have 2 identical parts for the base and 2 parts for the scales. Glue the sidewall parts to one box on both sides.
2. We cover the second box with colored paper. We lay it horizontally and glue the first box on top.
3. We bend the parts of the cups along the fold lines. We make holes in the corners. We also make holes on the ends of the ice cream sticks.
4. We thread the threads through the holes in the cups and on the stick so that the cups hang equally on both ends of the stick. We put a paper clip in the middle of the stick.
We put the paperclip on the toothpick, and put the toothpick in the corner cutout at the top of the base of the scale.
How to make a scale
This is what the base of two boxes should look like:
This is a moving part of a scale made from a popsicle stick with a paper clip in the middle.
Insert a toothpick into the paper clip.
Place a toothpick in the slots of the base.
The scales are ready, let's go get an A 
Let's weigh something already. And if you still don't understand how to make a scale, watch our video:
7gy.ru
Materials and tools for crafts from matchboxes
In order for classes on creating crafts with children of primary school age to be as effective as possible, it is necessary to correctly organize the work process.
For work, it is recommended to provide the child with:
| Work tool | What to pay attention to |
| Matchboxes | The main material needed to create a craft. The specific number of boxes is determined by the craft that you plan to make. |
| Colored paper | It is enough to give schoolchildren paper in the main shades - red, blue, green, black, yellow. |
| PVA glue | If students do not know how to work with liquid glue, it is permissible to use a solid glue stick suitable for adhesion of cardboard surfaces. |
| Adhesive brush | Necessary if liquid PVA is used. |
| White cardboard | You will need 2-3 sheets of at least A4 format. |
| Multi-colored markers | Necessary for detailing crafts, for example, adding headlights to a car or decorating the wall of a cardboard house with painted flowers. |
| Scissors with round ends | If there are no safety scissors, you can use regular ones, but at the same time supervise the actions of each child cutting out the shapes. |
| Paper napkins or soft paper | You can use it to remove excess glue. |
| Cotton buds | If they are not available, you can wrap a small piece of cotton wool around the end of a match, and then use it as intended as a cotton swab. |
| Simple pencil | It is necessary for the convenience of correcting lines in case of mistakes. |
| Eraser | It must be made of high-quality rubber so as not to leave streaks and marks when removing the pencil from the cardboard surface. |
Crafts from matchboxes
Do not rush to throw away empty matchboxes. It is enough to slightly change their shape, add a few details from other materials, and you will get simple but original models. Here are drawings of military vehicle models. Before you start making them, prepare the necessary tools: scissors, a knife, an awl, a ruler, a compass and a pencil. Don't forget to stock up on matchboxes, cardboard, plain and colored paper, insulated aluminum wire with a diameter of 2.5 mm and thin copper wire, empty ballpoint pen refills, and PVA glue.Let's start with the car (Fig. 1). To make it you need two boxes. Remove the drawer from one (Fig. 1a), and make two cuts in the lid according to the indicated dimensions and bend them at an angle. Cut off the shaded part. Insert the drawer into its original place. The result is a passenger car cabin with a front window. Cut the lid of the second box (Fig. 16) in half, and cut the drawer according to the dimensions. Insert the parts of the cut box on both sides into one of the outer halves. This is the motor. Connect it to the cabin with glue (Fig. 1c). From the remaining middle of the box, cut out the seats (Fig. 1d) and glue them to the cabin. All that remains is to make the cotton part.
Cut out twelve circles (Fig. 1e) with a diameter of 20 mm from cardboard, glue them together instead of four pieces (Fig. 1f) and cover them with colored paper (Fig. 1g, a). Prepare two axes from an empty ballpoint pen or wire of the same diameter (Fig. 1k). Punch holes in the center of the wheels with an awl and put them in pairs on the ends of the axles, covering them with glue. To prevent the wheels from falling off, place clamps made from aluminum wire insulation on the protruding ends of the axles. The insulation, cut in a circle with a sharp knife, is easily removed from the wire. If there are no insulating clamps, the wheels can be secured with thin copper wire, insulating tape or thread with glue wound around the ends of the axles. Bearings (Fig. 1i) are also made from cardboard according to these dimensions. Make shallow cuts with a knife or push with an awl along the dash-dot lines, bend, insert the axles with wheels into the bearings, glue them into a triangle (Fig. 1k) and glue them to the bottom of the model. The car is ready.
An armored personnel carrier is manufactured in almost the same way as a car (Fig. 2). The only difference is that the boxes intended for the hood (Fig. 2a, b) and the tower (Fig. 2d, e) must be cut at certain angles and cardboard parts must be glued in place of the cuts. After assembling the hood (Fig. 26), body (Fig. 2c) and turret (Fig. 2d), cut out hatches from cardboard - round side-goats (Fig. 2g) and rectangular top ones, as well as engine shutters (Fig. 2h ). Make the barrel of the machine gun (Fig. 2f) from a rounded match. Wrap part of it with thin wire and a glued strip of paper. Make a hole in the paper sleeve with an awl, insert the metal end of a ballpoint pen into it and secure the machine gun to the turret. Glue the bearings to the wheels. By carefully examining Figures 3 and 4, you will be able to assemble models of the Guards Katyusha mortar and rocket launcher. 3jo are a kind of trucks on which, instead of a ku-zoz, platforms with mortar barrels or a rocket are attached. The platforms (Fig. Ze and 4d) consist of two parts. The lower part is made from the lid of the box. The Katyusha has a rotating one. A round piece made from a pencil or paper tube is fixedly fixed at one end in the lower part of the platform (Fig. Ze), and its other end is freely inserted into the hole O of the fixed platform (Fig. Ze). Glue part (e) to the inclined plane of the platform (d) (Fig. Ze). Make six paper strips by wrapping them with glue around a round pencil. Secure them with glue in two rows of three pieces on the part (d), as shown in Figure 4. The upper part of the platform (c) of the rocket launcher is made slightly differently. Having made a longitudinal cut with a knife in the middle of the box lid, bend it inward, secure it with a metal bracket, glue it to the inclined part of the lower platform and, once assembled, glue it to the back of the Katyusha cabin.
Glue the rocket body (Fig. 46) from a paper strip, also winding it around the rod. According to the given drawings (Fig. 4e, f), cut out blanks from paper and glue the cone-shaped rocket head and parts of the three stabilizers. Glue the head to the front of the body, the stabilizers to the back. Strengthen the rocket in the recess of the platform. Place the models on wheels. Finished models can be covered with colored paper or painted with gouache, additional details can be drawn, and coated with colorless varnish. All that remains is to come up with a game. Design assignment. Try making a tank model yourself. Let's tell VVM that to make it you need three boxes: the body is made from two, the tower is made from the third. Pieces of a round pencil or paper tubes are suitable for fuel tanks, cardboard for hatches, and a ballpoint pen for a gun barrel. The coupling for it can be wound from a glued paper strip. And the model also requires six large wheels with axles and bearings and four small wheels. Caterpillars can be made from strips of fabric, calico or lederin. To prevent them from falling off while driving, stick round cardboard stoppers on small wheels. I. Dubinsky Drawings by the author Magazine Modelist-Constructor - 1979
Hello! In my free time I make crafts mainly from boxes and lids. The boxes are glued with PVA or paper clips, the lids are connected with rubber bands. Here are some of my works.
Cheerful Giraffe You will need 8 matchboxes, colored paper, glue, a brush, scissors. Half-open 2 boxes, connect them with the letter “G” (giraffe’s head), glue the third matchbox to the head (lengthen the neck), insert the neck perpendicularly into 3 glued boxes and the body), glue two boxes from below to the body (legs). [Crafts from boxes for children] Goldfish Cover the box with colored paper, cut out additional details - fins, eyes, scales and glue them to the right places.
| Next > |