JANUARY
Theme “Funny Birds” (from natural material).
Target
- Teach the “switching on” technique.
- Strengthen the techniques of “objectification”.
- Practice technical skills (gluing with glue).
- Develop creativity.
Material
- Alder cones on a branch (ready blank).
- Bird feather.
- Lionfish.
- Acorns.
- Plasticine.
Motivation
Birds for a corner of nature.
Preliminary work
Looking at illustrations of birds.
Listening to birds in audio recordings.
Selection of definitions.
Methodical techniques
Listening to birds in audio recordings.
Consideration of the proposed material.
Work planning.
Discussion of the plan.
Activity: “Tell me about your bird.”
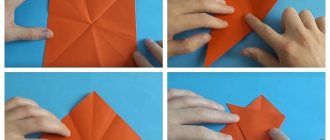
Theme: “Turning a semicircle into a cone” (from paper).
Target
- Introduce the paper sculpture technique - twisting a semicircle into a tall cone.
- Learn to use the shown method in making various crafts.
- Learn to analyze finished crafts.
Material
- Circles of writing paper of different sizes and colors with the diameter indicated in the outline.
- Several types of blank parts for “objectification” of crafts.
- Scissors, glue, markers.
- Demonstration material: cone 10 cm high.
Motivation
For decorating an artistic corner.
Preliminary work
Experimenting with a paper semicircle.
Lotto "Colored Shapes".
R/i “Find the image.”
Methodical techniques
Game situation: “Meeting of a low cone and a high one.”
“Turning a semicircle into a cone” is the process of making crafts.
Work planning.
Choice of material.
Voicing the idea.
Placing finished works in the art corner.
Theme “Bridges” (according to the condition, from building material).
Target
- Learn to construct bridges according to conditions.
- Develop a planning function.
- Develop the ability to correlate the sizes of parts with an object.
- Develop memory and thinking.
Material
- Set of building material.
- Freight and passenger transport.
Motivation
Bridges for crossing
Preliminary work
Bridge surveillance.
Examination of illustrations of bridges with their analysis.
D/i “Make a bridge.”
Methodical techniques
D/i "Constructor".
Conversation about the main parts of the machine built in the previous lesson.
Demonstration of the bridge design (confirmation of children's answers).
Consideration of transport (determining the required bridge width).
Independent work.
Discussion of the finished building (in accordance with the specified conditions).
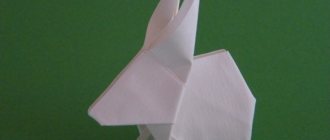
Theme: “Journey to the winter forest” (made of paper).
Target
- Fix the paper sculpture technique by twisting a semicircle into a tall cone.
- Exercise children in the ability to twist a semicircle into a cone.
- Develop imagination, creativity, fantasy.
Material
- Circles of writing paper of different sizes and colors with a drawn radius (cut line).
- Additional details to “objectify” the workpiece.
- Scissors, glue.
- Incomplete model of a winter forest.
Motivation
For theatrical activities.
Preliminary work
Looking at a series of pictures about the inhabitants of the forest.
Compilation of descriptive stories.
Drawing a winter fairy tale.
Methodical techniques
Riddles about animals.
Problem situation: “What can be added to the layout?”
Repeating the twisting method (cone from a semicircle).
Thinking through and voicing the idea.
Filling out the layout with crafts and writing a story.
Theoretical aspects of training
Paper construction (paper-plastic) is a type of activity for preschoolers that involves:
- drawing up an action plan;
- selection of materials for crafts;
- performing manipulations using the chosen technique.
In kindergarten, children construct crafts in classes organized by the teacher in a playful way.
Lesson objectives
Before planning a lesson, the teacher must set a goal that he wants to achieve. It is implemented through several tasks.
Educational objectives:
- introduce the properties of different types of paper (classic, velvet, holographic, crepe);
- develop the ability to cut out the necessary parts for a craft and name them (square, circle, etc.);
- clarify ideas about colors and their names;
- learn to make three-dimensional shapes from paper blanks by bending, crumpling, twisting or tearing them;
- encourage the creation of products according to plan (independently choose the theme and material for the craft);
- learn to combine elements into a composition (for example, roads and houses are a street).
Correction and development tasks:
- develop fine motor skills, thinking, attention and memory;
- improve visual and tactile perception;
- develop the ability to analyze created crafts and, based on this, plan your further actions;
- develop imagination.
Educational tasks:
- develop the ability to maintain order in the workplace and put tools in their place after finishing work;
- cultivate kindness, love of nature, etc. (depending on the craft).
Types of paper designs
Paper plastic is divided into 2 types:
- origami - folding figures by bending paper;
- volumetric paper and cardboard modeling, involving the use of scissors and glue.
Design forms
There are 7 forms of organizing constructive activities:
- Pattern design developed by F. Fröble. The teacher’s actions serve as an example. Children repeat what is shown, learning new techniques for working with various materials.
- Model design proposed by A. N. Mirenov. Instead of a sample, a model is used in classes - a ready-made craft. The method for creating the product is not shown. Students must recreate the model themselves. This form of organizing activities is used when working with children 5-6 years old and older. It helps to activate the thinking of preschoolers, because... they need to mentally disassemble the product into its components and reproduce the procedure unknown to them.
- Design according to conditions, developed by N. N. Poddyakov. He suggested not giving children ready-made samples and ways to solve a problem. The underlying conditions must be problematic in nature. For example, students are asked to make an object out of paper that can be given to their mother on March 8th. This method allows you to develop thinking and imagination. It is used if children have already made given objects or analyzed products that are similar in structure.
- Design based on drawings and visual diagrams. The authors of the method are S. Leon Lorenzo and V. V. Kholmovskaya. When working with preschoolers, templates are used. Children learn to use drawings as a way of understanding an object and how to create it.
- Design by design. For kindergarten students, this activity is difficult. In order for them to think creatively, the teacher must form in children an idea of the objects being created, the ability to repeat the teacher’s actions and look for new ways to create crafts. Only after preschoolers have mastered the existing methods of paper modeling will they be able to creatively use the acquired knowledge.
- Design on the topic. This form is close to making crafts by design. The difference is that the teacher limits the idea to the topic. For example, a teacher invites children to create any craft on the theme “Autumn”.
- Frame design proposed by N. N. Poddyakov. This method is rarely used when working with preschoolers. The teacher shows a frame made of any material, and then does something that changes the structure. With such training, children learn not only the structure of the frame, but also how to change it.
Motivation for children
To make it interesting for preschoolers, you can turn the activity into a game: bring a toy (hero) and invite the children to make a house or a gift for him.
It is important that children understand the practical significance of their activities. They will be more motivated if they know that their product can be given to an adult (mom, dad, grandmother, etc.).
Construction class in kindergarten
With proper organization of activities, construction can not only become a child’s favorite leisure activity, but also leave pleasant memories for the rest of his life. Please note what is the most common example given by people of the older generation when they talk about attention to children during the USSR and recall various Schoolchildren's Homes and Palaces of Pioneers. Most often, our parents mention not dance and art studios, but aircraft modeling clubs and modeling sections.
Technological maps and diagrams
The use of a card index of topics, as well as the availability of pre-prepared diagrams and blanks, will greatly facilitate the teacher’s work and make it possible to consider different topics and their combinations. Technological maps must be prepared according to a certain scheme and include the following items and sections:
- Design theme.
- The purpose of educational activities.
- Objectives of educational activities.
- Preliminary work.
- Organization of the development environment.
- Materials and equipment.
- Description of the stages of implementation, indicating the duration of each of them.
To facilitate the work and orientate children, design diagrams and drawings-tips are used, which clearly indicate the stages of work and facilitate the connection of structural parts. If you use ready-made construction sets like Lego, then similar diagrams can be easily found on the manufacturer’s website.
When making a diagram yourself, remember that it should not look like a drawing. The diagram should be simple and intuitive for the child, at the same time it should tell him the appearance of the finished product, the number of structural elements, places and methods of connecting them.
Table: example of a technological map for a design lesson
| Technical Design Topic | "Bridge" |
| Purpose of educational activities | Developing constructive creativity in children through working with construction kits |
| Objectives of educational activities |
|
| Preliminary work |
|
| Organization of a development environment | Imitation of a river, a wide stream (an obstacle that requires a bridge to overcome) made of plastic film. |
| Materials and equipment |
|
| Description of the stages of implementation with duration |
|
Photo gallery: examples of design schemes from Lego or similar
Building with blocks helps children learn new geometric shapes
You can assemble the model according to standard instructions, and then independently modify it according to the instructions of the teacher
Modeling with a construction set can become a favorite pastime for both children and adults
Boys will be interested in the opportunity to design their own car
Elements for construction can be of different sizes; for younger children it is better to choose larger parts
From the construction set you can assemble not only a house or an airplane, but also fairy-tale characters
Schemes for construction should be clear and understandable to the child.
Photo gallery: examples of diagrams for classes on designing from various materials
Schemes for design can be either color or monochrome. Applications can be made from different materials
Schemes must be prepared taking into account the type of building materials that the preschool educational institution has
Children can assemble the bridge and modify it later according to the instructions of the teacher
This diagram allows you to understand what the finished product looks like
Looking at the diagram, children can construct animals from prepared pieces of paper, cardboard or felt
Children can glue pre-prepared pieces of paper, cardboard or other materials onto the finished diagram
Photo gallery: finished crafts made in different techniques
Small-sized crafts require a lot of concentration from the child and help from adults.
During classes, children can work together both on one object and on entire installations
Children can design at home with their parents
The “Space” application was made using readily available materials (colored paper, disposable tableware, glue, felt-tip pens)
Installations can include both crafts and ready-made factory objects
Children really like it when they can play with completed crafts after finishing work.
Installations can be performed using any available materials, depending on the purpose of the lesson
Products made in design classes can be well integrated into other activities of the preschool educational institution.
Lesson time plan
The recommended duration of the lesson for the middle age group is 15–20 minutes. A general lesson plan might look like this:
- Introduction, organizational moment - 1 minute.
- Motivating start - 3-5 minutes.
- Demonstration and explanation of working methods - 2–3 minutes.
- Independent work for children - 6–8 minutes.
- Discussion of works - 2 minutes.
- Conclusion - 1 minute.
Table: materials for the introductory stage of the lesson
| Lesson topic | Motivating start |
| "Tumbler" | At the beginning of the lesson, the teacher asks the children a riddle: An unusual doll has come to visit us, friends. He doesn’t sit, he doesn’t lie, Just know, he’s standing. They know Sashka and Natashka, these dolls... (tumblers). The pupils are shown a tumbler who was in a hurry to visit them. The teacher talks with the children and asks questions: “Why do you think this doll is called a tumbler?”, “How to play with a tumbler?”, “What figures does this toy consist of?” etc. The game “Find where she hid” is played. The teacher says that another tumbler came to visit the children, but she was shy and hid behind one of the toys in the room. Children are asked to find the doll by verbal guessing (said in turn): “The tumbler is hiding behind the car,” “The tumbler is behind the ball,” “The tumbler is behind Katya’s doll,” etc. until the tumbler is found. |
| "Toy Animals" | At the beginning of the lesson, the teacher shows the children pictures of wild animals. The guys name them, the teacher hangs the pictures on the board. Then the teacher says that wild animals are dangerous, their behavior can be unpredictable, and suggests turning the animals from the pictures into toys (a game element). To do this, students must close their eyes and simultaneously clap their hands loudly 3 times. At this time, the teacher puts animal toys on the table, the images of which the children will design. |
| "Beauty Snowflake" | The teacher creates a surprise moment: there is a mailbox on the table, he tells the children that the postman delivered it to their group, reads out the address (the real address of the kindergarten is written - city, street, house, kindergarten number, group). A letter is found in the box, the contents of which the teacher reads aloud: animals from distant Africa address the children, they tell them what the climate is like in their native place and are sad that they have never seen snow, but have heard a lot about what an amazing and beautiful phenomenon it is. . The teacher asks how to show snow to the people of Africa, and through suggestions and hints, he leads the children to the idea that they can make snowflakes out of paper and send them by mail to Africa. |
Table: example of a design lesson summary
| Author | Suvorova L.A. |
| Name | "Dog Kennel" |
| Target | Create paper crafts using a new design method - folding paper in half. |
| Tasks |
|
| Materials |
|
| Progress of the lesson |
|
Video: lesson on designing from building materials in the younger group
Video: lesson on Lego construction in the senior group
Video: paper design lesson in the preparatory group
Differences between design classes in the senior group
In older preschool age (5-6 years), pupils already know the basic methods of creating paper products. They must become familiar with three-dimensional figures (sphere, cube, cone, cylinder, pyramid, brick) and learn to place them in space, making durable structures.
The teacher teaches children to see familiar elements in product samples, to work not only according to the sample, but also according to the drawings. You can start building with cubes of different shapes and sizes, and then make figures out of paper.
At this time, the already mastered skills of replacing parts with others, connecting them, using different techniques for working with paper of different densities are consolidated. Teachers organize collective activities to create 1 item.
Sometimes classes are held in the form of a role-playing game. For example, an adult says that the hare needs help: his home was destroyed by a fox. Some children can become builders and make a house, another part can become guards and design a fence, a third can design furniture, etc.
The older the children, the more creativity there should be in their work. If with younger students you can limit yourself to creating crafts based on a model, in the middle group you can teach how to work with drawings and diagrams, then in the older group, preschoolers can come up with a product on their own on a given topic.