What it is
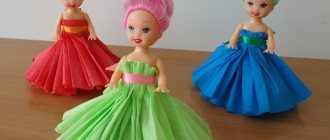
Nitcography (a combination of the words “thread” and “grafo” - I write, that is, “I write with thread” or “I draw with thread”) is the creation of paintings using threads.
Nitography is a type of fine art that allows you to create bright and expressive images
The main goal of artistic and aesthetic education of preschoolers is to awaken children's interest in visual arts. As for the purposes of using non-traditional drawing techniques, in particular, nitcography in the older group, these include
- developing the ability to select a color palette to reveal the meaning of the plot of the drawing;
- develop the ability to see a whole image from its individual elements;
- improve fine motor skills;
- foster a positive perception of the creative process.
Types and techniques of nitcography used in kindergarten
There are 4 types of visual arts using threads.
Option No. 1 - actual nitcography
A type of technique with which children begin to get acquainted with the visual possibilities of threads. This usually happens in the middle group.
What do you need:
- woolen threads (the more fleecy it is, the more intricate the image will be);
- paint (gouache or watercolor);
- 2 sheets of thick paper (watercolor sheets are ideal, but regular sheets are fine).
Instructions:
- Take a woolen thread 40–60 cm long.
- We dip it in paint (gouache is more convenient to use than watercolor), leaving a clean tail.
- Place it on a sheet of paper (it’s better to take thick paper).
- Apply a clean sheet and press down.
- Without opening the top sheet, we move the thread left and right by the tail.
- Remove the top sheet and remove the thread.
- We complete the patterns left by the thread, inventing images.
This is interesting. The base sheet can be folded in half and the thread covered with half, then the pattern will be symmetrical.
Gradually, the technique can be complicated with several threads dyed in different colors.
Video: how to work using the nitcography technique
Option number 2 - thread writing
In this case, you need threads of different colors, textures, glue (PVA or silicate) and a sheet for the base.
This is interesting. Thread painting can be done on fabric, then the threads are simply laid out on the base. No need to use glue. Only the pictures will be temporary - until the threads fall off.
Instructions:
- On a sheet of paper we draw the outline of the plot of the picture (you can use your own, or you can take a regular coloring template).
- Apply glue along the contour.
- Before it hardens, lay out the thread and press lightly so that it sticks.
- Now we fill the pattern element by element with threads of suitable colors.
The technique can be complicated by the way of laying out the threads:
- in a spiral;
- round;
- straight lines;
- zigzag lines, etc.
Video: learning to draw with threads on fabric
Option No. 3 - applique with threads
As a type of thread painting, instead of whole threads, pieces are used, that is, the threads are cut into small pieces, with which the space of the drawing is filled. This method is considered more convenient when working with younger children. In addition, it does not require much time to complete the task.
This is interesting. Familiarity with thread painting with a single thread usually occurs in the senior group, while mastering the technique from pieces is used in the middle and sometimes in the second junior group (only as 1-2 additional elements of the composition).
Option No. 4 - isothread
This technique of nitcography is not used in all kindergartens due to the fact that children have to work with sharp objects. Usually, isothread is the prerogative of preschool institutions with an artistic and aesthetic orientation. Mastering this type of thread printing technique begins in the senior group.
For the basis of the drawing using the iso-thread technique, you need to take medium-density cardboard
What do you need:
- threads;
- buttons in the form of studs;
- tablet;
- drawing on paper;
- scissors.
Instructions:
- We attach a drawing to the boards (can be from a coloring book).
- We insert studs or pins along the contours of all elements.
- Carefully, so as not to pull out the carnations, remove the paper sample.
- We wrap the carnations with threads, making two turns around each, and stretch the threads well.
This is interesting. As a simpler option, holes are pierced along the contour of the design, into which children pass threads with a needle.
Materials for practicing nitcography
Nitography combines the use of rather unusual combinations of materials and tools. You will need:
- Working surface. This is the basis. It is desirable that it be rough. There are no restrictions when it comes to color. Choose what you like. You can take cardboard or any other thick paper, fiberboard, a piece of flannel fabric, a piece of plain carpet, etc. An A5 size base is sufficient. For variety, make templates for future drawings in advance.
- Wool, acrylic or cotton thread with a diameter of at least 2 mm. For kids in the middle group of kindergarten, you can take a nylon cord with a thickness of about 4 mm. The main thing is that it should not slide. Pre-cut the threads into pieces of the required length. Older preschoolers can do this on their own.
- PVA glue with a brush.
- Napkins, oilcloth, scissors.
- For thread printing, you will also need toothpicks or thin sticks, with which the child will align the drawing.
If necessary, you can take pencils, markers and other additional devices.
If you decide to start thread painting, prepare an A5 landscape sheet, threads about 45 cm long, multi-colored gouache, brushes and jars in which you will dilute paints with water.
Scheme for compiling lesson notes for the senior group
A successful lesson plan is the key to successful activities for children. You need to start working on your notes by describing the goals and objectives of the lesson. In addition to the general purposes of using this technique in the senior group, we can highlight
- systematization of knowledge about obtaining shades by mixing paints;
- fostering a tolerant attitude towards the creative process.
Objectives are formulated based on the topic of the lesson. In general, the “skeleton” looks like this:
- develop memory, thinking, creativity;
- expand your understanding of the world around you;
- work on developing imagination.
Once goals and objectives have been identified, it is necessary to clearly distribute time between all stages of work on the topic.
It is important that children have enough time to complete the thread drawing.
A kindergarten lesson lasts 30 minutes. During this period, the teacher must work through 3 stages with the kids.
- Introduction (about 5 minutes). Includes motivational techniques: reading fairy tales, showing an excerpt from a dramatization, learning songs/poems, etc., depending on the topic of the lesson.
- The main part (about 20 minutes) is work on the drawing, physical education and finger gymnastics.
- Conclusion (about 5 minutes). It involves adults’ approval of the children’s work, as well as children’s reflection, which can be in the form of answers to the questions: “Did you like drawing with strings?”, “Do you think your drawing was a success?”, “Whose picture do you like more than others?” etc.
Example of a summary
Daria Muravleva “Summary of a lesson in visual arts for the senior group on the topic “Flowers for Mom” (Nitcography technique)” (fragment)
| <...Today I offer you an unusual way of drawing. You've never drawn like this before. Want to try and learn? It's called "nitcography". (Drawing technique is shown) - Take a thread, and now, using circular movements from the center in a spiral, lay the thread on a sheet of paper. Now you need to dip the thread into the chosen paint, holding the end of the thread, carefully helping with a brush, roll the thread onto a piece of paper in a spiral, as you did with dry thread. We direct the end of the dry thread downwards, holding it in the right hand, and with the palm of the left hand, pressing lightly, slowly pull the thread out from under the palm. Magic happens! Want to try it yourself? First, wake up your colors, but not all of them, but only those that are suitable for your unusual flower. – Try it and let’s see if you can do magic? I'm sure it will work! (Children do the work) As the children complete the task, I admire the bright colors they chose and the successful manifestation of their magical skills, and while they dry out, turn into flowers themselves and play a little...> |
Nitography techniques
Most often, thread painting, drawing with stamps and appliqué are used in classes. Let's look at each technique in more detail.
Drawing with threads
The thread plays the role of a brush. The process looks like this:
- Dip the thread into paint of the chosen color.
- Once it is well soaked, place it between two sheets of paper. Can be laid in a zigzag. This will make the picture unusual.
- Lightly squeezing the paper and pull the thread out.
An interesting mark will remain on the sheets. It is either supplemented with details, or cut out and used as appliqué.
Long-term plan for thread printing and thread writing
A long-term plan for non-traditional drawing techniques helps organize children's work by combining the topic of the lesson with a suitable technique for depicting it. The plan form is standard. Usually indicated
- month of work;
- topics of classes and drawing techniques;
- goals of using the methodology;
- sources that describe in detail the progress of work on this technique.
There is a separate column for notes, in which the teacher makes notes regarding work with a specific group.
Since when working in the technique of thread printing, the subject of the drawing is revealed after the image is received, it is difficult to integrate the technique into the general theme of the classes. In the middle group, thread printing and thread writing are used in those classes in which the “technique” column is marked “various.” As a rule, these are topics related to natural phenomena (rain, snow), creating patterns, for example, for a vase, etc.
In the older group, non-traditional techniques with threads are usually devoted to classes on a free topic or lessons dedicated to talking about dreams, fantasies, in other words, abstract topics.
Elizarova Olga “Perspective planning for drawing (senior group)” (fragment)
| <…MAY “Land of Colorful Dreams”. Goal: to consolidate the ability to use non-traditional techniques – drawing with “threads”...> |
As for thread painting, it is used in those topics where it is possible to use ready-made templates for coloring or abstract drawings.
Alekseeva Nadezhda “Perspective work plan for non-traditional drawing in the senior group” (fragment)
Drawing with colored threads
Goal: to introduce children to the technique of drawing with colored threads, to develop fantasy and imagination, and to cultivate accuracy. |
Innovation project: nitcography in the preparatory group
Elvira Ramazanova
Innovation project: nitcography in the preparatory group
Project on innovative activities of teacher of group No. 14 Ramazanov E. S.on the topic:
“Development of fine motor skills of preschool children using the non-traditional technique “ Nitcography ”
».
PROJECT PASSPORT
Project type : creative.
Project type : short-term.
Author of the project : teacher of preparatory school group No. 14 Ramazanova E. WITH.
Project participants : teacher, junior teacher, children, parents.
Number of participants: students - 29 people, parents (legal representatives)
– 55 people.
Project implementation period : February – May 2018.
Children's age: 6-7 years ( preparatory group )
Forms of educational activities:
Work on the development of fine motor skills in the process of using new technology is structured according to three blocks of the pedagogical process:
• organized - educational activities;
• joint activities between adults and children;
• free independent activity of children.
Relevance of the project .
The relevance of the project for the development of fine motor skills in preschool children is determined by the age-related psychological and physiological characteristics of children: in preschool age, the structures and functions of the child’s brain intensively develop, which expands his capabilities in understanding the world around him. A person cannot develop a comprehensive understanding of the surrounding objective world without tactile-motor perception, since it underlies sensory cognition.
Today, most modern children have a general motor lag. Parents try to buy shoes with Velcro, so as not to take the trouble of teaching their child to tie shoelaces, warm and comfortable jackets and sweatshirts with a zipper, and do not have to fiddle with your fingers for a long time and look for a button and eyelet. Unfortunately, most parents learn about problems with coordination of movements and fine motor skills only before school. This results in an increased burden on the child: in addition to learning new information, they also have to learn to hold a pencil in naughty fingers.
The development of fine motor skills of the hand is very important, because visual-motor coordination is directly related to learning to write at school. A child who has a high level of development of fine motor skills can reason logically, has sufficiently developed memory and attention, and coherent speech. The level of development of fine motor skills is one of the indicators of readiness for schooling. Therefore, in preschool age it is important to develop the mechanisms necessary for mastering writing, to create conditions for the child to accumulate motor and practical experience, and to develop manual skills.
There are a lot of ways to develop fine motor skills of children's fingers - drawing (crayons, pencils, paints, plasticine, modeling, working with scissors, which requires precision movements and strength, all kinds of small construction sets, mosaics, toys, shading, tracing, etc. Another way to improve children’s finger motor skills is to use the “ Nitkografiya ”
.
Activities with threads , scissors, glue, pencils are not only sensory-motor exercises. This is a way for children to have a detailed understanding of surrounding objects, promoting the manifestation of mental and speech activity and the development of imagination.
«Nitcography»
- laying out contour images of various objects using a lace or thick thread, that is,
“drawing”
with a thread.
“Drawings”
made with a thick thread or cord are distinguished by the softness of the resulting forms, seem voluminous and
“alive”
compared to a regular contour image. In addition, activities with pliable, soft and fluffy thread calm children and develop their interest in arts and crafts.
Distinctive feature of " Nitkografiya "
The point is that tasks for children can be adjusted depending on the state of development of fine motor skills.
It develops perseverance and meticulousness; Children develop a noticeable eye, as they see what length of thread to take , how long to draw the glue line when gluing the thread;
desire to bring the work to the desired result. “ Nitkografiya ” technology into the educational process
.
Tasks:
Create conditions for the child to accumulate practical motor experience and develop manual skills.
Develop fine motor skills of fingers, hands, precision and coordination of hand movements.
Prepare the child's hand for writing.
Develop hand-eye coordination.
Teach children to find original ways to create an artistic image.
Develop sensory perception abilities, sense of color, shape, composition.
Develop personal qualities - perseverance, patience, diligence, accuracy, hard work.
Epigraph of the project
"Hands give a man his head,
then the wiser head teaches the hands,
and skillful hands again contribute
brain development."
I. P. Pavlov
Conditions for organizing educational activities to teach children the “ Nitcography ”
.
1. Providing a subject-development environment with games that promote the development of motor skills of preschoolers in the process of the non-traditional drawing technique “ Nitkography ”
.
2. Creating an atmosphere of creative interaction between children and the teacher.
3. Creation and design of a center for joint and independent artistic activities of children.
4. Organization and visiting of exhibitions by children and parents.
5. Interaction between kindergarten and family.
Pedagogical methods and techniques in the “ Nitcography ”
.
Visual methods
Practical methods
Verbal methods
project implementation plan
“Development of fine motor skills of preschool children using the non-traditional technique “ Nitcography ”
.
Expected results.
The ability to find new ways for artistic depiction. Master the skills and abilities to perform the work correctly, observing the algorithm and safety precautions. Work independently, strictly following the instructions.
Stages of working on a drawing using the nitcography technique
"Goat"
For this drawing, children must turn the thread in a certain pattern.
The unusual thing about this drawing is that the children receive a task in advance: they need to draw a Dymkovo toy - a goat.
Instructions:
- “Look carefully at the Dymkovo goat, determine in which direction the thread should be turned by the upper tail, and which by the lower one (top - to the right, bottom - to the left).”
- “We cut the thread about 40 cm.”
- “Pour some gouache into a plate and dilute it with water.”
- “We dip the thread, holding it by the upper and lower tails.”
- “We apply the thread to a sheet located horizontally in front of you.”
- “Cover with a clean sheet and, holding it with your left hand, move the upper tail of the thread to the right with your right, and then the left tail to the left.”
- “Remove the top sheet.”
- “Using a black pencil, we draw the contours of the goat, the outlines of the muzzle, nose, and mouth.”
- “We outline the contours with a brown pencil.”
This is interesting. The above example can be worked on with children who are already well acquainted with the technique of making drawings using thread printing, since according to the instructions, children draw the plot as if “blindly”. Easier options are creating flowers, butterflies, etc., that is, those subjects that are invented on the basis of ready-made patterns made randomly with threads.
Photo gallery of drawings using the technique of nitcography
It’s very interesting when children come up with names for their pictures themselves.
To make a butterfly, you can take 1-2 colors to dye the threads, and paint the remaining shades along with the body
With the help of thread printing, children get ideas about different color combinations
Stages of working on a drawing using thread writing technique
Let's give an example of working in the thread writing technique using whole thread and pieces.
"Flowers"
For drawings with threads on colored paper, it is better to use silicate glue so that there are no marks left after drying.
Instructions:
- “We place a sheet of green paper vertically, and use glue to make a “path” for the stem of the flower.”
- “We take a green thread and lay out the stem with it.”
- “We make large drops of glue and put leaves on them, placing the threads in a circle, as if wrapping a ball.”
- “Again we make large drops of glue, distributing it evenly over the entire area of the bud of the future flower.”
- “We fill the element with pieces of thread, laying out first one layer, and then the second in the other direction.”
- “Add a couple of green threads for the calyx of the flower.”
Photo gallery of drawings with solid thread
The house and tree can be made without pre-applied contours
In this drawing, folding threads in a spiral and in a circle is practiced.
Such plots do not require small folds on the threads
Send your photos
Do you also make beautiful crafts?
Send photos of your work. We will publish the best photos and send you a certificate of participation in the competition. See also:
Dog under the Christmas tree. Craft made from plasticine.
New work for our competition in the children's category. Author: Denis Gorbachev, 4 years old. New Year is the time and...
Gifts of autumn. Eggshell mosaic
Ekaterina Petrovna Viktorova (Khvorostyanka village) presents her work “Gifts of Autumn” for the competition. From egg...
Application with drawing elements “New Year tree and Bunny”
The work for our competition is an application with drawing elements “New Year Tree and Bunny”, which was made...
Application – painting “Bouquet”
“Bouquet” of napkins is a new work by Olga Pivneva. A painting - an applique made by hand...
Autumn wreath
Another work for our competition from Olga Kiseleva from the city of Iskitim, Novosibirsk region. This panel...
Panel "Poppies"
Work by primary school teacher Elena Vlasova for a competition of crafts made from natural materials. Master-k…
How to crochet from elastic bands - basic elements
Weaving from Rainbow loom elastic bands has become one of the most popular types of needlework. And if initially...
Applique for a boy: ball, car and others (crochet)
Appliques, crochet, for boys Many people like to knit various appliques for children. Knitted…
Fox made from natural material
Victoria Zolotaya and her students continue to amaze us with their unusual competition entries. This time -…
Paper applique - autumn tree
Master class: Application from leaves “Trees” Author: Kazyanskaya Tatyana Mikhailovna, additional teacher…
Appliques for girls, crochet
Knitted appliques look very beautiful on clothes. They can also be used as brooches...
Volumetric applique “Snail”
A children's craft - a three-dimensional applique made of paper - is a huge scope for creativity. Enough...
Tags: Appliques, Handicraft techniques
Discussion: 17 comments
- Albina Nikolaevna:
November 5, 2020 at 6:09 amAs it is now called, nitkografiya. It’s a tricky name; when we were kids, during labor lessons, the teacher told us about drawing with threads, although colored wool was in short supply, they painted with regular wool and then tinted it with paints, and they only had silicate stationery glue, leaving stains from the glue.
Answer
Larisa:
November 5, 2020 at 5:59 pm
Yes, the name turned out to be interesting, half-Russian and half-Greek. Or then “thread writing” or... Maybe Olga will tell you