Aspects that need to be taken into account when preparing for a drawing lesson in the middle group of a preschool educational institution
Suitable paints and base
In the middle group, a variety of materials are used in visual arts classes. So, when drawing a gnome, you can offer students paints (gouache or watercolor), pencils and even felt-tip pens. The outline of the image is first drawn with a simple pencil. If children draw a gnome with paints, the teacher must tint the paper in pastel colors in advance; when using pencils, this is not required, since preschoolers usually complement the composition with a suitable background.
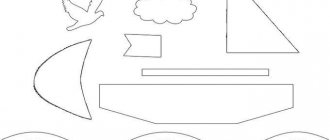
An easier option is to give the children cut out templates of gnomes (a face may already be drawn on them). The children's task is to identify the body parts and clothes of the little man and color them in the appropriate color.
A ready-made template for coloring with items of clothing and facial features marked with a simple pencil
A ready-made cut-out silhouette of a gnome with a painted face, on which children must mark and color body parts and items of clothing
Techniques and techniques used
Drawing a gnome in the middle group prepares preschoolers to depict such a rather complex object as a person . Note that at an earlier age, kindergarten students drew simpler options - a tumbler, a matryoshka doll, a snowman, where the proportions and shapes of body parts can easily be violated.
The image of a small creature - a forest gnome - is made up of separate simple parts: a round head, a shirt in the form of a triangle, also a triangular cap (only smaller) and straight handles. Note that children depict the legs of a man at will: the gnome can simply be dressed in a long shirt or fur coat. The person's face is indicated schematically (eyes - dots, mouth in the form of an arch and a round nose).
At the age of 4–5 years, children should already at least approximately observe the ratio of body parts in size; the teacher should focus on this.
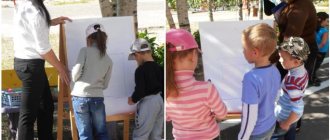
The theme “Gnome” can be transformed into a plot work (an image of several people connected to each other by meaning). At the same time, compositional skills will develop: arrangement of objects on one line or throughout the entire space of the sheet.
If preschoolers use paints in class, the ability to hold a brush correctly and apply strokes rhythmically, without going beyond the outline of the form, improves. The ability to thoroughly rinse the brush before using the next paint is also reinforced. When drawing with a pencil, students develop the ability to achieve darker or lighter shades, depending on the force of pressure.
Additional types of visual activities that can be used when drawing a little cheerful gnome
It will be interesting to diversify any drawing lesson with some other types of visual activity. So, children can add eyes and a mouth made of plasticine to a drawn gnome. These can also be large buttons on the fur coat of a fairy-tale character.
As for the applique, the composition can be supplemented by gluing voluminous green grass with cuts at the bottom. You can also stick a pattern of cut out geometric shapes onto the gnome’s clothes.
The appropriateness of using an individual approach in a lesson on this topic
Since at the age of 4-5 years the peculiarities of children’s development are already beginning to be visible, some of them show an increased interest in creative activity, then when drawing a gnome it is quite possible to individualize the tasks according to the design and level of complexity. So, stronger children can be asked to draw the legs of a man (while others depict just a long fur coat), draw a face in more detail, or depict a gnome along with some forest animal or its characteristic attribute (for example, a flashlight).
Christmas Gnome - Santa's Little Helper
Let's return to the New Year's theme. According to legend, Santa Claus's little helpers live in the North and help him make gifts for children and then take them home. It's not easy work, but it's a lot of fun. So figuring out how to draw a Christmas gnome will be very cool and interesting.
Let's start with a sketch. For now these will be basic shapes - circles, rectangles with smoothed corners, etc.
Then we will draw the line of the beard, hands clenched into fists, eyebrows, nose and boots.
Then we'll take care of his pointed hat, eyebrows, and torso. In one hand our hero will have a stick with a spherical knob.
All that remains is to make the eyes, the line of the mouth, add folds and individual hairs on the beard and hair.
At the next stage, you need to erase all the extra lines and draw the main ones well.
Let's add some color. Snowflakes will be spinning in the background, the gnome will be dressed in a blue suit, brown boots and a red hat. His long beard will be gray, and there will be a blush on his cheeks.
At this point the drawing is finished - you can place it in a frame and admire your work.
Target:
To develop children’s ability to convey in a drawing the image
a little
man - a forest
gnome
, composing an image from simple parts, to consolidate the ability
to draw with paints and a brush
, to lead to a figurative assessment of finished works, to cultivate independence and accuracy.
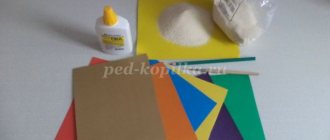
Materials for the lesson
:
- gnome
made from paper.
Paper 1/2 the size of a landscape sheet, a simple pencil, gouache paints, brushes, a jar of water, a napkin (for each child)
.
Educational areas
: artistic and aesthetic development, social and communicative development, speech development.
Preliminary work
: telling and reading fairy tales, looking at illustrations, toys.
Lesson notes - variations on the theme “Little Dwarf”
| Author's full name | Title of the abstract |
| Polukarova S. S. | "Little Dwarf" Educational objectives: learn to draw a forest gnome, obtaining an image from individual simple details (round head, triangular cap and fur coat, straight arms), improve the ability to paint with paints. Developmental tasks: consolidate knowledge of geometric shapes, colors, develop imaginative thinking, imagination. Educational tasks: cultivate interest in fairy tales. Integration of educational areas: “Artistic creativity”, “Cognition”, “Communication”, “Socialization”, “Health”. Demo material: Gnome doll, bell, wooden shoes, illustrations depicting gnomes, samples of step-by-step images. Handout: A4 album sheets, pencils, erasers, gouache, brushes, sippy cups. Progress of the lesson: The teacher invites children to get acquainted with small creatures - gnomes, who are in many ways similar to people. A conversation about what gnomes have (a very long beard, wooden shoes that always knock, caps on their heads). The children learn that fairy-tale gnomes live in forest caves.
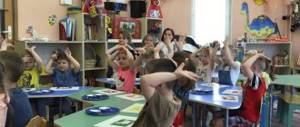
An outdoor game is played based on the theme of this poem: children “turn” into gnomes, in the hands of the teacher there is a doll - grandfather gnome. When grandfather claps his hands, the children step towards him, when he sings “la-la-la”, they jump. Next, the teacher invites the children to draw forest gnomes. He calls one of the strongest children to the board and, together with him, draws a man with a simple pencil according to the scheme: head (circle), cap (triangle), shirt (also a triangle) and handles (stripes). Then the drawing is painted with gouache. Independent activity of children to the music of Ekaterina Semyonovna “Little Dwarf”. Summing up the lesson. The teacher, together with the children, examines the drawings, chooses the most elegant gnomes, the funniest, the funniest, or, conversely, the saddest. Everyone is happy with the results obtained. |
| Lavrova O.V. | “Little gnomes” At the beginning of the lesson, the teacher invites preschoolers to remember fairy tales in which gnomes are found. Then the guys look at a picture of a forest man. A surprise moment is the appearance of a gnome made of paper. Children look at it, clarify the shape (cone-shaped). The finger gymnastics “Trees” is interesting, which is carried out by the teacher before directly productive activities:
You should pay attention to the summary of the lesson: children not only evaluate the resulting drawings, but also give the gnomes names according to their drawn character: “Clever”, “Grumpy”, “Sonya”, “Jolly”, etc. |
| Gulyaganova L. | “Little gnome” (drawing using geometric shapes) The lesson begins with a riddle about a gnome:
The teacher shows an image of a gnome made up of geometric shapes. There are mathematical sets on the children's tables - the children are asked to make a similar person out of geometric figures. After the children successfully complete this task, they must draw a gnome - trace the corresponding shapes with a pencil, and then color the resulting image to their liking. An interesting point: the teacher emphasizes that the gnome’s face should be pink: for this, children are asked to mix white paint with a drop of pink. |
Summary of a game lesson in the nursery group of a kindergarten (for children of the 3rd year of life), topic: “Gnome”
Goals:
Form stable ideas about color, shape, size, location of an object in space. Continue to teach children to count objects and determine quantity using the words “one-many.” To consolidate children's knowledge about the number “1” as a sign indicating quantity. Introduce words of greeting, farewell, and invitation into the children's active vocabulary. Teach children to draw straight and curved lines without going beyond the boundaries of the “path”. Practice brush painting and appliqué. Develop a sense of rhythm and tempo. Develop fine and gross motor skills. Cultivate accuracy when doing work, the desire to independently put toys and educational materials in place.
Equipment:
Toy "Gnome". A picture with drawn cups with different numbers of pencils in them. Numbers "1". A picture depicting a gnome and bags of different shapes, colored silhouettes of objects from the bags: Christmas tree, mushroom, pear, carrot, apple, strawberry. A picture of a gnome without a beard. White gouache, brushes. Silhouette images of gnomes of different sizes. Black and white drawing of a gnome's house and matching color details. Picture of a gnome without a cap and shirt, shirt caps cut from colored paper, glue sticks. Silhouette images of lanterns, colored clothespins. Picture with paths of different shapes, pencils. Metallophones. Audio recordings: “Procession of the Dwarves” by E. Grieg, “There are Dwarves in the World”, “There Lived a Dwarf in the Forest”, “Dwarfs”.
Samples describing the order of work within the designated topic in the middle group
When drawing gnomes, you can use various materials: photos 3, 4, 5, 8, 9 show work in gouache (moreover, in photos 8 and 9 the gnomes are made exclusively in blue tones, obviously this was the intention of the lesson), photo 6 is a painted gnome pencils, photo 10 - drawing with felt-tip pens.
An interesting interpretation of the “Gnome” theme is presented in photo 7 “Girl Gnome” - after all, the gnome may well be female, in a dress and with pigtails.
In photo 6 “Good Dwarf,” the teacher offers children a ready-made silhouette of a gnome for coloring.
Photo gallery of examples of finished works on this topic
Drawing with gouache Drawing with gouache
Works of middle group students
Works of pupils of the middle group Drawing with gouache Drawing with a pencil
A middle school student demonstrates her work
Children's work Children's work Drawing with felt-tip pens
Step-by-step drawing of a gnome for children 4–5 years old
The teacher determines how the children will draw the gnome. There are two traditional options:
- Contours, coloring, and detailing are done with colored pencils.
Children start drawing a gnome from the head
- The pencil sketch is colored with gouache.
The teacher helps the children complete the drawing of shoes, sleeves and mittens, since the kids are not yet fluent in the skill of symmetrically arranging small details of a design on a sheet of paper.
Natalya Vasylishin
Photo gallery: step-by-step drawing of a gnome with gouache
1. Trace the round stencil with a simple pencil
2. Place a small triangular stencil on top of the circle, trace
3. Place a large triangular stencil on the bottom of the circle, trace
4. Mix white and brown gouache until you get a flesh tone
5. Paint the bottom of the circle with beige gouache
6. Outline the contours of a small triangle with gouache (color of your choice)
7. Paint the small triangle
8. Outline and paint the large triangle (color of your choice)
9. Draw a small circle on top of a small triangle (pompom)
10. Draw two lines and circles (hands)
11. Draw boots
12. Painting the arms and legs
13. Using a thin brush, draw the eyes and mouth. The gnome is ready
Photo gallery: examples of finished works
Given the same task and materials, the gnomes turn out to be unique
Mischievous gnomes are children's friends
Gnomes can be adorable and cute
Drawing a human figure is a difficult task, it doesn’t work out the first time
Drawing “Little Dwarf” reinforces children’s knowledge about geometric shapes - a serious topic, no doubt about it. Thanks to the playful and story-based form of the lesson, children repeat the material covered with pleasure. And they happily draw good friends - gnomes.
The gnome waves his hand - visiting the little people
Dwarves are a fabulous people who are known not only for their amazing skills in various crafts, but also for their friendliness and wisdom. Children especially love all sorts of stories about this little people, so it’s worth figuring out how to draw a gnome for a child - he will probably like it.
Let's start with the face. Let's draw button eyes, a large nose and a mustache. We won't draw the mouth.
Then add a long curly beard, a cap and a perky smile.
Then we will draw a torso with a rounded tummy. Our character waves his hand, greeting someone, with his other hand behind his back.
The next stage will be the image of the legs in high, warm boots.
Now the drawing is completely ready.