What can be used as a motivating start to a lesson?
In order for preschoolers to better understand the signs and properties of the depicted objects, the teacher constantly works to help children understand the world around them. Without this, no drawing activity is possible. So, before inviting the children to draw mushrooms, the teacher conducts a lesson on this topic, where he talks in detail about what kind of living objects these are. Be sure to show pictures depicting all kinds of mushrooms, the teacher explains the difference between edible and poisonous ones. It is also good to touch on the topic of behavior in the forest.
As a motivating start to the lesson, it is possible to offer a fairy tale about mushrooms, of which there are a great many. For example, it is worth recalling the work of Russian folklore “The War of Mushrooms and Berries” adapted by V. Dahl or the famous fairy tale “Under the Mushroom” by V. Suteev. The children's task will be to draw their favorite episode from a fairy tale. By the way, this fairy tale can be played out in an interesting way: toy characters came to visit the children and asked them to help them hide from the rain - to draw a big mushroom where they could all take shelter.
In addition, we can recommend other, lesser-known literary works: E. Shim “The Brave Honey Mushroom”, N. Pavlova “Two Tales of Mushrooms”, A. Lopatina “Acquaintance with Mushrooms”, N. Sladkov “Amanita” and “Round Dance of Mushrooms” ", V. Zotov "Autumn Honey fungus". These literary fairy tales and stories touch on various issues, such as how the names of mushrooms came about, whether it is possible to grow mushrooms in the garden, and how beneficial mushrooms can turn into harmful ones. Many of these aspects can be played out in class and an interesting motivation can be created based on them. For example, tell that mushrooms grew near the road and became harmful (because they absorbed harmful exhaust gases), and the children’s task is to draw new, useful, environmentally friendly mushrooms that grow in the forest.
To develop speech and broaden the horizons of children, it is good to introduce them to signs and proverbs about mushrooms. For example, according to the superstition “Where there is a red fly agaric, there is a white mushroom sitting nearby”, you can create an entire composition (as an option “Where one butterfly was born, others fled side by side”).
fly agaric
There are not only edible mushrooms, but also those that cannot be eaten. One of these, the most popular, is fly agaric. Despite the fact that you can’t eat it, it has an attractive appearance, so now megamaster.info and I will tell you, using his example, how to draw mushrooms step by step.
Before you start drawing, you should know that fly agarics are very bright and you need not only to choose bright pencils, but also add a black gel pen and eraser to them. It is advisable to use watercolor pencils, which will highlight the beauty of the drawing. Now let's look at the steps:
- Determine the location where they will be located. Draw three outlines of future legs. We make the tallest one in the center.
- Add caps to the legs. Please note that their shape is different. For the mushroom, draw a circle on the left side and draw an arc on top of it. For the central fly agaric, draw a circle with wavy edges at the top and bottom. The last mushroom has a cap that resembles a russula.
- Let's add details. The legs of fly agarics are very interesting; they have folds that resemble a barrel. Some need to be placed in the center of the leg, the rest are placed at the bottom using several rows of wavy lines.
At this stage, add the plates in thin strips under the caps. - There are a few details left. These mushrooms have white dots on their caps. Draw them using different circles. Below you can draw low moss. We trace the drawing with a pen, wait until the ink dries and erase all the pencil lines.
- Using a gray pencil, shade the legs and the area with the plates. Leave some light space. Using a brown pencil you can deepen the shadows.
- Now let’s paint the caps with bright colors. We do this in three layers. The top will be orange, the edges will be burgundy, and the center will be red. Try to make transitions smooth.
All you have to do is paint over the moss, then our drawn mushrooms will be more realistic.
Drawing lesson notes
| Author's full name | Title of the abstract |
| Denisova G.A. | Drawing “Amanita” Educational objectives : learn to depict a fly agaric, drawing every detail: hat, leg, “skirt”. Developmental tasks : clarify ideas about mushrooms, the differences between poisonous and edible ones, consolidate the rules of behavior in the forest. Educational objectives : to cultivate interest and respect for nature. Integration of educational areas : “Artistic creativity”, “Cognition”, “Communication”, “Socialization”, “Health”. Demonstration material: pictures of mushrooms, photographs, samples of step-by-step images. Handouts: sheets of white paper according to the number of children, colored pencils. Progress of the lesson: A surprise moment - the appearance of Dunno, who asks the children a riddle: “Whoever has one leg, And even that one without a boot” (mushroom). The teacher reports that Dunno is going to the forest to pick mushrooms, but, unfortunately, he did not go to the nursery the garden doesn’t even know which mushrooms can be put in the basket and which ones cannot. The children are invited to help him - using the pictures they name the mushrooms and describe them. Particular attention is paid to the fly agaric; its cap and skirt with a long leg are discussed in detail. Dunno is given a riddle about the Fly Agaric: 1. He stood in the forest, no one took him, wearing a fashionable red hat, good for nothing. 2. On a distant forest edge, a bright mushroom stands sadly. Although he is nice in appearance, he is very poisonous. In order for Dunno to better understand what a fly agaric looks like, the teacher invites the children to draw it. Explains the drawing scheme (first the work is done with a simple pencil, then the hat is painted red, and the spots remain white). Finger gymnastics “Mushrooms” is carried out: |
Children, together with their teacher, draw the outline of a mushroom in the air. Independent activity of preschoolers. The result of the lesson - now Dunno can calmly go into the forest to pick mushrooms. Analysis of works.
Davydova S.A. Drawing “Fairy Mushroom” The work is also done with simple and colored pencils. The lesson begins with an introductory conversation about autumn, discussing various proverbs about mushrooms: “Spring is red with flowers, and autumn is red with mushrooms,” “A torn mushroom is lost forever, cut off at the root produces a bag of offspring,” “Not every mushroom is put in a box.” The teacher tells the children that fly agaric is poisonous only to humans, but for forest inhabitants it is very useful. The teacher also tells the children how the name of the mushroom can be used to guess its appearance. Next comes a small task for speech development - say the tongue twister “Grisha walked, walked, walked, found a porcini mushroom.” An interesting aspect of the lesson is gymnastics for the eyes: the children are asked to point with their eyes at a picture depicting a certain mushroom. Then the teacher invites the preschoolers to draw a fairy-tale fungus - one that no one has ever seen before, which can only exist in a fairy tale. Such a mushroom may have an unusual color or shape, it may have a human face, etc. – everything that the children’s imagination tells them. It is also suggested to think about the background of the drawing - it should not be white, because the mushroom does not grow on snow. Vasilyeva S. Drawing “There are many mushrooms in the autumn forest” (painting using the dipping method) The lesson begins with reading the poem “Autumn” by M. Evensen. To the music of Vivaldi, children and their teacher go for a walk in the autumn forest. They meet a squirrel there, to whom the children must tell what they know about mushrooms. And the motivation for productive activity is the story of the squirrel herself: she has grown only fly agarics in the forest, and she has absolutely nothing to store for the winter. The guys readily agree to help - to draw edible mushrooms for the squirrel so that it can collect them and be able to eat them in the winter. Children use white and brown paint to paint porcini mushrooms using the dipping method.How to draw a chanterelle mushroom
Now let’s look at a mushroom that differs in appearance from the rest. These will be chanterelles, they differ in their cap. Prepare the pencils and move on to the steps:
- First, we draw the contours of the future fox.
To make them beautiful, draw two auxiliary lines. One horizontal, the other vertical with a slight slope. - Add two forward slashes to the vertical line below. This is the base of the future leg. Now we pull upward lines from them, which will expand upward to create a shape similar to a bowl.
- To finish drawing the hat, you need to draw an elongated and uneven oval at the top. It should extend beyond the sides; it is better to use wavy lines to draw it.
- We erase the auxiliary elements. Please note, for example, under the cap of the mushroom there are stripes that are inclined in different directions. Add them to the drawing.
- As with the previous sketches, we recommend depicting a bunch of grass here. Draw it using triangles with the tops pointing to the sides.
- It's time to color the mushroom. Here you will need brown, orange and green pencils. Trace the outline of the drawing with a brown pencil. Lightly shade the mushroom with it. It is advisable to make the color more saturated on the sides. You can add a little orange color to the top of the leg. And the grass will need a green tint.
Here's how to draw mushrooms with a pencil step by step, but there are many other interesting lessons.
A drawing of a hedgehog will fit organically into the composition
Samples and explanation of the procedure for performing work on the specified topic in the senior group
Gouache drawing “Summer mushrooms” (photo 1). The teacher tints the base in advance. Children depict mushrooms and a snail.
Watercolor drawing on a white background (photo 2). Preschoolers first depict a family of boletus, and then complete the drawing with grass (the outline of the image is first worked out with a simple pencil, then painted with watercolors, the grass is drawn with the tip of a thin brush using abrupt lines).
The summer landscape is represented by boletuses of various sizes, grass, berries and a bee (photo 3). The drawing is interesting due to the combination of several techniques - colored pencils, paints, and felt-tip pens are used. First, the image is drawn with a simple pencil, then all the details are colored with colored pencils, the outline of the leaves is outlined with a green felt-tip pen, the blue and green background is made with watercolors.
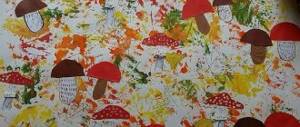
The original drawings “Honey mushrooms in a basket” (photo 4) and “Honey mushrooms” (photo 7) are drawings using the palm of the hand: the child traces his palm and completes the image with the help of details - the result is a whole family of mushrooms. Then the drawing is supplemented with the necessary background (basket, stump, sky, sun, etc.
In photo 6, the porcini mushroom is depicted using an unconventional technique - the use of cotton swabs: first, the outline of the object is depicted, which is then filled with imprints of cotton swabs.
Photo 8 “Under the Mushroom” is a children’s illustration to V. Suteev’s fairy tale “Under the Mushroom”. The image of a sparrow attracts attention, which, as in the previous drawings, was made using the palm of the child’s hand, which the child had previously dipped into paint. Raindrops are painted by applying the entire bristles of the brush.
Figures 5 and 9 are unusual - very kind and positive interpretations on the theme of fairy mushrooms. Photo 5 shows magic mushroom houses; near one of them there is a swing, also made of mushrooms. The drawing “Fairytale Family of Mushrooms” is very bright and colorful, made in gouache.
Porcini
Let's start with the simplest and most popular option. Let's try to figure out how to draw a porcini mushroom. Prepare a set of multi-colored pencils, an eraser and a simple pencil for sketching. Let's move on to the stages:
- Using a simple pencil, draw the outline of the mushroom.
We draw the hat in the form of a semicircle, and add an elongated oval-shaped leg from below. Try not to put pressure on the stylus. - To the right of the mushroom you can add another small one. After this, you can draw contours and detail. We draw an arc at the bottom of the cap. So, we will separate its top. Let's mark with a line the place where the leg begins.
- Draw the outline of a small mushroom nearby. Erase the auxiliary lines.
To make the mushrooms look beautiful and organic, add grass at the bottom. It may cover them slightly. On the left side we draw several thin stripes. - You can start coloring. Use brown pencils for the hats. Be sure to leave a light highlight on them. The legs can be shaded gray and the grass green. The area under the cap can be made yellow.
The drawing is ready, but in order not to leave a white background, you can shade it with a blue pencil.
You can also depict a tree in the background
Photo gallery of examples of finished works on the topic “Mushrooms”
gouache drawing
watercolor drawing on a white background
drawing with pencils, felt-tip pens and watercolors
palm drawing
drawing with colored pencils
drawing with cotton swabs
palm drawing
gouache drawing with palm painting elements
gouache drawing
Drawing of a landscape with mushrooms
So, we already know how to draw chanterelle, white and russula mushrooms. Let's combine our knowledge and try to create a picture with these forest mushrooms. You will need a liner, a simple pencil, a set of multi-colored pencils and an eraser. Let's start drawing:
- First we draw the contours of the legs of the mushrooms, placing them at a distance from each other. Make the one in the center the tallest. Let's bend the one on the right slightly.
- Schematically, using rectangles, we draw future hats. We start drawing with the leftmost porcini mushroom. We give it a rounded look from above and add plates at the bottom.
- Let's move on to the central one, this is a fox, here we draw the lower part of the cap and make it wider on one side. Add the top outlines and plates.
- What remains is the russula; its top resembles an elongated oval shape with a depression in the center. Decorate the porcini mushroom with a leaf on the cap and add the grass at the same stage.
- Outline the contours of the resulting picture with a liner and erase the pencil.
We start coloring with a white mushroom. For his cap we use dark brown color. For brightness, you can use orange. Shade the leaf on the cap. - Let's move on to the fox. Here you will need brown, orange and yellow shades. Don't forget to highlight shadows and highlights. For the last mushroom cap, use the same pencils. For the legs of all three you will need a regular gray color. There is no need to heavily tint these parts.
At the final stage, all you have to do is paint the grass green. In the picture you see real forest mushrooms, which are easy to draw. Children will even enjoy coloring these pictures. And by depicting the picture in a smaller version, you can complement it with a drawing of a hare or a bear.