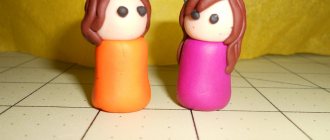
Plasticineography - what is it?
Plasticineography is a relatively recently emerged non-traditional art technique.
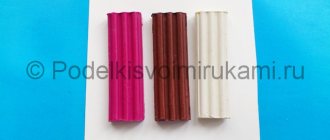
As the name implies, the image in this technique is obtained using plasticine. Plasticineography is drawing with plasticine. Such designs can be almost flat or convex, semi-volume, or embossed.
Cardboard or plastic is most often used as a base, less often paper.
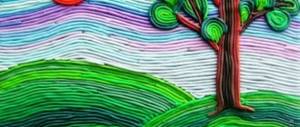
On a base made of transparent plastic, one of the varieties of this technique is obtained - reverse applique (example: a craft using the technique of reverse applique with plasticine - a maple leaf).
To practice plasticineography with kids, it is better to take a simple silhouette of something, a contour with smooth lines. The baby needs to smear the plasticine inside this outline.
With older children, the plots can be more complex.
Depending on the method of applying plasticine, the image created by it will have a different texture. Plasticine can be glued in pieces, flagella, balls, or you can simply smear it until an almost uniform flat surface is obtained.
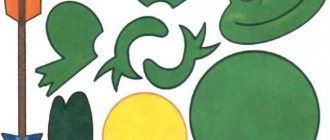
Craft “Underwater world and sea inhabitants”. Plasticine drawing on cardboard
Description of production (master class)
- On blue, blue or purple cardboard, draw the outlines of algae, stones and various sea creatures. These could be fish, starfish, seahorses, octopuses, jellyfish, crabs, mollusks, etc. For kids, one outline will be enough, for example, you can make a “starfish” craft, or a “fish” craft, or a “seahorse” craft.
- Fill the contours with plasticine of different colors.
- If desired, you can decorate the figures of sea creatures with beads. To do this, you need to take a pinch of beads and press it onto the plasticine, then again, etc.
I also suggest looking at other articles about crafts with fish (fish made from strips of paper or ribbons, from salt dough, from a Kinder Surprise container, or using the openwork paper cutting technique) or an article about a sea turtle - a craft made from a nut shell.
Happy creativity! Especially for readers of the blog “MORE creative ideas for children” (https://moreidey.ru), with sincere respect, Yulia Sherstyuk
All the best! If the site materials were useful to you, please share a link to them on social networks - you will greatly help the development of the site. Posting site materials (images and text) on other resources without the written permission of the author is prohibited and punishable by law .
Check out other interesting articles:
- Summer sea crafts: simple flat boat - origami
- Autumn leaves made of plasticine
- Autumn craft (reverse applique from plasticine)
- Braided fish made from strips of paper or ribbons
- At sea - a voluminous summer craft
- Rocket in space - a children's craft made from cereals and plasticine
- Decorating jars with plasticine and seeds
- Crafts from watermelon seeds and plasticine
- Crafts made from nut shells: turtles (sea and land)
- Our planet - painting with salt
- Crafts from Kinder surprises: tank
- Craft “Flower - multi-colored” (torn applique)
Abstract of a technology lesson on the topic 'Aquarium'
Lesson on the topic: Project: “Aquarium”. Product “Aquarium with fish”
The purpose of the lesson: to introduce students to the algorithm for performing work, to teach composition. Continue to develop skills in working with paper; develop skills in project activities under the guidance of a teacher.
Tasks:
Educational:
- Practicing paper folding skills.
- Learn to create a collective picture
Educational:
- Development of memory, attention, fine motor skills
Educational:
- Fostering a culture of communication
- Independence, self-confidence
- Foster an ecological culture, a sense of respect for the surrounding nature and wildlife.
Universal learning activities:
1. Personal UUD:
inclusion of students in activities at a personally significant level,
the formation of a positive attitude and interest in creative transformative subject-practical activities;
2. Regulatory UUD
The student learns:
plan upcoming practical work, correlate your actions with the goal;
follow the teacher’s instructions when performing work, be guided by the rules when performing work;
carry out self-monitoring of practical actions performed, adjusting the progress of practical work.
3. Cognitive UUD
The student learns: Cognitive: analyze a product according to given criteria, convert information from one form to another, compose answers to questions. Be able to navigate your knowledge system; analyze objects; find answers to questions in illustrations; transform information from one form to another: compose answers to questions (Cognitive UUD).
understand the features of project activities,
put forward a simple project idea in accordance with the goal,
mentally create a constructive plan, select means and methods for its practical implementation,
to defend the product of project activity with reasoning
4. Communicative UUD
The student learns:
formulate your own opinions and ideas, present them in a reasoned manner;
listen to the opinions and ideas of comrades, take them into account when organizing your own activities and teamwork;
comment and evaluate the achievements of comrades in a friendly manner, express to them your suggestions and wishes;
show an interested attitude towards the activities of their comrades and the results of their work.
Basic concepts and terms: Aquarium, origami, fold, cut
Equipment and resources:
The teacher has: product samples, presentation, sun ball, drawings of kittens.
Students: colored paper, aquarium background, scissors, glue, markers, evaluation sheets
Methods and forms of work:
- group form of work;
- individual form of work;
- compare and contrast method;
- a method of visually demonstrating techniques for working with paints and paper using the origami technique;
- an illustrative method of explaining new material;
- problem-search method;
- During the classes
1. Organizational moment.
Teacher: Good morning guys. Today, near the school, I met the sun, which came to visit us. But the sun is not simple, but magical. Whoever takes it in his hands will become the most affectionate and kind (We pass the balloon - the sun, saying a kind word to each other). It's true, we have become the kindest and most affectionate.
“You’ll find out who you will be in class today if you guess the riddle.”
She is the first one to enter the house
And lives in it for a long time
Sometimes he meows, sometimes he plays,
It disappears somewhere. Children: cat
(Slide 2) -Who will you be in class? (Kittens)
Teacher: all cats are different, they differ in the color of their fur, eyes, and character. Who do cats like to hunt? What do they eat? (children's expected answers).
Teacher: the kittens are taught by their mother, a cat. Do you want to know how she teaches her kittens? Then we turn into: I become a mother cat, and you become my obedient, smart kittens.
2.Updating knowledge
(Slide 3) Kittens guess my riddle:
There is a glass vessel on the chest of drawers. Snails and fish live in the vessel. But don’t catch fish from there! Just look at the beautiful fish. ( Aquarium)
— All cats love to watch fish in the aquarium, how they swim and dive. (Illustrations) The guys look at the drawings. ( On the desk)
(Slide 4,5,6) Guys, tell me a little about the aquarium and aquarium fish, how do you understand the word “aquarium”? What types of aquarium fish are there? Children's answers: decorative, small fish that require care, feeding, etc. Who has aquarium fish at home? Have you noticed their color, structure, and manner of movement? If some of you haven’t looked closely until today, I advise you to watch them.
(Slide 7-13) -What do you see there? (water, fish, etc.). Right. The most important thing in an aquarium is water, without which living fish cannot exist. Aquarium fish are the most unpretentious animals: fish do not need to be walked outside, they do not litter in the apartment, do not rattle, do not shed, fish do not cause allergic reactions and do not bite. The aquarium and its inhabitants calm, relax and help you relax. 3. Studying new material (Able to acquire new knowledge: find answers to questions using additional literature, their life experience and information received in the lesson; independently identify and formulate a cognitive goal (Cognitive UUD)) I think you, of course, guessed it what we will do in class today. (children's answers)
Teacher: Yes, we have to do a project called “Aquarium with fish.” My kittens have very skillful paws. They can do a lot, and this is what they will show in today’s lesson.
There is a country of paper technology, it is called origami. And you and I will go there. Do kittens know what origami is? (folding paper crafts) Timur's message.
Teacher: What country did this art come from? ( from Japan)
-What goals do you set for yourself?
3. Physical exercise The kittens woke up (the children are squatting, sleeping),
Sweetly stretched (stand on their feet, arms to the sides),
stood on their toes (stand on their toes),
Raise your paws up (raise your arms up).
They saw the fish, ran to the fish - 2 times (children run in a circle),
Jump, jump, jump (jump)
They didn't catch me! (spread their arms to the sides).
4. Practical work. Work on a project (Cognitive UUD: be able to pronounce the sequence of actions in a lesson, answer questions)
Teacher: Now let’s start working on the project.
Let's answer the questions of the young technologist:
1.what will I do? Answer: (fish for the aquarium);
2.What materials and tools will be needed for the work? (colored paper, glue, a sheet of aquarium paper, pencils, scissors).
3.How to get the job done? (using origami technique)
4. What will I do first, and what then? (we will organize a workplace, prepare materials, We will work in pairs, and then in a group, we will complete the fish, we will prepare the work, we will present the work).
— Before we get started, let's talk about safety rules during the lesson with scissors and other sharp objects. How to work with glue.
— Don’t forget the rule: help each other, keep your desk clean.
Teacher: So, let's start practical work.
The work is performed according to oral instructions and demonstration by the teacher. We create it on whatman paper or half a paper. Using paints we will depict objects and plants. The procedure for making fish:
1. Take a colored square and bend it diagonally. 2. Fold the square in half and crease all the folds well. 3. From the resulting workpiece we get a base - a triangle. 4. Using a simple pencil, we bring our workpiece to the end: we draw the eyes (on both sides), the tail and fins. 5. The shape of the tail and fins may be different. Now we take scissors and cut off the extra elements along the drawn line. 6. Glue the fish.
We use a felt-tip pen to decorate the scales of the fish.
- Now guys, you need to finish the fish yourself and make one or more.
Children work independently, show imagination and creativity (music sounds).
Whoever makes the fish faster and better glues it to a common large aquarium that hangs on the board (team work).
To make small fish yourself, use the remaining piece of paper.
Glue the fish into the aquarium. How many beautiful fish are in our aquarium! They are all so bright and colorful. We will admire them.
5. Reflection. (Self-assessment of own activities)
Are you satisfied with your work in class?
If you are very happy, raise your two hands and clasp them together in a handshake.
If you're happy, raise both hands.
If you're not very happy, raise one hand.
2. Evaluation of the student’s creative product:
“I completed the task completely on my own.”
“I couldn’t complete the task the way I wanted. I need to. I did the task well, but they helped me...”
“What did I learn?”, “What did I achieve?”, “What did I do?”, “What didn’t work for me before, but now I can?”, “Who did I help?”
Result: The result of the lesson is the defense of the project; students make a presentation of their work with a story about each component of the work.
-You have learned a lot today. What did we do? What did you like?
(children's expected answers).
Everyone deserves praise, thanks for the lesson.