Beautiful and simple Mushroom applique. Templates can be obtained for free. Details in my post here.
Judging by the ratings, science fiction and space themes remain at the peak of popularity. Children and adults avidly read, watch and even come up with something themselves. So you and I will also come up with, or rather, design crafts on the theme of space with our own hands . And as always, I offer options, and you can add your own ideas to the assembly!
Paper crafts for Cosmonautics Day
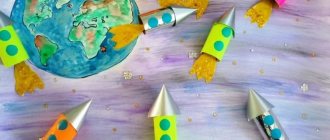
Although paper crafts are simple , working on them is no less fun. Let me introduce you to this option.
How to do it:
- Cut out stars, a round planet and 2 rockets from paper. There are 2 pieces for each model to give the structure strength and small volume.
- Please note that the rockets and planet have their own decoration. You don't have to stick to exactly the same design. You can decorate your rockets in your own way.
- 2 parts of the mini-structure are fixed to the bamboo stick on its two sides.
- Now we need a bucket (can be from popcorn or ice cream.
- Using polyurethane foam we will fix our cosmic “landscape”.
I give you the templates. You can print the templates for coloring or circle them on the screen, or you can print ready-made, colored ones. Don't forget that you need to print in 2 copies.
star pattern with face
simple star with rim
yellow sparkling star
five pointed star
stars for coloring
rocket and stars for coloring
rocket with astronauts, stars, planets
ready red rocket
rocket ready for printing
rocket template blue
rocket template green
rocket template
3 rockets
bright rocket
boy on a rocket - coloring page rocket template - coloring page
astronaut - applique rocket - applique
ready rocket
rocket template - coloring book
You can use colored or white paper so that the child himself can draw portholes and stick his photo in them, as if he is now rushing to the stars!
By the way, the stars can be made voluminous, as we did earlier in the link.
How to make a paper rocket that flies
Not only boys, but also girls will love this type of entertainment. For this task you will need:
- paper;
- adhesive tape or electrical tape;
- scissors;
- ballpoint pen or cocktail tube;
- glue gun (PVA glue takes a very long time to dry).
Stages of work:
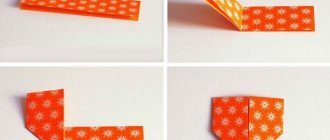
- A sheet of paper needs to be cut into 2 halves, about 5 cm wide.
- If you have a cocktail straw, use it. You can also take a disassembled ballpoint pen.
- A piece of electrical tape must be attached to one of the prepared halves. By wrapping a piece of electrical tape around the handle, you get a rocket body.
- Screw the entire piece of paper onto the handle, securing it with adhesive tape. After this, the base can be freely removed from the body. Trim uneven areas with scissors.
- Cover one side of the case with electrical tape or duct tape.
- Prepare 3 pieces of adhesive tape. From them you need to make stabilizers for the rocket (tail fins).
- To make the tail fin, you need to fold one piece of tape, without gluing it completely, cut the tape with scissors at an angle of 45 degrees. The result is a triangular stabilizer shape. You need to make 3 fins.
- Using sticky pieces of tape, the tail fins are attached to the base of the rocket. They must be glued at the same distance around the base.
- Make a cone from the second half of the paper, which is attached to the body.
- Cut off the excess part of the nose and cover the cone with adhesive tape.
- Fill the cone 3/4 full with glue, and insert the sealed part of the rocket body into the cone with glue. Wait until the parts stick together.
To launch, you will need a cocktail straw or a disassembled ballpoint pen (inserted into the rocket body). Holding it with both hands, you need to blow hard. For higher flight, use a pump.
Space structures made of plasticine
See what original shaker jars you can make, the so-called snow globe (follow the link for our detailed master class). Remember in American movies they give one like this on holidays. You shake it and snow slowly swirls in it, in our case sparkling stars.
- From plasticine or polymer clay (this option is more reliable) we make planets of different colors and sizes.
- Using a glue gun and wire or fishing line (but then they will dangle when you shake the ball), we attach the planets to the lid of the jar.
- Fill the jar with a mixture of glycerin and water in equal proportions. Glycerin can be purchased at a pharmacy. The more glycerin, the slower the glitter settles and the longer it swirls and sparkles.
- Add sparkles - “star dust”.
- Screw on the lid and turn the jar over.
With this jar it's easy to make a meteor shower!
Painting on cardboard “Space flight”
The process of making a picture on cardboard is reminiscent of appliqué. The details of the craft are similarly made separately, and then they are assembled into a complete work.
In order to make a plasticine picture, you should prepare:
- a sheet of thick cardboard;
- contour coloring printed on a printer on a space theme (rocket, planets, stars, etc.);
- set of wax plasticine;
- stacks;
- colored sand;
- photo frame (optional).
Step by step description
- Take a printed sheet depicting space paraphernalia and paste it onto cardboard. You can use the proposed option, or you can find space-themed coloring books on the Internet or draw them yourself.
- Using a stack, separate small pieces from a piece of plasticine, knead them with your fingers and carefully apply them to the picture, trying not to go beyond the contours. While working, distribute the pieces of plasticine evenly on the surface, stretching with your fingertips.
- First fill in the large elements and details of the picture with multi-colored plasticine: the rocket, large planets.
- For small planets, roll small multi-colored balls, attach them to the coloring sheet and flatten them. For wavy lines, roll the flagella, apply them to the contours and flatten them with your fingers.
- Once all the individual details are filled in, apply the blue background. To do this, pinch off blue plasticine from a block of blue plasticine in small pieces and apply it to the base of the picture. Using a little pressure, smear the plasticine, avoiding the appearance of white spots and avoiding the planets and the rocket.
- For the milky way, apply and smear white plasticine onto the base.
- To create a stardust effect, sprinkle a plasticine painting with colored sand.
- If desired, place the Space Flight painting in a frame.
Creative work will fit perfectly into the interior of a children's room.
What can be made from Lego
Lego sets contain a surprising number of tips for the creative development of little ones. You can also use individual characters from the set. For example, let's send Lego heroes to a distant planet.
Author of the idea
A space tray or a sensory box or an anti-stress sandbox that all children will immediately want to play with, your craft will definitely become the most popular and win the competition!
- We color the sand or sugar using simple paint or chalk ground into flour. You can add sparkles, crumble activated carbon (for black inclusions), because this is space! It would be cool to take kinetic sand with glitter or plain sand.
We color with liquid food coloring. This is the easiest way - just drip and mix. You can get different colors quickly and easily. By the way, the sand on our planet can be made colored.
- Let's take any box and fill it with this sand. This is an alien planet or just space in which planets and the sun will be located.
You can make black or blue sand. Place stones with planets, lego astronauts, ships. The circles in which the planets move can be indicated by sand of a contrasting color. Then it will also be a training box. So the solar system is ready.
- You can build mountains or scatter stones, or build any three-dimensional structures. Draw or stick paper planets on the stones and cover the top with PVA glue or clear varnish so that the paper does not lose its appearance. And here are the templates:
planets for coloring
solar system for stone placement idea
planets for cutting
planets for cutting
planets for cutting
- And now we send our space travelers to explore this planet. You can take small spaceships, minirobots and more.
For example, here are the mini-robots that Olezhka gave me for my birthday; a little later I’ll post a video on our channel of how I made Valli and Eva:
Interestingly, such a tray can easily be supplemented or even changed if desired.
How to make a Rocket applique from colored paper (2 options + photo)
The simplest paper rocket step by step. Required materials and tools:
- colored paper of different shades;
- scissors;
- pencil;
- PVA glue.
Stages of work:
- You should take blue paper and cut a strip 10cm*2cm
- The strip on one side needs to be made sharp.
- Using red construction paper, make a nose and wings. To do this, you need to attach the blue strip to the red paper and trace it with a pencil.
- Glue the parts to the back of the blue strip.
- Cut out circles in the shape of portholes and glue them at equal distances to the blue strip.
- Cut out flames at the bottom using orange or yellow paper. Glue them together, placing them on top of each other.
- Glue the fire to the base of the rocket.
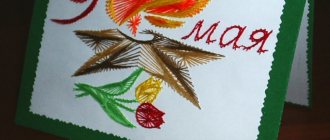
You can also make a three-dimensional applique postcard.
For work you will need the following items:
- colored paper (blue, cyan, white, silver);
- a sheet of cardboard for the background (blue, black, with a picture of space);
- scissors (regular or curly);
- glue;
- pencil;
- compass.
Stages of work:
- For a three-dimensional postcard, you should use the Origami technique. You can use any scheme that the child can complete.
- On white, blue, light blue paper, draw 3 circles of the same diameter using a compass. Fold white and blue in half, make cuts using curly scissors. You can also draw lines with a pencil and cut along the contour with ordinary scissors.
- A blue circle is glued onto a background sheet of cardboard - this is the Earth. Cut out circles are attached to it one by one, imitating the view from space.
- Having coated the wings of the rocket, you can glue it to the background.
- Cut out stars from silver paper and add to the card. You can use stickers.
Making from cardboard
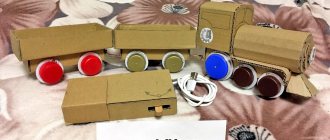
Have you ever been given gifts in very cute little boxes? These could be cakes, cups, books. And now the time has come to pack these gifts. We will make a robot out of cardboard boxes.
How we will make:
- Our robot is made of metal. We will show this now: we wrap the boxes with foil.
- We cut toilet paper rolls to size: one piece for the neck, two pieces for the legs.
- We glue or paint the blanks.
- We fold the paper with a spring; see how to do this in the video. You need 2 of these parts. These are hands.
- We cover the edges of the “hand” with foil.
- We paste over a larger box with small parts - circles, rectangles, as if these were buttons on the robot’s body. We make holes.
- Draw a smile on the head and glue button eyes.
- We assemble the structure.
The final touch will be the wire antennas. Here they are made with a heart. You can twist small loops or glue stars. More options:
Crafts from waste material
Here's a robot made from bottles . It looks very complicated, as if everything was created somewhere out there, by designers at a large factory. And no one will guess that it is homemade!
Now let's take a closer look at the robot:
- The frame consists of a durable bottle. Its bottom is at the bottom, and its neck is at the top.
- Several rows of corks are attached to the sides of the bottle.
- The head and legs are also made of corks of different sizes. To make the legs and arms movable, we thread a wire through the plugs. Holes can be made with a drill or a hot screwdriver. Dad will help.
And again! It is not important to adhere to the same order of cork combinations. Your robot has the right to be different and unique. The important point is the combination of one or two colors. Then the installation will look like a single structure.
And from disks you can make windows in a spaceship or flying saucers themselves, if you glue a ball of foil and a couple of antennas. And if you add covers, bolts, and paint everything with silver spray, you get a space station or satellite.
How to make masks and outfits to create images of animals?
If you don’t have much time or materials, then instead of making animal costumes, you can dress your child in the color scheme of the animal he represents. A felt mask will help complete the look.
If you need to make a character's outfit, then you can make an outfit in a short period of time.
Turtle costume
The outfit of this reptile was presented above. To recreate it you will need:
- green sweatshirt;
- yellow jacket or pullover;
- light green raincoat fabric;
- a piece of white and black fabric;
- green gloves.
For a sweatshirt, you only need the hood and sleeves.
If you don’t have green gloves, then sew them from scraps of a sweatshirt. The triangle of fabric from it will turn into the tail of an animal. To make a shell, cut out an oval from light green raincoat fabric, sew dark green braid here or glue tape or tape of the same color. You can simply draw these designs on the shell with a marker.
Cut the yellow jacket at the back. Make the edges semicircular. Sew the yellow jacket to the shell from the shoulders to the bottom of the armpits. On top, sew the hood of a sweatshirt, cut on the forehead with a “nose”, to these parts. Glue or sew here the eyes from white fabric, the pupils from black. Dark trousers and boots will complete the picture.
Polar bear costume
To make a polar bear costume, cut and sew a vest for a child from faux fur of the same color. From the same material, create shorts, a mask that can only cover the area around the eyes or be worn on the head.
How to make a monkey costume?
- Faux fur, but brown, will also help you make it quickly. Sewing a vest for a child is not difficult. If you don’t have this item of clothing, then take your favorite child’s shirt, tuck the sleeves in, open 3 pieces, attaching the shirt to the fabric. This is 2 sticks 1 back.
- Sew these blanks on the shoulders and sides, sew on the lining. Shorts are made in the same way. You can use the child’s shorts or his trousers as a pattern for them.
- From the remaining fur, sew a tail for this character and a hat. You can make a mask from felt.
- If you have a Panama hat of a suitable color, then sew monkey ears and light eyebrows onto it.
The way out is brown face painting, which is applied to the child’s face to temporarily make him look like this animal.
If your mother or grandmother knows how to knit, then you need to braid a hoop with thread and cast on the required number of loops. The ears are crocheted separately from beige and brown yarn and sewn onto this base.
If you don’t know how to knit, but can sew two round blanks from fur, then sew them onto a hoop and you will have a wonderful mask for a monkey costume.
If you need to make a monkey mask, then enlarge the following photo to the size of the child's face. Place the paper template on the cardboard and cut out the mask according to it.
Make holes on both sides here for threading the elastic.
To secure the holes where the elastic band on the mask will be tied, pre-glue it on the back and front sides with tape.
Tie the elastic band into place, after which you need to paint the product and begin creating the next monkey accessory. This is the tail. To do it, take:
- thick wire;
- stocking;
- textile.
Wrap the wire several times with a cloth. Place a stocking on this blank and twist the resulting parts into the shape of a monkey's tail.
It is put on the child's waist using a belt or a strip of brown fabric.
You can also use an elastic band, and make a mask from a hoop and fabric.
Here's how to make a monkey costume, and if you need a dolphin outfit, check out the options for making such an outfit.
Do the following if you have:
- blue suit for boy;
- soft toy dolphin;
- Velcro;
- blue fabric.
Sew a helmet-type hat from blue fabric, and sew a soft dolphin toy to it. A blue suit will be complemented by a matching bow tie and a silver shirt.
Silver and blue fabric will also make a good robe for a sea dweller.
For a girl, you can sew a dolphin costume from blue fabric with sparkles, like a jumpsuit, and sew long ruffles made of blue satin onto the trousers at the bottom.
All these characters will help children perform a performance on the theme “Our house? Planet Earth”, it’s good to perform at the matinee. If you still have questions about how to sew a monkey costume, then watch the video. It shows how to make a mask of this animal. If you would like to see how to make a globe, this is covered in the following video. You can make a small prototype of the Earth from an ordinary plastic bottle.
Solar system for kindergarten
I liked how you could design the solar system with the kids. This is useful, because we will introduce the tough ones to each of the planets, show the mysterious space and what place the Sun occupies in our lives and what it is. At that moment we will engage in creative work. After all, all toddlers are interested in decorating, collecting, and generally spending time profitably.
How to assemble a layout:
- We make 3 walls from cardboard: 2 side walls and one base. It is convenient to glue with hot glue or instant. You can also use tape.
- Paint all 3 walls dark blue. Kids can complete the drawing of “shooting stars”: asteroids and meteorites. Or just print the templates above and stick them on. You can even stick on a rocket and a couple of astronauts.
- Planets are made from round foam plastic blanks of different sizes or from plasticine (preferably air-hardening, since it is lighter and also hardens). You can roll up balls from foil or toilet paper, coating the layers with PVA.
- All blanks are painted to match the color of the planets of the solar system.
- Let's not forget about the rings of Saturn. We make them from cardboard.
- For the orbits you will need stiff wire. We thread it into the “planets” and place them all in their own order, fixing the wire to the base.
More options:
An extraordinary approach to creating a gastronomic panorama of the Sun, planets and stars. It will be interesting for little ones to make such a picture using star candies and fruits/berries as planets. And then eat it all! And the huge Jupiter, and the “candy-star cluster” on the outskirts of our “Universe”. This way the child will quickly remember the order of the planets.
Here is an application option. Paint the sheet blue or black. You can spray it with a brush with liquid white paint - this is dust, stars... Then we draw circles and glue the planets (you can print them out, which I gave above, or you can draw them yourself).
How to draw planets - pictures enlarge by clicking:
DIY children's crafts for Cosmonautics Day
Introduce your child to the structure of the solar system, show the starry sky and give him the freedom to reveal his imagination and talents. Kids love everything non-standard and unusual, so they often like to play aliens.
Therefore, they will find it interesting to make a craft with their own hands for Cosmonautics Day in the form of a UFO.
Materials:
- 2 paper plates
- Glue
- Colored rhinestones
- Silver paint
- Newspaper
- Styrofoam cup
Paint the outer parts of the plates with silver paint. To make the future craft heavier and give it stability, you need to fill the insides of the UFO with something - take a newspaper and roll it into a tube. Glue to one plate inside.
You need to glue two plates together.
Next, you need to cut the foam cup into two parts. Glue this half of the cup on top of the plates and decorate with rhinestones.
Along the perimeter of the plates, you also need to attach rhinestones at the same distance.
Together with parents or a teacher, any child can do such work in a short time.
A flying saucer can be made in other ways.