For many people, both adults and children, the world of paper and cardboard creativity offers ample opportunities to realize their ideas.
If you need to bring a composition to a thematic lesson, exhibition, competition at school, or you simply want to please your loved ones with an original homemade product, then a DIY paper and cardboard rocket for children will be an excellent solution to the task. It can be performed using any of the techniques presented below, each of which involves the use of a specific set of tools, consumables and accessories to decorate your creation. Here you will definitely find a suitable craft for Cosmonautics Day, for kindergarten and school. In addition to making a rocket, you and your child can learn the poems for Cosmonautics Day, which we posted here earlier.
Paper and cardboard rocket for children with templates
Using a sample, you can make a beautiful model without extra effort and in a short time. To ensure that within a quarter of an hour there is a rocket on your table that can impress a schoolchild or preschooler, you need to follow the instructions exactly and prepare in advance:
- colored paper;
- PVA glue;
- black cardboard;
- pencil, ruler, scissors.
The instructions offered for children can be used in a labor lesson at school or in a creative activity in kindergarten. If you need to complete your homework on creating a model of a rocket, then the option presented below is also suitable for execution - the finished space composition will definitely be favorably assessed by the teacher.
Step-by-step production of an interstellar ship:
- Decide on the color of a sheet of colored paper for the base. It should be bright and attractive, such as purple.
- Twist a pipe from the prepared rectangle. Glue the edges.
- Start making the top. Using a jar, compass, or anything round, draw the appropriate shape on the yellow piece of paper. Cut out and then cut the resulting circle in half.
- Use red construction paper to cut out the strip. Connect it to a sleeve that acts as a base.
- Twist a cone from the finished semicircle. Glue the outlines together to secure the shape.
- Glue the cone to the red rim.
- Create a porthole to view the Earth from space. Make a circle of a different shade or attach your photograph to the yellow tube.
- Decorate the bottom of the ship. Using blue paper, cut out 3 semicircles.
- Roll each piece into a cone, sealing the edges.
- Attach three blanks to the pipe along the diameter.
- Prepare the takeoff/landing area. Glue a circle (yellow or white to choose from) onto the black square.
Having made a launch pad, it can be used for successful flights and landings of both the manufactured rocket and similar models.
Craft applique paper rocket + templates and diagrams for printing and gluing
Up to this point, there have been many volumetric rockets, but now let’s look at flat ones. You can decorate any stand newspaper with these or simply bring them to a competition.
Take ready-made stencils, trace them on colored paper and glue them to the workpiece.
But the background can be painted with gouache paint.
As a result, you will get a rocket like this, follow these step-by-step instructions.
As soon as you complete this craft, glue it to the background.
You can also assemble a spacecraft from geometric shapes (triangles, circles and squares). Catch patterns:
Or use this template.
Here are a few more stencils, choose and create children's masterpieces.
Applique paper rocket with diagrams and templates for children (need to be printed, cut and glued)
Another easy paper rocket craft can be made for kindergarten or school. It’s not difficult to make; even a preschooler can do it. Below I will add templates and diagrams of the rocket that you will need to print, cut and glue.
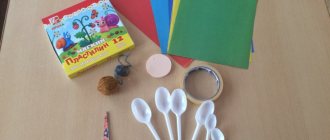
To make a rocket we will need:
- colored paper
- scissors
- pencil
- PVA glue
Step-by-step instruction:
- To begin, cut out a strip from blue paper
- We sharpen one end of the resulting rectangle, as can be seen in the photo below - this will be the rocket body
- From a red sheet we cut out the wings and nose of the future rocket.
- Glue the red parts (nose and wings) to the rocket body
- We cut out small circles from red sheets - these are portholes and glue them to the rocket
- The final step is to cut out the flame for the rocket from three colors - yellow, orange and red
- We glue the resulting flame parts together, placing one on top of the other.
- All that remains is to glue the flame to the rocket body. That's all, our paper rocket craft is ready, you can launch it into space.
Below, as promised, I post diagrams and templates for making a rocket from paper and cardboard:
Games
A rocket made of geometric shapes can be used in children's games and competitions. Children love this space object, which is associated with travel and something unknown. For example, you can make a rocket template out of geometric shapes for your son's birthday. Guests can color it or make a collective applique as a souvenir for the birthday person.
Step-by-step master class: paper rocket using origami technique
If you want to take the craft to a kindergarten, craft it with a child aged 3-4 years, then this is very easy to do with the help of lightweight double-sided cardboard. To make it interesting for your child, use colored material.
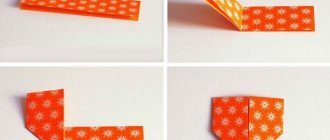
Perform all actions step by step:
- Cut out a square. Fold the workpiece in half and unfold. Bring the two opposite edges to the middle, where they touch, and then unfold the sheet - you should get three vertical folds. Now fold the workpiece so that a diagonal fold strip is formed and unfold the sheet.
- Fold the top two corners towards the middle.
- Two centimeters from the center of the top edge, fold the right side of the leaf towards the middle and turn the part back out.
- Repeat the above step on the left side of the piece and then flip the piece over.
To decorate origami, you can make an applique - glue a raging flame, observation windows, and even place a passenger in one of the windows.
Origami rocket that flies from home to the moon
Of course, it is impossible to create such a rocket, but many people dream of such a toy). Let's try to create one too.
Take a square shaped piece of paper.
Then make bends, first on one side, then on the other. That is, bend it on both sides, making a triangle.
After that, unfold the sheet again and simply fold it in half, thus creating the necessary lines.
Now make a “frog”, as this figure is called in origami.
It will look like a triangle.
Then fold one of the corners towards the middle.
Next, fold the bottom corner of this resulting figure towards the center.
Now unfold what you have outlined and fold it this way.
You will get the following fold lines.
Continue to the next step, extend the corner.
And then push it down.
Do the same work with all other corners. It turned out to be “4 legs”.
And then fold one “leg” towards the middle.
Now on the other side, so all the “legs”.
Here's what you'll get again: lift them up a little with your hands.
Now all that remains is to deploy the rocket, blow into the base or carefully level the inside with a simple pencil.
Source
Next, you can take a juice straw and blow as hard as you can, the rocket will fly around the house.
You can watch a similar master class in this video if you have any questions.
Well, now let's look at lighter circuits. Only these kind of rockets definitely won’t fly to the Moon).
In addition, there is also modular origami, using this technique you can also make a craft in the shape of a rocket.
How to make a rocket out of a toilet paper roll for kids
To make a craft, you will need to take three cardboard rolls left over from using toilet paper, colored and silver tape. The standard scheme for creating a rocket is as follows:
- The tubes are secured with colored adhesive tape.
- The uncovered surface is covered with silver tape - the body is ready.
- Cut out two triangles. This is how the wings of a spaceship are created from cardboard.
- Decorate the prepared elements with silver tape.
- The workpieces are cut to the middle along the long side of the triangle, located at 90° relative to the other side.
- Make two parallel cuts at one end of the silver pipe.
- Insert the wings into the body with a notch in the notch.
The final step is to glue the red fabric or paper strips inside the cone. They will simulate flames escaping from a rocket.
So another rocket made from scrap materials (toilet paper rolls) is ready. Below you can see another option for making a rocket out of cardboard.
Schemes and stencils for creativity “Making a rocket”
Applique of geometric basic shapes is a simple and very useful creativity. Such activities develop motor skills, teach concentration and develop imagination. Making a rocket from geometric shapes is not difficult if you carefully study the information and follow the step-by-step guide presented below.
Crafts for Cosmonautics Day: paper and cardboard rockets for kindergarten and school
Below I will publish some interesting ideas for crafts for Cosmonautics Day, which comes on April 12. All of the listed crafts can be made independently with your child for kindergarten and school. After this, I will continue to publish step-by-step master classes on how else you can make rockets with children.
For what activities and purposes may an image of a rocket be required?
Children's clubs, kindergartens and schools often host classes dedicated to space and the solar system, in particular. It is useful for children to learn about the structure of the world, the planet, and the Universe. Also, space is always remembered on Cosmonautics Day. This is a great opportunity to introduce children to astronauts, their stories and biography. As a creative task, it is often proposed to depict space or something related to it. What exactly a child can do should be chosen based on his age and skills. For example, even a preschool child can make a rocket out of geometric shapes. More complex art work should be left for school.
How to make a craft rocket out of corrugated cardboard for February 23 and Cosmonautics Day
At thematic exhibitions dedicated to special occasions, models made of corrugated cardboard always attract attention and arouse interest. Together with your child you can make a three-dimensional rocket. The kid will certainly be happy to join in the process and will delight you with his diligence.
A rocket is made from cardboard as follows:
- Strips 15-20 mm wide are prepared (cut from corrugated cardboard).
- The rocket body is being made. Pipes of 10 strips are twisted. The blanks are fixed with glue.
- The finished rolls are shaped into a cone by pressing the middle part inward.
- A circle is rolled up from a pair of strips 4 cm wide. Its diameter should correspond to the diameter of the cone.
- Turbines are made from strips 15 mm wide. 5 strips are used to roll the roll. You need to make only 6 copies - white and orange in equal quantities. They are glued together.
- Cones are formed from three white blanks.
- The hull of a spacecraft is assembled by gluing parts together. A white stripe is used to mask the joints.
- The portholes are glued. Turbines, white and orange, glued together are also attached to the body.
Such a craft for Cosmonautics Day - April 12 or for Defender of the Fatherland Day can last for many years. You don’t have to worry at all that it will break or become deformed. Even if your baby gets enough of playing with a cardboard rocket, it will definitely take pride of place in your home interior - on a table or shelf.
How to supplement the work
When the basic rocket applique of geometric shapes is ready, it can be supplemented. It is appropriate to use as details:
- Stars.
- Planets.
- Portholes on the rocket body.
- Cosmonauts in spacesuits.
- Aliens.
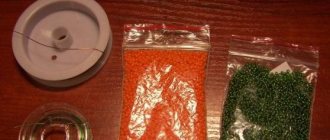
You can use improvised decor. Stars are glued shiny sequins (they come in different shapes and shades), buttons are portholes, beads are decor on a rocket or distant planets, etc.
You can make an application on a previously prepared background. For example, a child, independently or with the help of adults, makes a drawing of space with paints or pencils. As a result, the “space” work looks interesting, picturesque and extraordinary. By combining several different techniques, children learn to fantasize and master the basics of composition and color combination.
With the finished work, a child can decorate his room, take it to school for a competition, or congratulate relatives on Cosmonautics Day. In any case, making an applique on a space theme will help a child develop hand motor skills and develop his sense of taste.
Do-it-yourself large (volumetric) paper rocket for children
Such an unusual solution, how to make an entire rocket house at home, will definitely appeal to every child. Small models, of course, bring a lot of joy to kids, but participation in the implementation of a large-scale project causes real delight in children. In addition, then in a homemade building you can play and feel like a real astronaut going to the Moon, into interstellar space or a traveler striving for distant and mysterious planets.
So, how to make such a space house for children with your own hands?
To make a rocket, you will need to take cardboard (quite thick) and colored paper. The adult's task is to draw, cut out and glue the parts of the spaceship. Let the children decorate the house themselves - give them the opportunity to draw, glue stickers and use other prepared decor for decoration.
This is what the diagram looks like.
Another model made using similar technology.
And this is a master class in creating a three-dimensional homemade product. The plot describes a very interesting idea of creating a paper rocket. Just don’t forget that working with thick cardboard requires the participation of an adult, and children from 12 years old can make such a space house. Younger children are involved only as assistants to parents.
“Rocket” – GCD for paper construction
Smirnova Irina Grigorievna Tregubova Larisa Viktorovna Grebenikova Tatyana Alekseevna educators MBDOU "Kindergarten of the village of Tomarovka of the Yakovlevsky urban district"
The material was sent for publication in the All-Russian printed collection of practice-oriented materials “Preschool and primary education - modern methods and technologies of teaching and upbringing” - July-August 2020.
ROCKET NOD in the senior group - paper construction
Advertising message
Goal: to expand children's understanding of space. To develop the ability to create a three-dimensional design of paper rockets using a diagram and a sample.
Tasks:
- Educational: consolidate the names of geometric shapes: circle, rectangle, triangle; construction parts: cone, cylinder, cube. Teach children how to twist a rectangle into a cylinder, a circle into a cone.
- Developmental: develop design skills, the ability to convey the expressiveness of a composition, using the features of paper as a design material. Develop spatial thinking, imagination, and the ability to make inferences. Form a critical attitude towards your actions, objectively evaluate your work and the work of your comrades.
- Educational: to cultivate interest in paper construction. To cultivate accuracy in working with glue and scissors, independence, and initiative. Cultivate a desire to help a friend.
Integration of educational areas : Speech development, cognitive development, artistic and aesthetic development.
Enrichment and activation of the dictionary: Space, cosmodrome, planets, astronaut, orbit, body, nozzles, porthole, design bureau.
Methods and techniques: game problem situation, riddle, conversation - dialogue, looking at illustrations, outdoor play, verbal play, productive activity of children, self-analysis of work, summing up - reflection.
Equipment: a letter asking for help, illustrations depicting rockets, a sample of a finished rocket, parts of a three-dimensional construction set, an audio recording of space music.
Handouts: rocket design diagrams, cardboard, colored paper, scissors, glue, napkins, oilcloth.
Progress of continuous educational activities:
Cheerful music plays and children join the group.
Educator: Guys, today we have guests, let's say hello and invite them to come.
Children: hello!
Educator:
We will all stand in a circle together, You are my friend and I am your friend, Let’s hold hands tightly and smile at each other.
The teacher makes a riddle about space.
Educator: Guys, it’s not in vain that we started talking about space! Today our group received a letter asking for help. Shall we read it? (Yes!)
Educator: Dear guys! Soon there will be an epidemic on the planet “Zhelezyaka”! All the rockets and aircraft here have broken down, and the robots cannot make their flights. Help!
Guys, let's help the robots from the planet "Zhelezyaka"? How can we help robots?
Children's answers: Make rockets and launch them into space onto the planet.
Educator: Can you?
Children: Yes!
Educator: Who creates rockets? (designers, engineers)
Educator: today I suggest you be designers and design rockets for the inhabitants of the planet “Zhelezyaka”. I, as the chief designer, propose to consider rockets (there are illustrations of rockets on the easel)
Next, children examine a sample of a finished rocket made of colored paper and cardboard.
Educator: What parts is the rocket made of?
Children's answers: The nose of the rocket is made of a cone, the main part - the body - is made of a cylinder, the nozzles are made of triangles, the windows are made of circles.
Educator: but before you start creating rockets, do you want to play? (Yes!)
Outdoor game “Lay out the details of the construction set”
Children are divided into two teams and come up with a cosmic name for their team. Countdown: 3, 2, 1 – Start!
After the game, the teacher says that creating a rocket is a difficult and responsible job. You can pair up, agree on who will do what, and help each other.
Educator: please go to the design bureau!
Repetition of the rules for working with scissors and glue.
- Scissors must not be left open.
- You should not bring scissors close to your face.
- Pass the scissors to each other with the rings first, not the tip.
- Handle the glue carefully.
Look how many dangerous objects are lying around! If you do not follow safety precautions, you can injure yourself or a neighbor!
Educator: Guys, we have a problem! As you already said, to design a rocket you need a cone and a cylinder, we don’t have them.
But there is a design scheme. She will help us.
Look at it carefully and tell me, from what geometric figure can you get a large cylinder?
Children's answers: from a large rectangle, twisting it into a cylinder - a rocket body; from the circle, twisting it - the nose part. We attach the airlocks - triangles, and the portholes - circles to the body.
Educator: It's time to get to work (on the tables there is a set of geometric shapes for each child - a large rectangle, a circle, two triangles, small circles for portholes). During the activity, the teacher provides individual assistance.
Children place finished rockets in one line at the Mechta cosmodrome
Presentation of finished works
Educator: What beautiful rockets you have made, but can all rockets fly to the planet “Zhelezyaka”?
I'll give you one gold star. This is your voice. You will give it away - vote for your favorite work - (put a star next to the rocket).
Which rocket gets the most stars will be considered the best. (This is how children perform visual analysis of work)
Educator: Well done designers! Everyone did it! Will the inhabitants of the planet “Zhelezyaka” like your rockets? (Yes!). Applause!
Educator: Guys, I’m wondering
- -What are people called who fly into space on spaceships? (astronauts)
- -What was the name of the world's first astronaut? (Yuri Gagarin)
- -What was the name of the ship that lifted him into the sky? ("East")
Guys, do any of you want to become an astronaut?
To become an astronaut, what qualities do you need to have? (to be strong, courageous, resilient, responsible)
Educator: You are right, but astronauts must also follow the rules.
Word game "Space rules"
- If you want to become an astronaut, you must know a lot, a lot...!
- Any space route is open to those who love... work.
- Only friendly starships can take with them…on a flight.
- We will not take the boring, gloomy and angry into… orbits.
- Our main rule is to carry out any... order
- Fast rockets are waiting for us to fly to... planets.
- Whichever one we want, that’s the one… we’ll fly.
Let's train like astronauts and fly. I think that now the robots from the planet “Zhelezyaka” will invite us to visit.
Reflection: Guys, what did we do today? Who did they help? What games did you play? Was it difficult for you? What was the most difficult thing? What did you like most? Children's answers.
Literature:
- Kutsakova L.V. Construction and manual labor in kindergarten: Program and lesson notes M: TC Sfera, 2020. – 341 p.
You can see the table of authors and learn more about the collections HERE
Partner promotions
Rocket made of colored paper at home: applique
This option for creating a spaceship is quite feasible for children aged 5-7 years. The application and templates can be used by educators and primary school teachers, additional education teachers and creative parents. The craft for children offered here will be an excellent interior decoration, gift, themed poster or postcard for Cosmonautics Day. To make an applique from geometric shapes you will need the following materials and tools:
- white pencil;
- PVA glue;
- scissors;
- colored paper;
- black cardboard.
The application is done step by step. In order for your child to make a paper rocket, you need to control the entire process. The technology looks like this:
- Prepare the necessary materials in advance.
- Use templates to make applique.
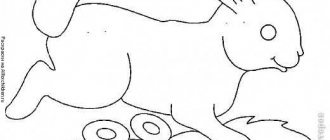
- Cut out the elements of the spaceship, its tail and the starry sky according to the template.
- Mark the boundary of the lower part of the interstellar vessel with a white pencil.
- Using a pencil or scissors, wrap the edges of the triangles that will make up the tail of the ship.
- Glue the triangles in three layers.
- Consistently attach the rocket parts and create a starry sky
A child can make such an application either at home or at school during the lesson. He will definitely succeed and will become the real pride of his owner.
As you can see, there are many options for making crafts on the theme of space. You just have to decide on the appropriate one and give your child the opportunity to realize his creative potential. The finished copy - a rocket made of paper and cardboard with your own hands for children - will bring joy to the child, excite his imagination and encourage him to conquer new heights, because now he will have his own ship, which can send its owner to any corner of the galaxy.
A few more options for paper applique:
At what age do you start applique?
Many parents begin to develop their baby very early. As soon as he begins to sit, he is taught to draw, sculpt and glue. Each child needs an individual approach. Some children are calm and assiduous by nature; they can sit for a long time and engage in “quiet” creativity. Others are active and inquisitive; it is difficult for such children to sit still and do one thing for a long time. Therefore, the age at which a child can cope with the application of a rocket from geometric shapes is a question that every parent answers himself. It is optimal to start learning about paper, scissors and glue from the age of two to four. At this age, the child already talks, understands the requests of adults, and can sit still for 5-10 minutes.