Every spring, the whole country solemnly celebrates Victory Day, parades take place, and fireworks sparkle in the sky. This year, due to quarantine, the celebration was postponed, but no one is stopping us from creating a festive atmosphere for our grandparents, decorating the premises in a festive way, and congratulating them with the warmest words. For this we have prepared the best vytynanki. Even a small inscription “May 9,” the cutting template for which is provided below, will add solemnity to the room.
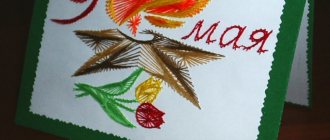
Stencils for May 9th for children on a postcard (carnations and doves)
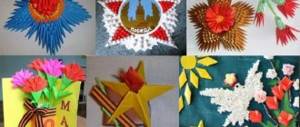
We started preparing cards ourselves a long time ago, and we try to make something original for every holiday that both you and those for whom you are preparing a gift will like. We will not miss the Holiday of Peace and Victory either. Look at the cool ideas in this collection for the warmest postcards.
The meaning of the upcoming event is the dream of living peacefully, without wars. This is a celebration of victory, which means it is symbolic if there are white doves on the postcard, harbingers of serene tranquility.
Another symbol of the holiday are carnations. They show that we remember all those who brought us this victory. We honor and appreciate their sacrifice, and therefore are ready to maintain peace on earth by any means.
And here we made carnations from paper and napkins.
I really liked the idea of this craft. It can be given to veterans along with a bouquet.
Here are the stencils for creating such a craft:
And here is another beautiful three-dimensional dove and templates for creating it.
And more cranes for your piggy bank. It is also a symbol of May 9, although no one knows exactly why. Some associate and justify this symbol with the famous song “Cranes” based on the poems of Rasul Gamzatov, translated by Naum Grebnev (composer Jan Frenkel). This is truly a very heartfelt song.
These voluminous pigeons can be made to decorate a school or home. They can be glued on a thread to the ceiling, chandelier or window. It will be very beautiful and festive!
View this post on Instagram
Publication from Elena Selivanova (@daynotes.ru) April 24, 2020 at 5:05 PDT
DIY “Eternal Flame” craft
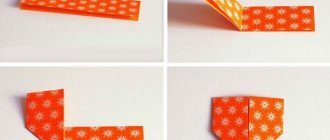
Using a stencil we write 1941-1945 on blue cardboard.
From red corrugated paper we cut out a strip 4.5 cm wide and fold it like an accordion, draw a circle with a diameter of 4 cm, and then cut it out, we immediately got several circles. We take 6-7 circles and fold them in half, fasten them with a stapler, and cut the fringe with scissors. Fluff it up and you get a carnation.
Glue them onto cardboard.
We cut out strips of 9*6 cm from green corrugated paper, roll them into a roll, glue the tip, and also cut out 4 leaves. Glue the stems with leaves.
We also cut out 4 trapezoidal strips and glue them to the flowers.
We cut out 2 doves from offset paper, and 3 from white corrugated paper (the template can be taken from here
).
We glue the dove from offset paper and corrugated paper.
We cover the second one with corrugated paper on both sides. We got 2 doves, we glue them together, leaving the wing free. Glue the dove onto the cardboard and draw an eye for it with a felt-tip pen. Let's move on to the bottom. A cardboard box (you can take it from a candy box, in our case it is from a cookie box with high sides that need to be cut off, leaving a height of 4 cm and covered with white corrugated paper). We cut strips of 6-3 cm from brown paper. We glue them like tiles, cutting the edges to the desired size. It is better to cut the pedestal out of foam plastic, but you can make it out of cardboard, like ours. It is cut out according to a template (which you can take) and glued together. First we glue the cardboard with the dove and carnations to the inside of the box, and then the pedestal.
On the back side of the red cardboard we draw a star from 2 triangles with sides of 8 cm so that the rays are 2.3 cm high.
We bend the rays inward.
We cut from one side between 2 rays to the middle (the cut is marked with a thick line).
Bend the star 3 times from different sides.
We glue the rays between which the cut is located, placing one on top of the other. We got a 5-pointed convex star.
Glue the star onto the pedestal.
From red corrugated paper we cut out several leaves of different sizes, pointed at the top. We glue them together below - we get a fire fluttering in the wind. Cut off the very top of the star (literally 1-2 mm) and use a toothpick (needle) to insert the fire into the resulting hole. From green, blue, yellow corrugated paper, cut into squares measuring 4*4 cm, take a pen rod, apply it to the center of the square and crumple the paper around the rod with your hands - you get a trim. We lay out flowers on the sides of the pedestal and in front of it: a yellow core, a circle of blue paper and a circle of green.
We write by hand, print out those typed on a computer, or use a stencil to write 2 separate inscriptions: “we remember” and “we are proud.” Glue them to the sides. So we have successfully made a DIY craft for May 9th with our own hands. Happy Victory Day, dear handicraftsmen!
Irina Nagibina Сhudesenka.ru
If you, as parents or because of your profession, are involved in creative work with children, then new ideas and work options are always needed. The article discusses how the “Salute” applique is made from paper in different ways. It can be used to design a postcard, gift panel or packaging for Victory Day, New Year or other holidays. Explore possible ways. Choose the one you like. Create gifts and souvenirs with your own hands.
Stage 1 - star layout
Master class on how to make a model of a star for the eternal flame with your own hands:
- Take a large sheet of cardboard, scissors, glue or tape, pencil, ruler, paint and brush.
- Place a dot in the center of the cardboard.
- Draw two dotted lines through the point.
- Draw two more dotted lines that, when intersecting, form the letter “X”. They should be half the length of the first two.
- Connect all vertices with dotted lines. You will get a star.
- Place a point in the center opposite each side of the star at a distance of several centimeters.
- Connect the vertices and the assigned points with a solid line.
As a result, you should get a figure like the one in the picture above. Cut it along solid lines.
Stage 2 - star
Master class on how to make a star for the eternal flame with your own hands:
- Take the star design and cut it out.
- Bend the star layout along the long axes inward.
- Flatten the layout.
- Bend the star layout along the short axes outward.
- Flatten the layout.
- Give the layout a three-dimensional star shape using the resulting fold lines.
- Connect the protruding parts together, which should serve as a support for the star. This can be done either with glue, if the protrusions overlap each other, or with tape.
- Turn the star over and color it red or
Vytynankas on windows for Victory Day
The advantage of vytynanok is that they can be made very easily. To do this, you only need A4 paper, a stationery knife, a template, and glue. The process of making cuttings will bring a lot of pleasure and will captivate parents and children in one task.
Letters Victory Day
To decorate a window, you don’t have to come up with something clever; you can just cut out letters from paper and make up the words “Victory Day” from them.
75 years of victory
This year we celebrate the 75th anniversary of the victory. This inscription can be a decoration addition to the main drawing.
Soldier
Soviet soldiers defended their homeland with blood and sweat, their feat will never be forgotten.
Eternal flame
The eternal flame is a memory of those who were taken by the war. This symbol can also be cut out of paper. Below are the best stencils for windows.
Firework
Every year, in all cities of our country, fireworks sparkle in the sky with multi-colored lights in honor of May 9 - Victory Day. So why don't they decorate the windows?
Cranes
Often soldiers who did not return from the war are compared to cranes; this is also sung in a famous song. A printed and cut out crane will be a decoration in your home.
Manufacturing from round blanks
The Victory Salute applique can be made from large parts created according to one template from different colors of designer paper. This is one of the easiest ways.
To make such a decoration for a postcard, wall panel or other decor, follow these steps:
- Take several sheets of different shades, or better yet, surface textures. Metallized and pearlescent thick paper or cardboard will look great.
- Prepare a template (or several) from a regular sheet. Make a round blank of the required diameter. Choose any size. It can be from 2-3 cm for a postcard to 10 cm for a wall panel.
- Cut out several circles from prepared sheets of paper one template at a time. Make cuts on each one from the edge to the center; you can even decorate the outer circle in the form of a wave or teeth.
- Glue the cut out parts onto the base, preferably a dark color. Arrange the elements so that the small circles are at the bottom and the larger circles are at the top or to the sides. This will make a more realistic picture by creating the illusion of perspective.
As you can see, this kind of work is not difficult to do. The child can handle the task on his own if he already knows how to handle scissors.
Fire for the ninth of May templates. Bonfire for New Year's performance
1:502 1:512
Be sure to make such a safe bonfire for the New Year at home or for a performance in kindergarten or school. A bright fire made of felt, smoldering coals made of sticks, foil and New Year's garland - it is impossible to take your eyes off such beauty! The New Year's decorations will certainly be appreciated by both guests and spectators.
1:1071
Our two master classes will help you create this wonderful decoration. Choose any!
1:1235
Mysterious atmosphere, flickering tongues of “fire” and crackling foil... It seems that this fireplace was lit by some fairy fairy. Another moment - and the timid sparks will swirl in a whimsical dance and flare up with a bright flame. A bonfire made of lace and garlands is an excellent decoration for a New Year's fairy tale.
1:1852
1:9
You will need:
1:44
- lace ribbons,
- branches,
- foil,
- PVA glue,
- stationery knife,
- white paint and brush,
- stones,
- New Year's garland.
1:287
1. Wrap the sticks in foil.
2:850 2:860
2. Make a solution of PVA glue and water: one tablespoon of glue per liter of water. Cover the lace with several layers of solution to stiffen the ribbons.
3:1647
3. Wrap each branch tightly with lace. Leave to dry overnight.
3:128 3:138
4. When the glue is completely dry, use a utility knife to cut the lace along the sticks.
4:807 4:817 5:1332
5. Carefully remove the branches and remaining foil from the shell.
6:1950
6:9
Voila! The lace firewood is ready.
7:577 7:587
6. Light a fire. Make a small circle of stones and place a garland inside. Make sure there is an outlet nearby so you can easily turn on the lights.
8:1364 8:1374
7. Throw some wood on the fire. If necessary, clamp them with stones. Add more stones for effect.
9:2091
9:9
A cozy fire is ready to warm you with its hot fire.
10:613 10:623 11:1138
Soft and pleasant to the touch felt will be an excellent basis for creating a New Year's bonfire. And bright colors will leave no chance for him to go unnoticed.
12:1959
12:9
You will need:
12:45
- felt in yellow, red and orange colors,
- scissors,
- threads or glue,
- filler (synthetic fluff) - optional,
- paper templates,
- sticks and stones.
Hard felt with a thickness of 1.2 mm is ideal for work.
12:435
1. Make three arbitrary templates - tongues of fire: large, slightly smaller and very small. Transfer to felt.
12:656
2. The fire must consist of two parts, each of which must have five layers. The biggest one is red. On both sides of it, glue two smaller pieces: orange and yellow. Now make the cuts to create a 3D effect later.
12:1105 12:1115
3. Collect some sticks and stones from the street, wash them and dry them. Assemble the hearth parts.
13:1799
13:9
Congratulations! The fairy fire is lit.
14:589 14:599
But if you want to make
a fire in the shape of a soft toy, make six parts:
two large, two smaller and two smallest.
Sew as shown in the photo below and fill with synthetic fluff. To create a fairy-tale fire, you need to sew together three three-dimensional parts. 14:1080
If desired, make soft toys such as firewood, cookies and marshmallows from felt.
14:1211 14:1221
Making a Victory monument with an eternal flame with your own hands
Fimina Ekaterina Borisovna Description: The master class is intended for high school children, teachers, educators, all those who are not indifferent to the heroic heritage of our country Purpose: The product is made to decorate a classroom, stage, corners dedicated to the Victory in the Great Patriotic War, as a decoration for performances, etc.
Goal: Making a monument as a decoration for staging a song dedicated to Victory Day Objectives: Develop patriotic feelings, respect for the heroic past of our country, war veterans, improve skills in working with cutting tools, cardboard, paper, glue. On the eve of the celebration of the 70th anniversary of the Victory, many different events are being held dedicated to this event. Great importance is given to decorating public institutions so that the anniversary celebration remains in the memory for a long time. This master class serves the same purpose. To manufacture this product we need the following Materials and tools: - cardboard boxes; - pieces of ceiling tiles; - wallpaper with a marble pattern; - scissors, stationery knife; - metal ruler; - pencil, black felt-tip pen; - adhesives: wallpaper, for ceiling tiles, PVA, pencil; - red gouache. We begin gluing the thin box on all sides, having previously cut out pieces of cardboard (ears) from the back side and lowered them down for subsequent fastening of the box in a vertical position. Now we take the largest box, cover its bottom and sides with wallpaper using wallpaper glue. We glue a flat box perpendicularly to the back surface of the large box, using pre-cut pieces (ears) of cardboard for better fixation. Additionally, we fix it using a construction stapler. While the structure dries, we make a star for the eternal flame. To do this, we use a template, increasing it to the desired size. We cut out the shape along the solid lines, use a ruler and scissors to draw along the dotted lines and fold a three-dimensional star. Using strips of cardboard and ceiling tile adhesive, glue the rays of the star together. We paint the resulting star with red gouache. While the star is drying, we cover the horizontal part of the monument with wallpaper. Using the template, we print out the letters of the words “We are proud” on red paper. We remember” Also, using the template, we print out the numbers 1941, 1945 on red paper. We print out St. George’s ribbons on white paper. Order of the Great Patriotic War. We cut everything out, glue it onto pieces of foam plastic using pencil glue or PVA and cut it out again, we get three-dimensional parts. The order and ribbons, if necessary, can be corrected using a black felt-tip pen. Of course, you can draw and draw everything yourself directly on the tile, but printing it is faster. Now you can begin gluing the parts to the monument using ceiling tile adhesive or PVA. The star has dried up, but it is not a simple star, but an “Eternal Flame”. To do this we need to make a torch. We take a cardboard tube of food foil or toilet paper; the diameter should be such that a battery-powered flashlight fits into the tube to illuminate the “flame.” You will also need corrugated paper in yellow and red shades. Cut a 17/27cm strip from the red paper. We cut off the required section from the tube, lubricate one end with pencil glue and glue the red paper together. Using scissors we cut out the flames. Cut a 6/15cm strip from the yellow paper, apply glue on top of the red paper and glue it in place, cutting out the flames. You can also add a fiery color. In the center of the star, cut out a hole for the torch, insert it into the hole, after smearing it with glue. Glue the star to the pedestal. Glue the order with a ribbon to the vertical surface.
A bright fire made of felt, smoldering coals made of sticks, foil and New Year's garland - it is impossible to take your eyes off such beauty. Be sure to make a safe
New Year's bonfire
at home or offer to make an interesting craft for your friends for a school performance. The New Year's decorations will certainly be appreciated by both guests and spectators.
How to make a fire from felt?
Soft and pleasant to the touch felt will be an excellent basis for creating a New Year's bonfire. And bright colors will leave no chance for him to go unnoticed.
You will need:
- felt in yellow, red and orange colors,
- scissors,
- threads or glue,
- filler (synthetic fluff) - optional,
- paper templates,
- sticks and stones.
Hard felt with a thickness of 1.2 mm is ideal for work.
1. Make three arbitrary templates - tongues of fire: large, slightly smaller and very small. Transfer to felt.
2. The fire must consist of two parts, each of which must have five layers. The biggest one is red. On both sides of it, glue two smaller pieces: orange and yellow. Now make the cuts to create the 3D effect later.
3. Collect some sticks and stones from the street, wash them and dry them. Collect the hearth parts.
Congratulations! The fairy fire is lit.
But if you want to make a fire in the shape of a soft toy
, make six parts: two large, two smaller and two smallest. Sew as shown in the photo below and fill with synthetic down. To create a fabulous fire, you need to sew together three three-dimensional parts.
If desired, make soft toys such as firewood, cookies and marshmallows from felt.
With such a fire you can arrange various children's games: jump over it; “cook” food over a fire, imagining yourself as fairy-tale characters; play Indians and even learn English - why not?
Making a fire from lace and garland
Mysterious atmosphere, flickering tongues of “fire” and crackling foil... It seems that this fireplace was lit by some fairy fairy. Another moment - and the timid sparks will swirl in a whimsical dance and flare up with a bright flame. A bonfire made of lace and garlands is an excellent decoration for a New Year's fairy tale.
You will need:
- lace ribbons,
- branches,
- foil,
- PVA glue,
- stationery knife,
- white paint and brush,
- stones,
- New Year's garland.
1. Wrap the chopsticks in foil.
2. Make a solution of PVA glue and water: one tablespoon of glue per liter of water. Cover the lace with several layers of mortar to stiffen the ribbons.
3. Wrap each branch tightly with lace. Leave to dry overnight.
4. When the glue is completely dry, use a utility knife to cut the lace along the sticks.
5. Carefully remove the branches and remaining foil from the shell.
Voila! The lace firewood is ready.
6. Light a fire. Make a small circle of stones and place a garland inside. Make sure the outlet is close and you can easily turn on the lights.
7. Add some wood to the fire. If necessary, clamp them with stones. Add more stones for effect.
A cozy fire is ready to warm you with its hot fire.
Of course, you have a lot of acting skills, and with such scenery on stage, the audience will certainly give you a standing ovation.
Happy holidays and may the flame of creative ideas never go out!
Eternal Flame Templates
The most common symbol of Victory Day celebrations is the Eternal Flame. It is he who says that we remember the sacrifice of our people, which was given in the name of peace on our land. The Eternal Flame will also look appropriate in the pictures that we will prepare using the templates from this section.
Flame stencil
A classic example of painting a body is flames or fire. Many cases have stylish airbrushing on their sides in the form of flames, a few fewer cases have overlays or windows in the form of flames, but in any case, fire is the most popular type among both novice modders and seasoned professionals.
We present to you flame stencils made in different directions - classic flame (old school), tribal (legacy of tattoos), hot-road flame.
Each stencil is adapted both for working with an airbrush, when you draw a flame on the case, monitor or keyboard, and for transferring the template to the case for the purpose of further cutting out the flame with a Dremel.
Important: We present only basic flame options; if you have a need for modification, please contact us, we will be happy to help you develop your own, unique template.
You can use each stencil either as a whole or divide it into separate parts, from which you can later create your own, unique flame stencil.
Download flame cutting stencil in pdf format
Print the flame stencil, do not forget to turn off scaling when printing, transfer it to tracing paper or self-adhesive film if you are going to draw the flame. If you plan to cut out a flame in metal, then simply glue the printout to the side panel and start cutting along the contour with a Dremel.
Download flame stencil for drawing, airbrushing
Download a flame stencil for the side or top cover of the case
Important: We provide a flame stencil in A4 size, if you need a larger size, contact us, we will make a stencil of the required size and break it into A4 pieces, after printing and gluing you will receive the required stencil size.
Print the stencil on a printer, glue it to the top cover of the case and cut out the gray areas of the stencil with Dremel. After cutting, paint the outline with a thin strip of yellow or red paint, you will get a very stylish top modding case cover. This flame is calculated in size from the beginning of the front panel of the case to the power supply.
Download a flame stencil for 1/2 of the top cover of the case
Download a flame stencil for the top cover of the case with an approach to the power supply
Download a stencil for a top or side cover in hot road style
Important: We provide a flame stencil in A4 size, if you need a larger size, contact us, we will make a stencil of the required size and break it into A4 pieces, after printing and gluing you will receive the required stencil size.
Tribal is a trend in tattooing - designs with sharp corners, usually very aggressive, and perhaps the most effective.
The flame in the tribal style is the most effective and beautiful; the stencil is intended for the side cover of the case.
Download stencil for side cover in tribal style
Important: We provide a flame stencil in A4 size, if you have a need for a larger size or modification of the design, contact us, we will make a stencil of the required size, shape and break it into pieces in A4 format, after printing and gluing you will receive the required stencil size.
modnews.ru