All preschool children are fond of creating various crafts and appliqué becomes one of their favorite activities.
If you and your child have made a whole forest kingdom at home and don’t know what else to come up with, pay attention to the frog applique. Let's consider master classes that will show all the actions in detail.
Princess Frog
To work you will need the following:
- cardboard;
- A4 paper;
- colored paper;
- a simple pencil;
- PVA glue;
- scissors.
First we make the preparations. You can draw them yourself. But this task turns out to be difficult for children, so it is better to use ready-made frog templates. Having chosen the one you like, print it out and carefully cut out all the details along the contour.
We use these elements to create body blanks and other fragments:
- On green paper we outline the body, legs and head of the frog.
- We take a smaller circle and outline the abdomen on a yellow sheet, and do the same with the arrow.
- We make the water lily on dark green paper.
- We outline a flower on a blue sheet.
- We draw the eyes: irises and shine on a white sheet, and pupils on a black sheet.
We cut out the details of the applique and paste it onto the cardboard in the same way as the plot asks: first the body, then the belly, head, paws, arrow. After that, draw the mouth and nose. Before gluing the eyes to the base, we prepare them: black ones are attached inside the white circles with glue, and small white circles are also glued onto them. Looking to the side looks interesting, as can be seen in the photo.
This application is made in different ways. Children finish drawing clouds, a swamp and anything else they want.
Watch cartoon Frog traveler
Enjoy watching!
And despite the fact that this cartoon first appeared on TV screens back in 1965, many children, as well as their parents, continue to like it today.
As part of today's lesson, we will look at how to make a frog from plasticine, and in order to make the lesson as exciting as possible, we will give it the appearance of the main character of an old instructive cartoon. However, before we start sculpting, we note that our frog will consist not only of large, but also some small elements, which means that it is better to make it together with the child, that is:
- entrust the child with the production of large elements of crafts, and do small ones independently;
- do not forget to prepare a stack (can be replaced with a toothpick) for cutting out the toes on the frog’s paws;
- Knead the material well before starting to make the figurine.
Frog made of colored paper
This frog applique is ideal for children from the younger group. It develops finger motor skills and is easy to do.
To do this you need the following:
- coloring;
- gouache, felt-tip pens or colored pencils;
- brushes for painting;
- glue (can be dry or PVA);
- cardboard;
- scissors.
Detailed instructions:
- Take the coloring book and choose a leaf with a frog on it.
- We ask the child to paint it.
- Cut out the painted picture (each detail along the contour).
- We glue the elements onto the base - cardboard.
- We finish drawing the river, sky and water lilies.
This technique is suitable for beginners as it does not require much effort.
How to make paper crafts with children 4-5 years old
I will provide templates, descriptions and ideas for paper frogs. For example, such a voluminous craft has a stand (base).
You can do something similar using this scheme. Cut the workpiece along the dotted lines or along the contour. Fold the lower free edges and glue them together.
Of course, you can always find improvised materials that will give the toy a special touch. For example, this photo uses a disposable plate as a basis. They can be either cardboard or food-grade plastic. The remaining parts are cut out of paper and glued to the body.
A funny idea with an image of the outline of the palms. The child will be interested in tracing his palms. You just need to help cut them out.
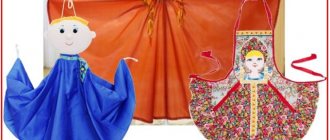
Remember the puppet theater? Where cardboard or fabric puppets are pulled by the strings. If you print this blank, all that remains is to align the holes on the torso and limbs and tie them with thread or wire.
You can make many crafts from round blanks.
Or this one.
Decorate an ordinary glass with the head of a smiling frog.
Toilet paper rolls are also used for creativity. For example, a game was invented here: you need to catch the tip of a frog with your open mouth. Believe me, this will not happen right away.
Here are some more funny green frogs having a conversation.
Or you can play with the bushings like this. Just glue on long strips that will imitate legs.
And in this version, the craft can stand, and pencils or pens can be placed inside for storage.
Like here. So for some time you can replace the organizer and pencil holder.
I offer an interesting craft on a water lily leaf.
You can use this template.
I also liked the bookmark. We made completely different ones as children, so this option is not entirely familiar. But you will definitely notice such a corner and immediately find the right part of the book.
Of course, we need to make such an assistant.
Once again the origami technique came to our aid. Take a square sheet and find its diagonals.
Fold the sheet in half and turn the corner closest to you. And we find the middle of the outer triangles.
We wrap them inside.
And on one side we hide the edges inside. To make it more interesting, glue on the eyes and tongue.
And such a princess can be made from felt.
This frog seemed very funny to me. A perky smile and long accordion-shaped limbs give her a very fabulous look.
You don’t know what else to do with your child. I'll give you an idea! Cut out the head of the wah and insert a balloon into the mouth. When you inflate it, the child will see not your face, but a frog's.
Egg trays make such cute frogs.
Here's another idea for a three-dimensional craft. With funny bellies that give frogs stability.
For the applique, I suggest printing and cutting out this blank.
I would like to show you an easy master class on creating crafts from bushings.
Hanging view of a pencil holder. It is very convenient when it hangs on the cabinet door.
This option is also interesting. Look - the strips are used the same width. This is an important nuance for obtaining volume.
These little frogs have legs that move.
There is no shame in taking such a craft to kindergarten. If a suitable topic is found))
Here's another template for cutting. In addition to these parts, PVA glue will also be useful. It is considered the safest for children.
Make another wah out of hearts.
The highlight of this craft was the body, made from strips of the same length.
This is how you can entertain kids at a birthday party. Such whistles are sold in holiday departments.
Would you like me to show you how to draw a frog beautifully? Here are the step by step steps. All that remains is to repeat.
Such kids can be useful when creating an applique or postcard.
And you can make not only green frogs, but also yellow, blue or other bright colors. Children often go beyond their usual boundaries and let their imagination run wild.
Frog made of geometric shapes
Prepare the following materials:
- paper (colored);
- stencil;
- pencil;
- scissors;
- cardboard;
- glue.
Progress:
- Take green paper and, using a stencil, draw on it a circle (body), a diamond (head), 2 rectangles (legs), 2 triangles (handles), 2 circles (eyes).
- Draw a smaller circle on a light piece of paper. This will be the abdomen.
- On the red leaf we draw a triangle for the mouth.
- Take any color of paper and draw a rectangle, narrowing it downwards. The bucket is ready.
- To create the pupils and eyelashes we use a black leaf.
- We cut out the outlined parts along the contours and glue them onto cardboard as in the photo.
- We finish drawing the paws, spout and handle of the bucket.
How to make a Frog Princess from plasticine.
If your child has successfully mastered the basics of modeling from plasticine, and now he is bored with “stamping” the same type of simple figures, in order to revive the child’s interest in doing manual arts, you can complicate the task and offer him, instead of another mushroom, to make a character from some Russian folk tale , for example, to make a frog princess.
To make such a green beauty you will need:
- a rectangular piece of thick cardboard or thin plywood;
- packaging of plasticine in 12 colors;
- modeling board;
- match and wooden toothpick.
The procedure for making crafts
1. The fairy-tale frog lived in a swamp, but to make the craft look more elegant, place your frog on the shore of a lake. To form a “water surface”, take a piece of cornflower blue plasticine, add a little white and ultramarine to it, and lightly knead the lump so that all the colors connect with each other, but do not mix into a single monotonous blue mass. Cover the front side of the cardboard with a thin layer of the resulting “marble” plasticine.
2. Roll a ball from emerald green plasticine - a frog head blank, and give it a rounded triangular shape.
3. On the front surface of the head, press in the eye sockets, outline the nostrils and make the wah “smiling from ear to ear” muzzle.
4. Make frog eyes from tiny balls of white and black plasticine and place them in the eye sockets.
5. Break off another piece of emerald green plasticine (slightly larger than the one you used to make the head), and roll an egg out of it - a blank for the princess’s torso. To ensure that the beauty does not “lose her head” and that she sits securely on her shoulders, insert a match into the upper part of the body and place the frog’s head on this pin.
6. From plasticine of the same color as the body, mold the hind legs of the frog and attach them to the body so that the princess “sits” in a characteristic frog pose.
7. Make the frog's front legs.
8. Place the frog on a bright green leaf of a water lily and place a symbol of royal power on its head - a small “golden” crown molded from yellow plasticine.
9. Make an arrow from brown, beige and white plasticine.
10. Place water lilies on the “surface of the lake” of the fox, sit the frog on it and give Ivanushkin’s arrow into its paws.
If you find an error, please select a piece of text and press Ctrl+Enter.
heroes and characters
Share with friends:
We also recommend watching!
How to make a tulip from plasticine step by step.
How to make a zombie from plasticine.
How to make Cinderella from plasticine.
How to make a seahorse from plasticine.
How to make a swallow from plasticine.
How to make Batman from plasticine.
How to make an iron man from plasticine.
How to make Goofy from plasticine.
How to make a squirrel from plasticine (film “Ice Age”).
How to make a castle from plasticine.
We teach the child the seasons in a playful way. Modeling from plasticine.
How to make Winnie the Pooh from plasticine: master class with photos.
Fabric frog
And this craft is suitable for those children from the older group of kindergarten. It is created from fabric, so unlike paper crafts, such work is more difficult.
Step by step execution:
- Print out the design template and cut out the head, body and paws along the contours.
- On a piece of felt folded in half, outline the blanks and then cut out the parts.
- We outline the abdomen on light green material, then cut it out and sew it on the body.
- On the face we draw a mouth, nose, eyes and glue pre-prepared circles from light green felt (dimples on the cheeks).
- We sew the elements of the legs together, and also grab the thin laces (arms and legs).
- When sewing together parts of the body, grab the laces and leave room to push the filler inside.
- After that we sew up the rest of the part. We do the same with our heads.
Master class “Geometric frog”
Another version of appliqué, which is most often practiced in younger groups of kindergartens. in the process of creating a picture, the child learns to remember and recognize the various shapes that make up a frog.
You can prepare the necessary elements yourself, which is not difficult even if you have no artistic skills. It is enough to make markings using a ruler on colored paper and cut out the desired shapes. Otherwise, use one of the presented blanks.
The upcoming master class will look at creating a frog from triangles.
Sequencing:
Make several blanks from green paper - one larger and four small ones.
You can use this drawing as a sample. Attach the largest triangle to the cardboard base sheet.
Glue the legs.
The next step is a two-piece head. You should not leave a large distance between the halves, which symbolizes the mouth.
Eyes can be made from rhinestones or 4 circles (2 white and 2 black) glued on top of each other.
This is the frog we got. Various options and forms are possible, which depend solely on your imagination.
Volumetric applique “Little Frog”
An original material for children's creativity in kindergarten or primary school is cotton pads, which can be purchased at a pharmacy or store. Blanks for the future picture are cut out of them and pasted onto a sheet. To make this craft you will need:
- scissors;
- a sheet of cardboard for the base;
- set of gouache paints;
- cotton pads.
You can paint the discs in advance or after the application is ready. It must be remembered that colored cotton wool takes quite a long time to dry. Natural, unpainted material also looks interesting.
The technique for making a frog applique from cotton pads is as follows:
- Cover the cardboard base with glue and lay out the picture. This method is suitable for children who have not yet mastered the delicate work with glue.
- Trace the silhouette of the part on the cardboard, smear the outlined area with glue, and then press the part to it.
- Apply glue to the part and attach it to the cardboard base.
- Lay out a drawing from the un-glued parts. Then lift the parts one by one, apply glue to the cardboard base and attach the parts.
These are the pictures with funny frogs that came out after the glue had dried.
Templates for applications “Frog”
Do you love fairy tales? We are very! What wonderful magical adventures happen to the heroes of fairy tales! Fairy tales often contain magic! And it's so interesting. We propose to make a beautiful applique - an illustration for the beloved fairy tale about the frog princess.
Step-by-step instructions for creating a finger frog that opens its mouth
And for a puppet theater you can make such a toy for your fingers. The same origami technique is used. You can decorate the craft with eyes and a mouth. And also stick on a crown.
Watch how you can make a frog that opens its mouth in this video.
If you glue the legs to this triangular part, the wah will become more realistic.