Needlework
07/02/2018 Anastasia Prozheva
It is no coincidence that in preschool and primary school educational institutions a lot of time is spent on modeling from plasticine. Working with this material develops fine motor skills and abstract thinking in children, and has a beneficial effect on the course of psychological processes, so we advise you to familiarize your child with a plasticine applique on the theme “Golden Autumn”. And since the centers responsible for the development of voluntary movements of the fingers are located next to the speech centers in the cerebral cortex, modeling will have a beneficial effect on the development of speech. The recommended age for starting to work with plasticine is 1.5-2 years. Therefore, plasticine applique in kindergarten should occupy a special place among children's creativity.
We sculpt a birch tree
Let's look at a step-by-step master class on how to make an autumn birch tree from plasticine.
We will need:
- Glue "Titan";
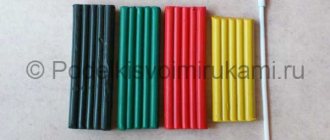
- Plasticine;
- Modeling board;
- Cardboard;
- Scissors.
Cover about 2/3 of the cardboard with a thin layer of white plasticine. It will be heaven.
Note. To ensure that the plasticine adheres well, first knead it in your hands until soft.
In some places, add touches of different shades of blue, simulating clouds. Cover the remaining part of the cardboard with brown plasticine. This will be the earth.
This is how the background turned out:
Now cut out a birch tree trunk from cardboard. Using black plasticine, make characteristic black inclusions on it. You can download the template. Glue the finished design onto the background.
Roll small flagella from black plasticine. Use them as branches.
Make small droplets from yellow plasticine - foliage blanks, approximately like in the photo.
Next, form the crown of the tree. In this case, you can do without glue. Plasticine adheres well to cardboard on its own.
You can frame the finished result. It turns out such beauty!
Modeling in the middle group on the theme of autumn
panel “Autumn Trees” made of plasticine spirals
What to prepare for sculpting:
- a sheet of white cardboard;
- watercolors or pastels;
- a simple pencil;
- a set of plasticine (brown, orange-red, terracotta, green, yellow);
- modeling board;
- stacks and spatulas.
Sequence of work:
Let's prepare the background of the picture - paint the entire space of the cardboard sheet with blue watercolor (dissolved in water) or pastel crayons. At the top we will depict clouds. To do this, lightly blur and blend the blue tone in several places with a cotton pad moistened with water.
Let's ask the child to draw trees with a lush crown with a pencil. At this stage, the baby can and should be helped. To simplify the work, download, cut out and paste tree templates without leaves onto cardboard.
Let's prepare plasticine parts for applique. Cut plasticine (brown for the trunk, red, terracotta, green, yellow for leaves; green for decorating the root part of the tree) into strips, then roll each into a thin rope on a modeling board.
We divide the plasticine flagella into parts and roll them into a medium-density spiral. The colors of plasticine in one spiral can be combined. The work is quite painstaking, you may have to help the child.
We sequentially attach the flagella of the corresponding colors to the trunk and crown of the tree. Lightly press with a spatula for better fixation to the sheet. Using a stack we will draw the relief of the bark. To simplify the work, the tree trunk can be painted with oil pastels or watercolors, and only the crown can be covered with plasticine spirals.
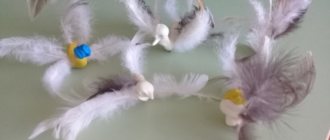
bouquet of autumn leaves
- several leaves with raised veins - maple, oak, chestnut, etc.;
- flexible board for working with plasticine;
- a set of hardening plasticine (burgundy, lemon, green, terracotta);
- plastic rolling pin, spatulas and modeling stacks;
- a large plastic glass or shaped bottle;
- scissors, glue, sheet of colored cardboard.
How to make a bouquet:
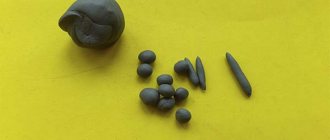
Roll plasticine of different colors (hardening is better) into balls of medium diameter. The bouquet will look more interesting if you mix plasticine of two or three shades. To create beautiful transitions of tones, add additional colors at the end of rolling the balls. The color of the plasticine mass should be heterogeneous.
Place the blanks on a flexible modeling board and flatten them into cakes with a diameter of 7-12 cm (according to the size of the collected leaves). Place the prepared autumn leaves on top with the embossed side down. Let's press them to the plasticine. This is conveniently done with a plastic roller.
Let's outline the contours of each leaf with a thin stack. Cut out plasticine leaves with imprinted veins using a spatula. Remove excess plasticine from the board. Let's fix the edges. We will continue the work in a day, when the plasticine has hardened. By the way, after hardening, crafts made from such plasticine can be additionally painted with pastel or gouache.
Use a spatula to carefully remove the leaves from the board. You can complete a composition in different ways. For example, put a bouquet in a cute vase. In this case, do not forget to attach the leaves to wooden skewers or dry twigs before the plasticine hardens.
Another interesting design option: attach an autumn bouquet to a sheet of cardboard with a glue gun, and draw a vase, make it from paper or from half a shaped plastic bottle.
You can decorate a voluminous plastic vase with jute or hemp rope or in any other way you like.
Application “Autumn Tree” - video tutorial
Autumn tree
Another interesting autumn tree. It can be completed by 1st grade and 2nd grade students. A visual presentation will help the children understand the master class better.
Article on the topic: Crochet openwork shawl: patterns with descriptions and video tutorials
You will need:
- Cardboard (blue or dark blue);
- Plasticine;
- Napkin;
- Modeling board.
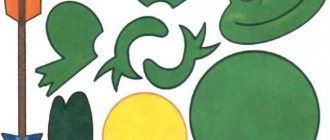
Roll out flagella of different colors from plasticine.
Twist them like a snail.
From the resulting spirals, form the crown of a tree.
Make a trunk from brown flagella.
Cut off the excess bottom of the trunk.
Form waves from the remaining flagella and arrange them to imitate fallen leaves.
Make a frame from lilac and red sticks.
The craft is ready!
Step-by-step photo lesson:
Work should begin not only with the selection of plasticine colors: green, brown and orange, but also with a suitable canvas for drawing. Use white or blue cardboard as the basis of the picture. In the first case, it will be necessary to decorate the background, in the second, the blue color will look like a real autumn sky. It is convenient to draw relief on a soft mass using a stack. To create a sky on white cardboard, you will also need blue plasticine.
Knead some blue plasticine. For a more believable effect, mix it with a dash of white and black. Spread the warm soft paste onto the top of the painting. Try to move your fingers along the rectangle.
Spread green plasticine casually mixed with orange on the bottom of the sheet.
Use brown plasticine to create many elongated sausages.
Make the resulting sausages into the base of a tree trunk. Stick them in a row, tightly joining each other.
Create lots of small orange leaves from soft play dough. The leaves may also be yellow or reddish.
Begin to attach the leaves to the branches of the tree in a chaotic manner.
Form a thick crown-dome from many yellowed leaves. Be sure to add an orange blanket to the base of the tree and capture a few leaves frozen in the air.
The autumn tree made of plasticine is ready. In this way you can make a green tree with fruits, as well as an entire garden or forest.
Plasticine is an indispensable material for the development of fine motor skills of children's hands. That is why it is so often used by educators, teachers, and parents in fine arts classes. And in this lesson we offer you several ideas and master classes, thanks to which your child will make plasticine appliqué (with the watchful participation of an adult, of course) without difficulty and with pleasure.
Preparatory group modeling on the theme of autumn
oak branch with acorns (plasticine)
What you need for sculpting:
- plasticine (gray-blue, beige, light brown, light green, white);
- flexible board for modeling;
- thick cardboard;
- template “Oak branch with acorns”;
- pencils, felt-tip pens for drawing panel details;
- a set of stacks and spatulas for plasticine.
Sequence of work:
Let's draw the contours of an oak branch on a sheet of thick cardboard (white or light blue). To simplify the work, we use a ready-made template of an oak branch with acorns.
Let's soften the pieces of gray-blue plasticine, spread them in a thin layer on the cardboard - we will create the background of the picture. To make the material more pliable, warm it up a little in lukewarm water. We will “paint” the upper third of the sheet with a more saturated tone, and the lower third with a lighter tone. We roll 3-4 small cylinders from white plasticine, flatten and stretch them on cardboard, cut them into a stack, giving them the shape of clouds.
Sequentially fill the contours of the branches, leaves, and acorns with brown and gray-green plasticine. It’s convenient to “draw” with pre-prepared small balls of plasticine of different colors. The layer of material should be sufficient for a volumetric effect, but not too dense. To obtain the required shades, plasticine can be mixed while kneading.
Let's correct the contours of the drawing with a spatula and a stack. Let's draw or make leaf veins from thin plasticine flagella. Let's do some shading on the caps of the acorns and the bark of the oak branch.
plasticine painting “Autumn mood”
What set to prepare for creativity:
- a set of plasticine (gray, dark orange, blue, yellow, red, etc.);
- modeling board;
- cardboard sheet for the base;
- drawing template;
- pencil;
- set of stacks, spatulas.
How to “draw” with plasticine:
Let's draw the outlines of the picture onto the cardboard. We use a ready-made template. If a suitable drawing is not available online, you can create a similar one from individual parts: a girl under an umbrella, a dog, etc.
Let's decorate the background of the picture - smear slightly warmed gray plasticine on the cardboard, in some areas we will use dark orange plasticine to mark sections of the brick wall. Using a stack (deep pressing) we draw clear outlines of the bricks. For plasticineography, it is better to choose hardening or wax plasticine.
At the bottom of the sheet we attach small cakes of dark gray plasticine, flatten them, smear them a little along the edges, and draw the contours of the paving stones. Using pale blue plasticine (if this is not in the set, mix blue and white) we will depict puddles. To simulate water with a thin stack, draw concentric circles on them.
Let's sequentially fill all the elements of the drawing with plasticine of the required shades - the girl's face, hair, arms, legs, cloak, boots. Let’s “color” the dog and the umbrella with plasticine. Let’s “depict” raindrops. For work, it is convenient to use pre-prepared small balls of plasticine of suitable colors. Before filling in the contours of the picture, it is better to warm them slightly in warm water.
We outline the contours of the finished drawing with a stack. We will remove excess plasticine and correct the details. Leave the picture for a day until the plasticine hardens.
Summary of GCD: Modeling Topic: “Rowan autumn leaf”
Contents
Direction: Artistic and aesthetic development Educational area: Artistic creativity middle preschool age (4-5 years) Compiled by: teacher G. G. Kurbanyazova
Program tasks: 1. Strengthen the ability to separate a piece of plasticine from a whole piece by pinching it, roll the plasticine with straight and circular movements between the palms. 2. Teach children to place a piece of plasticine on a base (cardboard sheet), press and smear it with the thumb of their right hand, and give it the shape of a rowan leaf. 3. To develop children’s ability to place parts of a rowan leaf on a cardboard sheet of paper (each other, opposite each other, maintaining the distance between pairs of leaves). 4. Cultivate the ability to bring a job started to completion, to experience joy from the results of collective work. Integration of areas: Cognition - expand children’s understanding of the seasons and plants growing in the kindergarten area. Reading fiction - to introduce verbal art, the development of artistic perception of poetic works (verses). Communication – development of free communication with adults and peers. Formation of vocabulary: activate the words in children's speech - coral, rowan - mountain ash, bunches, flexible twigs, autumn, leaf petiole, cinchona. Material: Demonstration: pictures depicting summer and autumn rowan bushes; subject pictures - oak, rowan, poplar, birch leaves; easel, a sheet of Whatman paper with a painted rowan (without leaves). Handout: plasticine, stack, backing board, wet napkin, cardboard sheet of rowan (according to the number of children). Preliminary work: Observations in nature, excursions, conversations about the season, plants, looking at plot paintings, subject pictures, reading children's fiction, memorizing poems, asking and guessing riddles about plants, node - modeling, didactic game “Which tree is the leaf from? ", "One, 2, 3 - run to the tree." Progress: Educator: I invite the children to listen to the riddle In the spring she turned green, In the summer she tanned, In the fall she put on Red corals... Children: Rowan B: Well done, they guessed the riddle. And today she came to visit us. Let's ask her to show herself to us. Call me kindly. Rowan... D: ... Rowan, rowan V: Repeat after me: “Please show yourself to us, rowan!” D: Show yourself to us, please, rowan! (I remove the napkin from the painting on the easel, the children come up and look at it) Q: Here is the mountain ash. Guys, let's look at the rowan and tell you about it. Is rowan a tree or a bush? What branches, what color are the berries? D: Rowan is a shrub because it has branches coming straight from the ground, they are thin and flexible, the berries are red. Q: I agree with you guys, the rowan is a very beautiful shrub, especially in autumn. Red clusters hang on rowan branches. Why is she so sad? Who knows? ... (children's answers) Q: Correct! It has no leaves. And why? D: Autumn has come... Q: The season of autumn brings both joy and sadness. Autumn gave the mountain ash a very beautiful colored outfit... (showing pictures). What color were the leaves on the mountain ash in summer and autumn? D: In summer there are green leaves, and in autumn there are orange-red, brown leaves... And now the leaves have fallen, and the mountain ash is sad. Q: Guys, let's help the mountain ash. We will make rowan leaves from plasticine. And for this we need to learn as much as possible about rowan leaves (on the table there are pictures depicting leaves of birch, oak, poplar and rowan) Q: I suggest finding a rowan leaf (children find and show) Q: Well done, you have correctly found a rowan leaf (examination leaf). What is this? (showing) D: Stem... Q: And it’s called correctly - petiole, the leaves live on it. First we will sculpt the petiole. Here’s a petiole (I draw it in the air with my finger, the children repeat). And the leaves, look, one is up (I show it in the air, the children repeat). Then there are two identical brothers (children point with their palms). Below are the brothers - the leaves, older and longer in size. The lower, the longer the leaves. The brothers live very friendly. Look - there are two twins and they don’t push each other. We need to make the same friendly leaves for the mountain ash so that it does not get upset, but only rejoices. Game: “Rowan” (physical exercises) Goal: continue to cultivate interest in gaming activities. 1. Rub your palm against your palm (warm it up). 2. Look at your palms: at the left, and then at the right. 3. Show the leaves - open your palms as much as possible. 4. Stand on your toes, stretch like a mountain ash towards the sun. 5. Pull the arms up - the branches grow. 6. Circular movements with your palms - the leaves sway in the wind. 7. The wind blew - sway your whole body from side to side. 8. Spin around - arms to the side (leaf fall). 9. The leaves have fallen - sit down. At the end of the physical session, the children go and sit down at the tables. Q: I suggest taking rowan leaves made from cardboard. We need to decorate them, but not with paints, but with plasticine. I show you how to work with plasticine and how to properly smear colored plasticine on a base. Let's make a branch in the form of a thin rope. Place a piece (flagellum) of plasticine on the base (cardboard sheet) and press down. For the leaf, you need to flatten a small sausage so that it looks like a boat and smear it with the thumb of your right hand. And so we make all the rowan leaves. Independent work of children at tables. Individual reminders during work. At the end of the work, the children examine the leaves and analyze. Q: Let's look at our work. Do you think the mountain ash will like them? (work analysis in progress). Children approach the mountain ash on the easel and attach the leaves to the branches. Q: Guys, look how beautiful the mountain ash is, what colorful leaves it has! Q: Well done, you did a very good job today. I suggest you listen to Irina Tokmakova’s poem “Rowan”: Rowan A little red berry Or this berry The rowan gave me. It’s just not ripe, I thought it was sweet, or a cunning rowan, but it’s like a cinchona. Did you want to make a joke?
Previous: Long-term plan - Forming interest in children of the 4th year of life in people of different professions Next: System of tasks “Characters and lines”
Development of Prototype in the Class Hour, Lesson Notes section and published on December 14th, 2014 You are in:
www.inksystem-az.com