Crafts made from napkins are perfect for any holiday, because they are unusual, creative, and most importantly convenient. This material is very easy to work with and can be purchased at any store. It is worth noting the variety of bright colors, because they give a feeling of celebration and the opportunity to show your artistic style. In this article we will look at how to make crafts from paper napkins with your own hands. And also at the end of the article you will find a whole gallery of photo instructions on how to easily, quickly and interestingly fold fabric napkins.
Napkin butterfly
You will need: paper napkins, scissors, thin wire.
Master Class
- Take a napkin and draw fold lines along two diagonals, then fold in half.
- Fold the triangle along the diagonal folds as shown in the image.
- Fold the ends of the triangle with the apex on one side.
- Turn the triangle over and connect the top to the base.
- Lightly bend the workpiece in half.
- Prepare a piece of wire, fold it in half and wrap the napkin on both sides.
- Twist the wire and form antennae, then cut off the excess wire.
The paper napkin butterfly is ready!
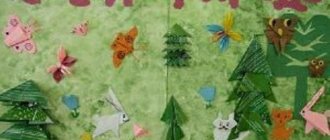
"Magic Lumps"
This type of activity is intended mainly for primary school students, but adults will not find this type of activity boring either.
We will make a cute little gnome. For work we will need:
- Paper napkins (white, blue, pink, burgundy and other colors as desired);
- Scissors;
- Paper glue (PVA or glue stick);
- Colored paper;
- Cardboard;
- A simple pencil.
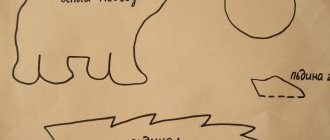
Trace the gnome using a simple pencil according to the template (the template can be used from the photo below).
Now prepare the napkins themselves: cut each napkin into 4 parts, then each part into 4 more parts, and now the resulting pieces into 4 more parts. You should get something like the picture.
Roll the resulting small pieces into balls.
Now we move the resulting balls onto the paper. It is recommended to start with small details, such as the mouth, nose, eyes.
Now let's move on to the big details: beard, cap, hands, etc.
Here we have such a cute gnome.
It is recommended to put the craft under a press for a while, so it will be less subject to deformation and look neater.
You can hang the picture on the wall or make a stand so that it can stand on a table or shelf.
Related article: DIY bead pendant: master class with video
Craft stand
We cut out a strip about 6 centimeters wide from a whole sheet of cardboard, stepping back 3 centimeters from the edge and bending the strip to form a leg.
Now we glue it to the back of our picture with glue or tape.
This technique is the most popular, it is what is most often used when making applications from paper napkins, because it looks very unusual, but at the same time is simple in its execution. Below are other works made using the “magic lumps” technique.
This technique can be slightly modified: do not roll the small squares made from napkins into balls, but simply glue them onto the prepared template. This type of work is called trimming, it looks like this:
It also turns out very interesting and beautiful.
Carnations
You will need: white napkins, bobby pin, thread, marker, stems and leaves, scissors.
Master Class
- Fold the napkin like an accordion.
- Fix it with an invisible one in class=”aligncenter” width=”806″ height=”580″[/img]
- Cut off the ends of the napkin.
- Color the ends of the napkin with a marker.
- Remove the bobby pin and tie it with thread class=”aligncenter” width=”805″ height=”580″[/img]
- Form a bud: to do this, you need to crumple each layer of napkin from the center to the edges.
- Attach the stem with leaves to the bud.
- Make the required number of carnations in the same way.
Paper napkin carnations are ready! I recommend watching this video!
How to make FLOWERS FROM NAPKINS / DIY: Paper Napkin Flowers / NataliDoma
Interior decorations
Small original details make your home interior more comfortable and warm. Crafts made from napkins, made by yourself, can be used to decorate your own home or as a gift to friends and loved ones.
Sunny bouquet
Dandelions are called sunny flowers. A bright bouquet made of paper napkins will remind you of a sunny, warm summer all year round. You can put these crafts from napkins on the table at home or at work. Materials and tools needed to make a bouquet:
yellow napkins;- roll of toilet paper;
- green corrugated paper;
- balloon;
- stapler;
- scissors;
- glue;
- a plate of water;
- hairspray with glitter;
- small flower pot.
First of all, you need to make a base for the bouquet. Toilet paper is torn into small pieces. The balloon is inflated to the size corresponding to the selected flower pot and pasted over it with pieces of paper soaked in water. The base is completely auscultated and the ball is carefully removed from it.
The napkins are folded into squares and secured in the middle with a stapler. Their edges are cut in the shape of a circle and buds are formed, alternately lifting and pressing each layer to the center.
Ballerinas made from napkins
You will need: flexible wire that holds its shape well, multi-layer napkins, starch paste, pliers, white thread, transparent fishing line, scissors, thin needle.
Master Class
- Make a ballerina skeleton out of wire. There is no need to make it detailed; it is enough to simply outline the main contours - head, torso, arms and legs.
- Divide multi-layer napkins into separate layers and tear several of them into strips 1-1.5 cm wide.
- Wrap the wire frame of the ballerina with strips of napkins, then saturate the top with starch paste.
- Leave the ballerina to dry.
- Make a ballerina's outfit this way: fold the napkin as if you were going to make a snowflake and trim at the desired level. Slightly round the cut line.
- Twist the workpiece clockwise several times and then in the opposite direction to crease the folds.
- Repeat steps 5 and 6, making a second blank.
- Make a petticoat if desired.
- Make small holes in the dress for the arms and head, then put on the figurine.
- Pull the thread tightly around the waist of the dress.
- Thread the fishing line with a thin needle through the top of the figure for hanging.
- Make the required number of ballerinas in the same way, choosing the most beautiful napkins.
Napkin ballerinas are ready! Browse the photo gallery and get inspired!
Detailed video master class!
DIY