Porcini
Let's start with the simplest and most popular option. Let's try to figure out how to draw a porcini mushroom. Prepare a set of multi-colored pencils, an eraser and a simple pencil for sketching. Let's move on to the stages:
- Using a simple pencil, draw the outline of the mushroom.
We draw the hat in the form of a semicircle, and add an elongated oval-shaped leg from below. Try not to put pressure on the stylus. - To the right of the mushroom you can add another small one. After this, you can draw contours and detail. We draw an arc at the bottom of the cap. So, we will separate its top. Let's mark with a line the place where the leg begins.
- Draw the outline of a small mushroom nearby. Erase the auxiliary lines.
To make the mushrooms look beautiful and organic, add grass at the bottom. It may cover them slightly. On the left side we draw several thin stripes. - You can start coloring. Use brown pencils for the hats. Be sure to leave a light highlight on them. The legs can be shaded gray and the grass green. The area under the cap can be made yellow.
The drawing is ready, but in order not to leave a white background, you can shade it with a blue pencil.
You can also depict a tree in the background
Drawings of edible mushrooms for children with names: photo
Mushrooms can inspire artists to paint and gardeners to create living tree sculptures. This is what mushroom trees look like.
Mushroom trees in the park
Young artists love to draw mushrooms. They can be realistic and fabulous, large and very small. In the picture below, there are a lot of small porcini mushrooms that children collect.
Mushroom picking
But in the next picture, porcini mushrooms are shown in close-up. To create the same beautiful and realistic picture, you will need colored crayons.
How to draw a porcini mushroom: drawing with colored chalks
This is how you can draw a boletus mushroom. This mushroom may have a grayish or brownish cap.
Pattern: boletus mushroom
Below is another drawing in which mushrooms are the central part of the composition. Mushrooms grow on it in a magical, fairy-tale forest. Apparently this is a mushroom family: mother and daughter.
Boletus flowers close up: painting with paints
A professional artist painted a close-up of a porcini mushroom with paints. This mushroom is edible. Such a giant can be cut down and taken with you.
Drawing: porcini mushroom in the forest
In the picture below, the porcini mushroom and chanterelles are painted with paints.
The picture shows a porcini mushroom and chanterelles
The following picture appears to show russulas with red caps. Be careful not to confuse them with fly agarics.
Drawn Russulas
And the poisonous fly agaric mushrooms look so beautiful. You should not put these mushrooms in baskets and it is better not to touch them with your hands. You can simply admire such beauty and look for edible mushrooms in the forest. You should know these mushrooms by sight and not collect mushrooms in baskets if you doubt whether it is edible or not.
Inedible fly agarics
VIDEO: How to draw mushrooms?
How to draw a chanterelle mushroom
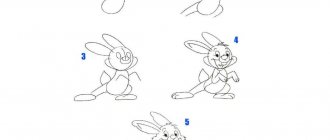
Now let’s look at a mushroom that differs in appearance from the rest. These will be chanterelles, they differ in their cap. Prepare the pencils and move on to the steps:
- First, we draw the contours of the future fox.
To make them beautiful, draw two auxiliary lines. One horizontal, the other vertical with a slight slope. - Add two forward slashes to the vertical line below. This is the base of the future leg. Now we pull upward lines from them, which will expand upward to create a shape similar to a bowl.
- To finish drawing the hat, you need to draw an elongated and uneven oval at the top. It should extend beyond the sides; it is better to use wavy lines to draw it.
- We erase the auxiliary elements. Please note, for example, under the cap of the mushroom there are stripes that are inclined in different directions. Add them to the drawing.
- As with the previous sketches, we recommend depicting a bunch of grass here. Draw it using triangles with the tops pointing to the sides.
- It's time to color the mushroom. Here you will need brown, orange and green pencils. Trace the outline of the drawing with a brown pencil. Lightly shade the mushroom with it. It is advisable to make the color more saturated on the sides. You can add a little orange color to the top of the leg. And the grass will need a green tint.
Here's how to draw mushrooms with a pencil step by step, but there are many other interesting lessons.
A drawing of a hedgehog will fit organically into the composition
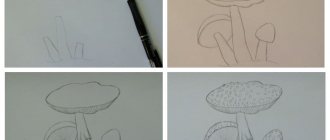
We draw boletus mushrooms step by step from life
I choose a couple of prettier mushrooms, first I will draw them with a pencil.
We repeat the theme “Mushrooms” more than once throughout the year - we painted the mushrooms, fed the squirrel, and compared the umbrella with the mushroom. It seemed to me that I had a clear idea of what mushrooms look like - the cap and the stem. Yeah, but now I finally see real, and not schematic mushrooms. Wow, how massive the legs of boletuses are. And it’s also so interesting that they are flared at the bottom. And I thought that mushrooms have legs like an even column, but it turns out that not all of them do.
I designate the middle line - I won’t call it the “axis of symmetry”, because the similarity of the halves of my mushrooms is very approximate. I draw a line for the cap - here it is necessary to correctly determine the angle of inclination: the cap of a large mushroom is put on straight, and the cap of a small one is on one side. The shape of the caps is dome-shaped, but also not ideal. On the underside of the cap there is a spongy “hymenophore” - this is what the whole mushroom grew for - the place where mushroom spores ripen. In the boletus, the hymenophore looks like... foam rubber, porous and slightly lumpy.
The contours of the mushrooms are drawn. Let's add volume with shading.
By the way, the cap of the small mushroom is almost black, and we’ll draw the larger one lighter. The legs are also different. I used to think that the legs of mushrooms are white, but look at them – they are gray with many black specks. Well, my theoretical ideas were very different from what mushrooms actually look like. Okay, it’s important not to dwell on your misconceptions, but to admit and follow the truth.
Well, the mushroom drawing is ready.
Russula
Another example of how to draw a mushroom step by step for children. This time we will try to depict a russula. It can be compared to a porcini mushroom, since their shape is approximately the same, but the drawing process itself will be different. Let's start:
- Draw a vertical line. Divide it into three stripes. The upper part will be for the cap, the lower part will be for the leg.
Let's start drawing the top. During this process, make sure that the stem of the hat will sit flat on the stems. We draw a semicircle. - At the bottom we add an additional line, which will give us a view of the bottom of the mushroom. Let's draw the contours of the leg with thin, barely noticeable lines.
- To make our mushroom look beautiful, we will add a beautiful autumn leaf to its cap. Erase additional lines with an eraser.
- At the bottom of the picture you can depict a little grass. Since our picture shows autumn, it should not be thick and tall. We draw the contours with a black pencil and immediately add plates in the form of stripes under the cap.
- Let's color the drawing starting with the leaf. For it, use a yellow and orange pencil. Try to use them in different parts of the leaf to make it look voluminous.
- Now let's paint the hat. Russulas can have different colors, for example, yellow, pink and green. Our mushroom will be green. Shade the cap, leaving shadows and highlights.
- For the area under the cap and stem you will need a gray and blue pencil. Do not press on the lead; the color should be light and pale.
All that remains is to paint over the grass; it is better to use soft colors. The russula is drawn.
We also recommend depicting a squirrel
How to draw edible mushrooms with a pencil step by step for beginners and children?
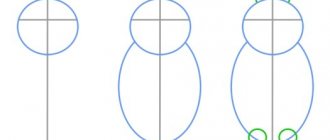
To draw edible mushrooms step by step, it is enough to be able to draw simple geometric shapes: circle, oval, triangle. A mushroom whose cap resembles a hemisphere is drawn like this:
How to draw a mushroom for beginners
In a circle, draw an oval that will be the bottom of the cap and an oval that will be the stem of the mushroom.
Edible mushroom drawing for beginners
Remove unnecessary lines with an eraser and color the mushroom with pencils or paints. Mushrooms whose caps resemble a cone can be drawn like this:
- Draw a triangle, point up
- Draw an oval that will be the bottom edge of the cap and an oval that will be the stem of the mushroom
Mushroom drawing for beginners
Now erase the unnecessary lines with an eraser and color the mushroom. You can add leaves or grass to the design.
Drawing a mushroom step by step for beginners
If you need to draw mushrooms whose caps look like funnels, then you will need to draw a triangle with the top down.
How to draw edible mushrooms step by step
If the edge of the mushroom cap is wavy, draw a wavy line along the oval line and remove the auxiliary line with an eraser. All that remains is to color the mushroom with pencils or paints.
Edible mushroom drawing for beginners
If you don't use a compass or ruler and the figures turn out to be of irregular geometric shape, this will only add naturalism to your drawings. After all, it is difficult to find mushrooms in nature that have the correct geometric shape. Their caps and legs come in the most bizarre shapes.
Fairy mushrooms
fly agaric
There are not only edible mushrooms, but also those that cannot be eaten. One of these, the most popular, is fly agaric. Despite the fact that you can’t eat it, it has an attractive appearance, so now megamaster.info and I will tell you, using his example, how to draw mushrooms step by step.
Before you start drawing, you should know that fly agarics are very bright and you need not only to choose bright pencils, but also add a black gel pen and eraser to them. It is advisable to use watercolor pencils, which will highlight the beauty of the drawing. Now let's look at the steps:
- Determine the location where they will be located. Draw three outlines of future legs. We make the tallest one in the center.
- Add caps to the legs. Please note that their shape is different. For the mushroom, draw a circle on the left side and draw an arc on top of it. For the central fly agaric, draw a circle with wavy edges at the top and bottom. The last mushroom has a cap that resembles a russula.
- Let's add details. The legs of fly agarics are very interesting; they have folds that resemble a barrel. Some need to be placed in the center of the leg, the rest are placed at the bottom using several rows of wavy lines.
At this stage, add the plates in thin strips under the caps. - There are a few details left. These mushrooms have white dots on their caps. Draw them using different circles. Below you can draw low moss. We trace the drawing with a pen, wait until the ink dries and erase all the pencil lines.
- Using a gray pencil, shade the legs and the area with the plates. Leave some light space. Using a brown pencil you can deepen the shadows.
- Now let’s paint the caps with bright colors. We do this in three layers. The top will be orange, the edges will be burgundy, and the center will be red. Try to make transitions smooth.
All you have to do is paint over the moss, then our drawn mushrooms will be more realistic.
Drawing mushrooms - lesson 2
Now I’ll do what I’ve wanted for a long time, but I didn’t dare and put it off. I will paint with watercolors.
The fact is that I didn’t like working with paints since childhood. In art school I really hated painting. She shirked and pretended to be sick so as not to go to the art room on painting day. The teachers took an impressionistic approach, and this was not at all close to me. I liked thoughtfully looking for correspondences of halftones and contrasts in a black and white pencil drawing, and it was even exciting. But my soul did not accept brushwork, color transitions, and reflexes. I learned painting through force and clenching my teeth.
After finishing school, I happily threw the box of watercolors onto the mezzanine and forgot about it. Subsequently, as a graphic designer, I worked a lot with gouache, but this is a completely different technique. But now, when I started writing educational lessons, it somehow happened that I became interested in drawing in color. The always-favorite black and white drawings are somehow not enough anymore. The soul asks for more. Only now I have grown to color!
At first I colored the drawings with felt-tip pens, then I bought watercolor pencils. But recently, surprising myself, I found a box of watercolors on the mezzanine. God, how long has it been lying there... Do you know how difficult it is to overcome the dislike received for some subject at school.
But, never mind, be brave.
The watercolor technique consists of either applying several transparent layers - glazing, or working on a raw sheet. But I’ll do it simpler: for the first time I’ll just try to choose the color as accurately as possible and paint it in one or two layers.
I choose two other mushrooms - for variety. We have already discussed how to draw. Now it's up to the paints.
When coloring, the hats were easy to draw, but the most difficult part was the legs.
There are not only black specks on them - there are even what look like small shavings.
In general, I had to draw these patterns with a semi-dry brush:
Okay, the boletus mushrooms turned out to be recognizable, and now it will be easier for me to work with watercolors - the first step has been taken.
And you, dear readers, bless me for further exploits of color and draw too! Draw like me and better than me!
Marina Novikova told you how to draw mushrooms.
I placed the article in the section “Russian flowers and fruits” because the mushrooms that we see are the fruiting bodies of the mycelium. So it goes.
Drawing of a landscape with mushrooms
So, we already know how to draw chanterelle, white and russula mushrooms. Let's combine our knowledge and try to create a picture with these forest mushrooms. You will need a liner, a simple pencil, a set of multi-colored pencils and an eraser. Let's start drawing:
- First we draw the contours of the legs of the mushrooms, placing them at a distance from each other. Make the one in the center the tallest. Let's bend the one on the right slightly.
- Schematically, using rectangles, we draw future hats. We start drawing with the leftmost porcini mushroom. We give it a rounded look from above and add plates at the bottom.
- Let's move on to the central one, this is a fox, here we draw the lower part of the cap and make it wider on one side. Add the top outlines and plates.
- What remains is the russula; its top resembles an elongated oval shape with a depression in the center. Decorate the porcini mushroom with a leaf on the cap and add the grass at the same stage.
- Outline the contours of the resulting picture with a liner and erase the pencil.
We start coloring with a white mushroom. For his cap we use dark brown color. For brightness, you can use orange. Shade the leaf on the cap. - Let's move on to the fox. Here you will need brown, orange and yellow shades. Don't forget to highlight shadows and highlights. For the last mushroom cap, use the same pencils. For the legs of all three you will need a regular gray color. There is no need to heavily tint these parts.
At the final stage, all you have to do is paint the grass green. In the picture you see real forest mushrooms, which are easy to draw. Children will even enjoy coloring these pictures. And by depicting the picture in a smaller version, you can complement it with a drawing of a hare or a bear.
Landscape of a mushroom meadow
Now, given that we have already learned to draw various mushrooms, we can try to combine them and depict the clearing where they all grow side by side. The materials you will need are the same as for the previous drawings, including a liner or gel pen for outlining.
- First, draw the legs of the mushrooms at some distance from each other. The tallest and largest leg will be located in the center, and the one on the far right will be slightly curved.
- We begin to schematically outline the caps of future mushrooms. Then we move on to drawing in more detail. Let's start with the porcini mushroom on the left. Draw a hat and don’t forget about the stripes at the bottom of it.
- The central element of the clearing landscape will be the chanterelle mushroom. We draw her hat in all details in the same way as we did earlier.
- On the right, all that remains is to draw the russula. Her hat will have a recess at the top. Now you need to decorate the cap of the porcini mushroom with a fallen leaf and draw the grass where all these mushrooms grow.
- Now is the time to carefully trace all the contours with a liner or pen, and then, after waiting for it to dry, erase the pencil marks.
We also start coloring with a porcini mushroom - its cap will be dark red. The greenish leaf will stand out beautifully on it.
- Next we paint the chanterelle and russula. You can use those shades that you like and are in harmony with the color scheme. For example, brown, red, yellowish, golden. We make the legs of all three mushrooms brownish-gray and highlight shadows on them. And don't forget to color the grass.
As you can see, drawing mushrooms is not difficult, and the skills acquired can help your child get higher grades in drawing at school, as well as better understand the world around him.
We recommend watching:
- How to draw a hare with a pencil step by step?
- How to draw a hedgehog
- How to draw a mermaid with a pencil
- How to draw a pig
- How to draw a butterfly with a pencil
- How to draw a spider with a pencil
Development of sensory-emotional perception of natural phenomena, the ability to convey the character and mood of characters in painting; developing the skill of working with a brush and mixing paints.
Equipment.
Photographs of mushrooms or dummies; several paper hats (to imitate mushroom caps); gouache; brushes; water jars; thick drawing paper in A4 format; palettes; sprayer for watering flowers; audio recording of P.I. Tchaikovsky “Humoresque” and “Sounds of Nature” (the sound of rain).
PROGRESS OF THE CLASS
I. Organizational moment
The teacher checks the readiness of the students' workstations.
II. Lesson topic message
Teacher.
What a wonderful forest in autumn! All the familiar trees are dressed up in multi-colored outfits, here and there they flash with bright fiery foliage, rejoicing in the last sun in anticipation of a long and cold winter. It’s impossible to sit at home on a fine autumn day; you just want to wander along the paths between the trees, breathe in the fresh forest air, filled with new autumn smells of the forest. What does the autumn forest give us?
Children.
Mushrooms, autumn berries, nuts, acorns.
U.
Today we will look into the autumn forest and find out what adventures await Blob in it.
III. The Tale of the Wonderful Umbrella
U.
Every day the Blob walked around her property, examining and noticing everything new that every autumn day brings.
The teacher asks the children to close their eyes and imagine an autumn forest.
– One day Klyaksa went out for a walk. Very pleased, she trotted along the narrow path, turning her head left and right. Suddenly strange sounds were heard, similar to a quiet whisper, to the light blows of invisible fingers on the leaves of trees. The blot stopped, wondering what it could be. Suddenly something fell on the top of her head, then behind her collar. What could it be?
The teacher turns on an audio recording with the sounds of rain and lightly sprays the class with water so that a few drops fall on each student.
“When the sounds and blows intensified, and a huge drop flowed from her nose, the Blob was very frightened. Nothing could terrify her more than rain. Where to run, where to hide?
Some children will offer all sorts of hiding places from the spot.
“It was very far from the hole; the foliage of the bushes was no longer as lush and dense as in summer. What to do? Suddenly, not far away, Blob saw a strange object, it did not look like either a plant or an animal: on a long column-leg rested a round piece that resembled either a roof or a hat. How it looked like an umbrella! Without thinking twice, Blob grabbed the leg, strained, pulled out a strange object from the ground and ran as fast as she could to her home. What was that?
D.
Huge mushroom.
U.
Droplets of rain pounded around Blob more and more, and when she ran up to her house, a real downpour began. The blot climbed into its hole, and the mushroom, with its beautiful cap, got stuck in the door and did not want to hide from the rain. I had to leave it outside, turning it into a beautiful roof for the porch.
IV. Mushroom image
The teacher opens photographs of mushrooms on the board or shows dummies.
U.
Each mushroom has its own character. What kind of mushroom do you think the Blob could pick?
D.
Fly agaric, russula, chanterelle, boletus. The porcini mushroom does not look like an umbrella - its stem is too thick.
U.
How do mushrooms differ from each other?
D.
They are of different colors, some are large, others are small, some have plump legs and others have thin legs.
U.
Can a mushroom have its own character?
Children may be confused.
– What character can a fly agaric have? He is probably cheerful, pleased with himself, not afraid of mushroom pickers, and showing off his colorful hat.
The teacher asks one of the children to put on a paper hat and pretend to be a fly agaric. At this time, the teacher quickly makes a sketch on the board: a mushroom with a cap that has slid to one side.
– What kind of character can a boletus have?
D.
He may be proud, arrogant or shy. A mushroom may be frightened if a mushroom picker approaches it or a snail has crawled onto its cap.
U.
What kind of toadstool could it be?
D.
Cheerful, mischievous or sad, because everyone considers her ugly and poisonous.
Children try to depict the character of mushrooms, and the teacher makes sketches on the board.
U.
What colors can we use to represent mushrooms?
D.
The caps of mushrooms can be multi-colored, and the legs can be light.
U.
Please note that the center of the cap is always darker than the edges.
The teacher draws the children's attention to the photographs.
– Come up with your own mushroom, it doesn’t have to look like a real one. But he must have his own character.
Start with the cap, then draw the leg.
The guys start working.
– Don’t forget that our mushrooms don’t grow in a vacuum – we need to create a background. Which?
D.
Mushrooms grow in dense grass and can hide among fallen leaves and twigs.
V. Summary of the lesson
All mushrooms are “planted” in a common clearing. The guys try to guess the nature of their comrades' mushrooms, and the authors tell stories about their heroes. There won't be enough time for this in class, of course. The game can be continued during recess or during a speech development lesson.