Most often, mushroom stencils may be needed to create children's or autumn crafts. However, the range of their applications is much wider. Imagine how original a handmade candle, brooch, patch on a jacket, or even a lamp in the shape of a mushroom will look. But all these crafts require templates.
We have made for you an appropriate selection of images that will help bring all your ideas to life. Here you will find several options for stencils of the most popular mushroom - fly agaric. Champignons, porcini mushrooms, various toadstools and other templates - all these pictures are ready for printing and cutting out of paper.
The mushroom stencils presented below can be divided into two categories: traditional (close to reality) and funny (reminiscent of fairy-tale, cartoon ones). Choose those that match your ideas. Single or double, long or plump, simple or with many details - we hope that in this selection of pictures you will find everything you were looking for.
If you need to print several stencils on one sheet at once, collect them in a graphics editor into one document, and then print them out. The same applies to cases when you need to combine two different images: for example, putting a mushroom on the needles of a hedgehog.
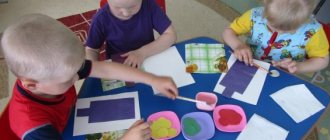
Applique is a type of creativity that allows you to create patterns or paintings from pieces of paper, fabric, plant and other materials, glued or sewn onto a certain base. And for children, such activities are also a great opportunity to develop intellectual and creative abilities and train fine motor skills.
That is why applications are so widely used in developmental activities for children in the senior and middle groups of kindergarten. In general, of course, such applications are already made in the second younger group, however, from pre-prepared parts of the mushroom. But already in the preparatory group, quite complex work is already being done. This article will provide master classes on making mushroom appliqués for beginners.
For cutting, you can prepare a stencil specially downloaded from the Internet, and the prepared parts cut out from the stencil can be pasted onto the outline, which can again be downloaded on the Internet or drawn by hand. A basket of mushrooms made by kids looks very nice - while working, it will be useful to further study the names of edible mushrooms that may be in the basket.
The advantage of this type of creativity is the opportunity
create real works of art from scrap materials, and sometimes even from unnecessary things.
To develop the baby and expand his horizons
and the amount
of knowledge
about the world around him - it is very important to teach him to create something with his own hands.
A suitable option in this case would be the “ Mushrooms
” applique - it is not difficult to execute and does not require a lot of time and materials.
This “Mushrooms” applique for the middle group can be a fun activity that develops their horizons well and perfectly trains fine motor skills. To make this craft we will need:
This list of materials
can be supplemented at your discretion. You can use corrugated paper, cereals, plasticine, and paints.
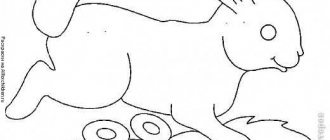
Mushroom template
You can download it from the Internet and print it, or you can draw it yourself. This can be an outline image or a multi-colored picture.
Here are step-by-step instructions for performing the “mushrooms” appliqué in the middle group. To begin with, it is recommended to choose the simplest mushrooms in shape.
You can make spots
by drawing them with felt-tip pens or paints. You can glue small paper circles.
Application "Mushrooms" made from natural materials
Application "Mushrooms" in the older group from natural
materials - a somewhat more complex process, but very interesting and exciting. It is very easy to make an applique from dry leaves.
Collected leaves
need to be leveled and dried with a warm iron. You can dry the leaves between the pages of the book. Such an application can turn out to be very original and bright. The sequence of actions in this case will be as follows:
- To begin with, blanks for legs and caps are cut out of thin paper according to a template.
- Each paper piece is covered with dry leaves, selected by color.
- All parts are glued to a cardboard base.
The lower part of the picture is decorated using dry blades of grass, twigs, and small leaves.
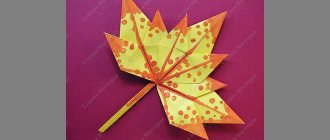
We create an application “Mushrooms” with children using the origami technique
This technique is suitable for older children who are in the older group of kindergarten. During the lesson, you can tell the kids about the features of such a topic on the surrounding world as “mushrooms of my area.”
The applique is made from colored paper.
You will need:
- Scissors
- Glue
- Cardboard
- Colored paper
Step-by-step instruction:
- Take a sheet of colored paper, for example 20 by 20 cm, fold it along two diagonals
- Turn the wrong side towards you and bend 3 corners
- Fold in half, leaving the bottom corner open
- Turn the workpiece over to the other side and bend the corners inward so that they connect
- Cut and bend the sides so that you get mushroom legs
- Fold the bottom corner inward to trim the edge of the workpiece.
- Turn over and see that your mushroom is ready:
- Finish the job by pecking additionally (in addition to the mushroom) various pieces of colored paper or making a fly agaric.
If you stick several mushrooms on one sheet of paper, it will look like you have made a whole family in a clearing.
Making applications from cereals
A very natural and original application on the theme “Mushrooms” can be made using cereals
or grains.
To make such a craft, you will need a mushroom
on white paper.
However, it is absolutely not necessary to print out the finished template; you can simply draw it for your child. This template
will allow you to preserve the natural colors of the materials you will use.
If necessary, you can use paints
and give the applique any desired color.
However, it is better to postpone such coloring until the end of the work, because coloring bulk material is not the easiest task.
The sequence of making an applique from cereals can be as follows:
You can make an applique from pumpkin or watermelon seeds
. To do this, the template is made on a cardboard base, the cap and leg are covered with a thin layer of plasticine. The seeds are carefully placed on the surface of the plasticine.
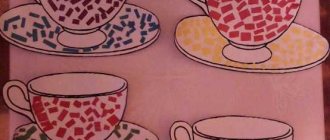
Mosaic of cereals
A very unusual, but original and natural application “Mushrooms” will be obtained if you use grains. Cereals can also be used for these purposes. A drawing of a porcini mushroom is suitable as a template. It will allow you to preserve the natural shades of the materials, although they can be painted. It is better to apply any shade after gluing. It is usually difficult to paint a loose mass.
To do this, work in the following sequence:
Using the same principle, you can lay out a pattern of watermelon and squash seeds.
Application "Amanita"
An applique in the form can turn out to be very elegant and attractive and also gives scope for children’s imagination - after all, this beautiful mushroom can be created and decorated in the most incredible ways. To work, you can use the proposed template.
Below are step-by-step instructions for one of the options for creating the “Amanita” application:
Now all that remains is to smear the lower part of the space under the fungi with glue and “grow” the grass
from tea or dry blades of grass.
In the same way, you can decorate the background of the application using semolina
or other small cereals. All that remains is to let the application dry thoroughly and shake off the excess grain.
Our craft is ready!
You can start a lesson with children with a riddle
He grew up in a birch forest.
Wears a hat on his foot.
The leaf stuck to it on top.
Did you find out? This is... (mushroom)
DIY application “Still life with mushrooms”
To complete the application you need to prepare:
Colored paper in the desired shades;
Cardboard for the applique base;
Scissors:
A napkin for wiping off excess glue
Step-by-step application process
1. Let's start with the simplest mushroom shape.
Take a rectangle of paper, fold it in half (vertically) and round two corners, then cut along the fold. We have two legs ready.
2. Cut out two mushroom caps. To do this, fold a square of paper in half, round the corners and cut the paper along the fold. Two hats are ready.
Glue the cap to the leg. The first pair of mushrooms is ready.
You can glue a circle onto the fungus or make a spot with a felt-tip pen.
3. Cut out a fox from paper.
Fold the rectangle in half and cut along the drawn outline.
4. Cut out the boletus.
We cut out the mushroom cap as in step 2. To cut out the stem, fold the rectangle in half and cut along the contour.
Glue the cap and stem together.
5. Let’s move on to making beautiful fly agarics.
We cut out the dome hat from a red square.
This shows the process of cutting a leg from a rectangle.
To cut out a skirt, fold a narrow rectangle in half (vertically) and cut off the corners. We cut the resulting trapezoid with scissors, but you don’t have to cut it.
Glue the leg with the skirt to the hat. The fly agaric is ready.
6. Cut out a few more mushrooms (we make oval caps for some mushrooms). We make a basket with a long handle, lay out the silhouettes of our mushrooms and then glue them loosely.
You can use this template to make a basket
Our mushroom still life is ready.
Application "Mushrooms"
We will need: colored cardboard, colored paper, packaging cardboard, thin stick, PVA glue, scissors.
1. Using a stencil, cut out a mushroom cap from thin orange cardboard. Then we cut out the stem of the mushroom from gray cardboard and the fringe on the stem from white cardboard.
2. Glue together the parts of the mushroom stem.
3. Cut out a strip of 2x6 cm from the packaging cardboard, glue it to the cap from the wrong side and connect the parts of the mushroom.
4. Now let's make 2 small mushrooms. Using a stencil, we cut out 2 small hats from orange cardboard, then 2 legs from white cardboard.
5. We connect the caps and legs together. Cut out 2 small squares from thick cardboard and glue them to the mushrooms from the wrong side.
6. Cut out a 25x25 cm square from dark green cardboard.
7. Cut out a figured element in the form of two ovals from green paper and paste it onto a green square.
8. Cut out strips 5-7 cm long and 15-20 cm wide from green paper of different shades. We cut the fringe on these strips. Then we cut out several leaves of different shapes.
9. We glue the cut out elements in such a way that they run from the middle to the edges. Thus, we got grass. Glue a mushroom on top.
Applique - creating patterns, paintings or just figures from pieces of paper, fabric, plant and other materials. These pieces are glued (or sewn on) and you can create amazing works of art from completely simple or simply unnecessary household items. And given that such activities develop the creative and mental abilities of children, applications are always welcome guests both in the senior group and in the preparatory group.
Autumn holiday “In a forest clearing”.
I will bring you Autumn
I'll look for her in the forest
I will call on the beauty of autumn.
Leaves, returns with Autumn
Autumn:
Hello guys. I am a wizard. Take a closer look at me, You will see all the beauty of an autumn day. I will sew golden outfits for the trees. And the birch and maple trees will be happy to wear them. It’s me, the sorceress, who changed everything, painted the earth red and yellow. And today I’ll joke with the guys,
I’ll spin you around with my magic umbrella, I’ll turn girls and boys into wonderful vegetables.
I open my umbrella and invite vegetables to the holiday.
Round dance
We have a vegetable garden, Look what grows there, Harvest the harvest, Just keep up. You, cucumber,
run out, You dance, don’t get tired, We admire you, Look how big it is.
We have a vegetable garden, Look what grows there, Harvest the harvest, Just keep up. Tomato
run out, You dance, don’t get tired, We admire you, Look how big it is.
We have a vegetable garden, Look what grows there, Harvest the harvest, Just keep up. You, potato
, run out, You dance, don’t get tired, We admire you, You have grown so big.
We have a vegetable garden, Look what grows there, Harvest the harvest, Just keep up.
You, cabbage,
run out, You dance, don’t get tired, We admire you, Tasty and big.. Oh, so many vegetables, Both for soup and cabbage soup, We will collect them together, And let’s go to a merry dance.
Children sit down
Autumn:
And we continue the holiday
We invite you to visit the fairy tale
Come on, spin my umbrella
Show yourself a fairy tale to children.
Cowberry comes out and sits down.
Ved:
A lingonberry, a red ball and an eyelash grew in the clearing.
The fox ran into the clearing.
Fox:
What kind of berry is lingonberry! Red ball and eyelash! I’ll pick you now and take you to the foxes.
Lingonberry:
I'm not ripe yet, I'm immature. Don't tear me down just yet, go your own way!
Presenter:
And the little fox ran on its way.
As soon as the fox ran away, Magpie flew into the clearing. Magpie:
What a berry, lingonberry! Red ball and eyelash! I’ll pick you up now and take it to the kids.
Lingonberry:
I'm not ripe yet, I'm immature. Don't tear me down just yet, go your own way!
Ved:
Magpie did not tear up Cowberry, she flew to her chicks, and Squirrel hurries to the clearing.
Squirrel:
What kind of berry is lingonberry! Red ball and eyelash! I’ll pick you up now and take it to the kids.
Lingonberry:
I'm not ripe yet, I'm immature. Don't tear me down just yet, go your own way!
Ved:
Squirrel ran on her way, and the Sun looked out into the clearing where Lingonberry grew. The sun warms Lingonberry and Lingonberry turns red. The rain waters the Lingonberry and the Lingonberry ripens.
Lingonberry:
Now I am ripe, tasty, ripe. Collect in boxes and bake pies.
Preparation of material
1. Base with a pattern. As you might guess, to create a pattern you will need a base on which our wonderful materials will be attached. Typically cardboard, thick paper or wood are used. If the 2nd younger group (from 3 to 4 years old) is engaged in appliqués, then it is better to help the kids with the drawing (the ideal option is for adults to draw it) and remove from it all the details and lines that would be difficult for the kids to lay out.
2. Glue. Regular PVA glue will do. Of course, we can use a needle if we are working with cardboard or paper, but it is important to consider its thickness so as not to leave too large holes and to make it comfortable to work with. Naturally, you won’t be able to work with a needle on wood.
3. Materials. In our example, you will need cereals (buckwheat, rice and millet) and tea. But the choice of materials is limitless: from a sprig of rowan, caught in the December frost, to sugar or old and unnecessary scraps. And their selection will be a creative task not only for children, but also for adults.
4. Paints. The choice of paints depends on you, but it is better to take inexpensive ones - otherwise you will face inevitable disappointment when the child manages to mix the paints into something gray.
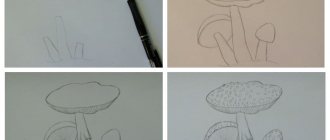
Step-by-step instructions for creating the “Amanita Mushroom” application
1. Creating a drawing. You can draw it yourself or buy a thermal pattern if you don’t have any talent for fine art. And working with a ready-made mushroom template for applique is much easier. You can buy it in the store either separately or as a set with an embroidery kit. For example, here is a wonderful representative of the mushrooms of my area - the fly agaric:
2. Apply PVA glue in small droplets to the stem and cap:
3. Then sprinkle with tea (or cereal) so that there is no empty space between the grains. First, sprinkle the mushroom stem:
4. Then we “plant” blades of grass from the tea (not forgetting a few drops of glue) and sprinkle the cap with fine-grained cereal:
5. Let's wait a little. When the cereal sticks, take paints and begin to paint the hat:
6. Now let’s create the background for the picture. Let's repeat what we already know how to do well: carefully drip glue, sprinkle with cereal and our work is finished:
If you want, you can varnish the picture and/or put it in a frame and under glass.
APPLICATION. "MUSHROOMS IN A FOREST CLEARING"
(TEAMWORK)
Software tasks.
Continue to teach children to compose a general plot-thematic composition, to place objects on a wide strip of land both “closer” and “farther”; consolidate the ability to cut mushrooms from ready-made initial forms, using their entire surface; when depicting identical objects, use the technique of paired cutting.
Material.
The teacher has a large sheet of paper with a picture of a forest clearing, a mushroom in two parts. For children, the initial shapes for the legs and caps of mushrooms are the same as for lesson 3, and short green paper strips (grass), scissors, glue.
Progress of the lesson.
“Today we will make a big picture together, which will be called “Mushrooms in a clearing,” says the teacher. — I did my part of the job. This forest clearing (shows a large sheet with a picture of a clearing). And you cut and paste mushrooms of different colors. Mushrooms will grow in the clearing in different places - both close and far (points to those and other places in the clearing). You will glue ready-made mushrooms to the clearing. Here they are (shows a glued fungus). Glue a hat onto the leg. If you want to cut out a family of mushrooms, then stick them on the grass - like this green stripe, and then glue the whole family along with the grass onto the clearing. Everyone must do their part well so as not to spoil the overall picture.
Fig.8
In the process of work, it is necessary to remind children that it is better to cut out identical mushrooms immediately using the paired cutting technique. Tell the children to try to cut out smoothly rounded mushroom caps so that they do not look like they have been eaten by snails. When ready, invite the children to bring their mushrooms to the teacher’s table, spread the mushrooms with glue and stick them on the clearing. At the same time, ask where the mushrooms grew - close or far. Give advice on which mushrooms are best placed nearby and which in other places, taking into account their color and free space in the clearing. Make sure that there is free space around the group of mushrooms. If there are more mushrooms than required for a beautiful composition, leave them for making the didactic game “Paired Pictures”.
At the end of the lesson, ask the children if each of them alone can complete such a large and interesting picture. Emphasize that this can only be done together. Praise children for their efforts. Then offer to show where the mushrooms farthest from them grow, what color their caps and legs are, where the closest mushrooms grow, which mushrooms they liked. Conclude that only a wide surface of the earth can accommodate so many mushrooms.
LESSON 5
- DIDACTIC GAME “FIND A SQUARE OF THE SAME COLOR
BUT A DIFFERENT SHADE"
Target.
Develop color perception in children - the ability to distinguish up to five shades of the same color.
Material.
Paired sets of squares of the same color, but different shades (4x4 cm) - two red, two blue, etc.; cardboard strips divided into five cells.
Progress of the game.
I option. “Make a pair.”
The teacher places two strips of squares in the middle of the table, one above the other. Gives children one square from a set of the same color, for example blue squares of different shades. Offers to make pairs of squares of the same shade. He places a blue square on the first square and asks: “Who will make a pair? “Each player looks at his own square and determines whether it is the same shade. The child who has a square of the same shade says: “I’ll make a pair,” and puts his square on the first square of the second card.
The game continues until five pairs of squares of the same shade are made. You can ask the children to close their eyes, move two or three squares on one card, and then open their eyes and restore the pairs. Then the children make pairs of squares of a different color: red, orange, brown, etc. If there are ten people playing, then each subgroup of five children leaves pairs of squares of different colors.
Option II. “Who will lay out the track faster?”
Each player receives a “track” - a card with squares and two sets of squares of the same color (10 pcs.). At the teacher’s signal “Begin!” children lay out a path of five squares of the same color, but in different shades.
Step-by-step making of a basket of mushrooms
1. Let's make a mushroom cap. To do this, draw a circle with a diameter of 5 cm and divide it in half. There are already two hats, only four left.
2. Now let’s make a leg template from cardboard and cut it out:
3. Glue the hats with the legs and paint them with gouache:
4. And now the most difficult part - the basket. Let's draw a circle with a diameter of 11 cm and divide it in half:
5. Let’s make a handle (a semicircle with a diameter of 10 cm) and the edge of the basket:
6. Draw two more semicircles a little higher; they will be the far edge of the basket:
7. Cut out the excess and get a finished product:
8. On another sheet, draw a semicircle with a diameter of 11 mm and cut it out. This will be a kind of “pocket” for mushrooms:
9. Glue, paint with gouache and carefully place the mushrooms:
Now with a full basket of mushrooms, as if collected in a clearing, you are guaranteed an autumn mood.