Applique classes in kindergarten should be given attention. This type of creativity requires greater preparedness of the teacher to conduct a lesson than other types of artistic activity (such as drawing, modeling). Creating an applique involves working with various objects (pencils, scissors, brushes and glue) and materials (from the usual paper and cardboard to eggshells, fabric, cereals, cotton pads, napkin balls). At the age of 4–5 years, a child improves fine motor skills when creating applications, and also learns to independently think through an idea and its implementation in a given space.
Preparation for appliqué classes in the middle group of kindergarten
So, in the middle group of kindergarten we work with those types of applications for which the pupils have sufficiently developed fine motor skills:
1. Creation from a template
. Is the child asked to circle the available elements? cut out and glue them onto cardboard yourself, as demonstrated by the teacher.
2. Silhouette applique
. It involves the student carefully cutting out figures along a contour drawn on the reverse side of black paper. Then the elements are glued onto a cardboard base in white or light pastel shades. Samples of silhouette applique are reminiscent of scenes from a shadow theater, so the first experience of working in a similar vein should be accompanied by a story about this type of performing art.
3. Broken applique
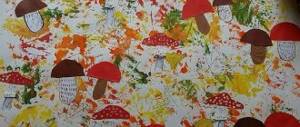
. Pupils tear paper into pieces, which helps to activate tactile sensations. This activity has a positive emotional orientation and has a calming effect. Next, the resulting elements must be glued onto cardboard in accordance with the original plan. This type of applique is especially successful for creating images of spotted animals and colorful flower paintings.
4. Overlay applique
. With this type of work, creative and spatial thinking is activated: the student needs to glue the elements by overlapping each other so that the given image is obtained.
5. Symmetrical applique
. It is used when the work requires figures with a symmetrical structure. At the age of 4–5 years, it is still difficult to draw and cut out an element so evenly that the halves are mirrored to each other. Therefore, we give a simplified task: draw a figure, fold a piece of paper with its image in the middle and cut it along the contour of one of the halves, holding the fold. The child opens the piece of paper and gets a symmetrical figure.
6. Modular application
. The most complex type of application, in the middle group of kindergarten you need to start mastering this method of work in order to improve it at the age of 6–7 years. First, you need to tell the students what the modules are (these are elements of the same shape that may differ in color and size). Creating modules will not cause difficulties for this age group if all the elements are cut out according to prepared templates, this is exactly how you should start introducing them. Then complicate the task, let the children try to draw elements of a larger or smaller size on their own. The pedagogical value of working with modules is that this type of activity serves as one of the first steps to understanding the basics of design. The student is considering how to obtain a complex image of a given object from many identically shaped elements. Abstract thinking begins to work, the child works with the overlay of elements, multi-layering, tries to bend modules and receives a three-dimensional object.
8. Collage
. This type of appliqué comes close to the realm of art. The teacher should talk about collage as a separate art form that creators turn to to create paintings, sculptures, photo and video projects. Collage as a type of applied creativity combines the types of application we mentioned above. The child prepares a variety of elements (whether symmetrical, modular, or any other) from materials of various colors and textures, but then he doesn’t just make an image of one or several objects, but tries to create a picture using the collage technique.
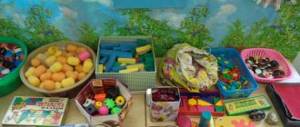
In the middle group there are no restrictions on the materials used. Primary skills were developed on classic paper and cardboard. But to maintain interest and activate your creative imagination, use a variety of materials:
Haberdashery (beads, beads, buttons, sequins) - textile (various types of fabrics, felt, braid, ribbons) - household (napkins, candy and chocolate wrappers, foil, paper napkins, cotton pads and sticks) - natural (leaves, sticks , dried berries, cereals, pebbles, shells, straw) - aromatic (coffee beans, cinnamon sticks, clove buds, dried berries and thin mugs of citrus fruits and apples). Thick cardboard is used for the base of the applications; works with fabric elements look great on a felt lining or velvet-coated paper.
Examples of applications on the theme “Mushrooms”, made from non-traditional materials.
Application from napkins Application from grains Applications from crinkled fabric Application from grains Application from felt Application from grains Application from corrugated paper (trimming) Application from rhinestones Application from fabric and buttons Application from seeds and seeds
The instruments are already familiar to the students. These are scissors, glue with an applicator for application or a brush, stacks for working with plasticine or plastic clay, pencils for creating contours, tracing patterns and applying markings on the base.
Examples of motivating material on the topic “Mushrooms”.
- Tales about mushrooms:
E. Shim “Brave Honey Honey”, “Mushroom Smoke”, N. Pavlova “Two Tales of Mushrooms”, A. Lopatina “Acquaintance with Mushrooms”, N. Sladkov “Fly Agaric”, “Round Dance of Mushrooms”, V. Zotov “Autumn honey fungus”. - Poetry
“I have two legs. They run fast. The legs are jumping and jumping, running, chasing the ball. Stools have legs, beds and banquettes have legs, sofas and wardrobes have legs, dressers and tables have legs. Why do they need legs? Then I thought a little... But I’ll keep the answer about these legs a secret from everyone!” (A. Valasina) They walked along the path - they found Borovik. The boletus hid its head in the moss. We could pass it, it’s good that we walked quietly. (A. Prokofiev) A mushroom picker was walking from afar, and there wasn’t a mushroom in the basket! Not a single mushroom - Only grass and leaves. The mushroom picker got tired and sat down on a tree stump. - Tell me, forest, are you with or without mushrooms? The dense forest looked down on the mushroom picker. I swayed - creaking and creaking! – Showed a mushroom under the tree. “I’m with mushrooms,” said the forest, “And you with or without eyes?” (V. Shulzhik)
Signs and sayings about mushrooms
: Late mushroom - late snow. Where one oiler was born, others fled side by side. The oat panicles have ripened - honey mushrooms have grown in the forest. If there are few mushrooms produced, then the winter will be snowy and harsh. Those who love to bow to the earth will not be left without mushrooms. Those who get up early put mushrooms in the car. When it rains in the evening, expect mushrooms in the morning. When it’s hot and damp, mushrooms gather under the trees; when it’s damp and damp, they scatter into the clearings. Rain in the evening - expect mushrooms in the morning. How many rains - so many milk mushrooms. If there is a steamy fog over the forest, go mushroom hunting. Heavy dew - to fertility, and frequent fogs - to the harvest of mushrooms. If there are waves in the forest, then expect the milk mushrooms to appear soon. If the rye starts to sprout, white mushrooms and boletus mushrooms begin to appear. Where the red fly agaric is, there is a white mushroom sitting nearby. If the night at Christmas is starry, the same is true for Epiphany, then in the summer there will be a lot of berries and mushrooms.
Puzzles
about mushrooms:
| He was hidden deep, One-two-three - and came out, And he stands in plain sight. White, I will find you. | Red-haired girlfriends are growing at the edge of the forest, Their names are... | All Antoshka is a hat and a leg. When it rains, it will grow. | A man walked into a pine forest, found a slug, it would be a pity to throw it away, it would be raw to eat it. | Red ears with a fox top lie in the grass - for little hedgehogs. | Near a shady ravine an impatiens mushroom has grown: If you press a little on the side, lo and behold, there’s already a bruise. | He stood in the forest, No one took him, In a fashionable red hat, Good for nowhere. | He looks down on you - hands on your sides. Beautiful and important - but no one needs it. |
| Borovik | Volnushki | Mushroom | Gruzd | Chanterelles | Mosswort | fly agaric | Toadstool |
In the middle group, for the “Mushrooms” applique, it is suitable to create an applique based on a template with an additional task “Try to draw elements of the same shape, but of a different size”, symmetrical and ribbon appliques, overlay (for example, to depict a family of honey mushrooms on a stump). The program requirements for students in the middle group indicate the need for the teacher to teach the children to think through the image more carefully. They should create objects using more elements, work with color combinations and transitions, and try to create three-dimensional compositions. If a group form of activity is chosen, it is recommended to distribute among the students the creation of applications of the simplest types (pattern, symmetrical) with subsequent mastery of the collage technique. Use entertaining topics for assignments to attract the interest of students: “Mushroom clearing”, “Kingdom of the white mushroom”, “Basket with forest gifts”, “Mushrooms for a squirrel/hedgehog”, “Family of honey mushrooms”. An outline must be drawn up for the application lesson, reflecting the stages of preparation and conduct of the lesson and consistent with the age-related skills of the students.
A condensed lesson plan for creating the “Mushrooms” application
1. Goals and objectives. 2. Materials and tools used. 3. Safety precautions when working with scissors and glue. 4. Step-by-step progress of work (20–25 minutes are allocated for the lesson): — Organizational moment, 1–2 minutes; — Introduction to the topic of the lesson (motivational material), 3–4 minutes; — Discussion of the work plan, 2–3 minutes; — Making parts for applique, 10 minutes; — Gluing parts onto the base, 3–5 minutes; — Demonstration of finished works, summing up, 1–2 minutes. 5. Reflection (were the assigned tasks and goals achieved, whether difficulties arose during the lesson, what points in the organization of activities need correction).
Lesson plan for the middle group on creating an application in the middle group “Mushrooms for the squirrel”
: creating an image of the natural world using appliqué.
- Objectives
: development of fine motor skills, ability to work in a team, education of perseverance and accuracy, respect for nature. - Materials for the lesson
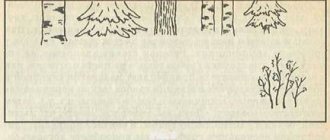
: On the easel is a painting made using the appliqué technique. It depicts a pine tree, with a small squirrel sitting on a branch.
- Progress of the lesson:
(Children stand near the teacher.)Children, we have news. I'll tell you about it now! I received a letter, it came from the forest.
Shall we open? (children’s answers).
Oh oh! Letter from a squirrel.
“My child, the smart little squirrel, is lost.”
Guys, what are we going to do? (children's answers)
Well, then let's go with you to the forest. Let's put on hats, fur coats, felt boots, and mittens. (Show)
Hold hands so as not to get lost in the forest.
“The birch trees are glowing, it’s quiet all around, We quickly go to the squirrel’s aid. Children are walking along a forest path, White snowflakes are spinning and singing.”
Squirrel, huh? Guys, let's all call the squirrel together.
(The teacher draws the children’s attention to the toy gnome.)
Oh, a little gnome is walking along the path, The gnome looks a little bored. He's bored in the forest alone. The children will go to the gnome now.
(The teacher verbalizes the toy).
Who is this walking in my forest? - We guys came on business. - For what reason?
Encourage children to tell us that the squirrel called us for help. She asks for help finding the baby squirrel. And what kind of little squirrel is he? Small, gray.
Gnome. I found one animal in the forest: small, gray. - Show me (the teacher draws the children’s attention to the easel). - Yes, here he is, sitting on a tree. - This is our little squirrel. - I thought it was a bunny. — The little hare is white in winter, not gray. And the little bunny doesn’t know how to climb trees. - Or maybe it’s a wolf cub, he’s gray. — A wolf cub doesn’t climb trees. - Or maybe it’s a fox, look at the tail, how big and fluffy it is. — The fox has a red fur coat, not gray. This is a baby squirrel. Yes, gnome, you live in the forest, but you don’t know the animals. Do you guys know what animals live in the forest? We know and we will show you.
Physical education
Along the dry forest path, thump, thump, thump, feet stomping. A gray hedgehog covered in needles walks and wanders along the path. (Walking in place)
A bear wanders through the forest, walking from oak to oak. The Bear wanders along the forest road to his den. (Tilting the body to the right and left).
We'll gallop across the lawn Like bunnies, like bunnies. (Jumping)
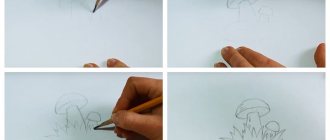
Guys, it’s so good that you and I helped the squirrel find the baby squirrel. Do you know what squirrels eat in winter? (Children's answers). Look what mushrooms the squirrel dried on pine branches. (Identification of the main parts of the mushroom: cap, stem). Winter is long. I'm afraid that the squirrel will not have enough of these reserves. Would you like to help a squirrel with her baby squirrel? How can we do this? (Showing how to cut an oval shape from a rectangle - the stem of the fungus, rounding the corners of a triangle - the cap of the fungus.)
Independent work of children
. The children take their seats and get to work. As you work, ask the children what they are doing. Strengthen the skills of neat cutting and pasting. Provide individual assistance to children in need.
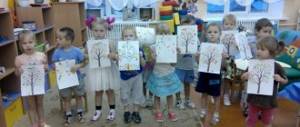
Summarizing. At the end of the work, the teacher offers to stick the finished pine twig with mushrooms on a large sheet. Offer to review the work, encourage them to give an analysis of their work and the work of their peers. The teacher thanks the children on behalf of the squirrel for their help. An application on the theme “Mushrooms for a squirrel” can be made using various techniques, using waste (including natural) materials. Individual work or work in subgroups can be used.
Application "Amanita"
Application in the form of a fly agaric
can turn out to be very elegant and attractive and also gives scope for children’s imagination - after all, this beautiful mushroom can be created and decorated in the most incredible ways. To work, you can use the proposed template.
Preschool children will definitely love a paper mushroom, especially since it is not at all difficult to make. Mushrooms are usually classified as autumn crafts, but for us it is quite multi-seasonal, as it includes bright colors and rich green colors. But a paper mushroom made using a similar technique can also be associated with autumn crafts, if, for example, you change the colors. Moreover, it is enough to attach a maple leaf not green, but yellow to the mushroom. Even better is a natural, dry leaf.
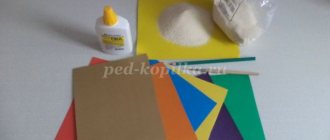
Making a beautiful mushroom from paper
Roll the white cardboard into a tube and glue the edges together. Glue sticks can be weak for cardboard, so PVA is the best option.
Cut a circle out of orange colored paper, find the middle and draw a radius, step back a few centimeters and draw another one. Make a cutout. All values are determined depending on the size of the mushroom. But we must remember that the more centimeters between the radii, the thinner the cap will be. And since we didn’t need a cap on the mushroom, I retreated about 2 cm.
Prepare the next piece for the paper mushroom. Measure the stem of the mushroom, determine the height of the future grass and cut out a rectangle from green paper according to these parameters. Lay out as shown in the photo, the thickness of the grass can be different, mine is 1.5 cm. Cut into strips.
From green paper, cut out a leaf according to the template (or use a dry one), and a section of the clearing - some uneven oval or other indefinite figure.
Now we have all the components of the mushroom ready, it’s time to start assembling.
Glue the grass to one side of the mushroom stem, help it bend beautifully to the sides. If necessary, trim the length.
Glue the cap together, attach a leaf to it, and then glue the cap to the stem. If you simply apply glue to the top end of the mushroom stem, the cap will not be secured tightly enough. If you need a more stable structure, you can attach it with superglue or tape. Or cut the ends of the roll, bend them outward and glue the cap to them.
That's it, the paper mushroom craft is ready.
In the middle and older groups, children can already perform more complex crafts, and they will definitely be interested in the “Mushrooms” applique
, the implementation of which allows you not only to engage in creativity, master working with various materials, but also have fun, solve riddles and play dynamic games. Like other activities in kindergarten, fine art creativity takes place in a playful way, so that children not only make something with their own hands, but also learn more about the surrounding nature and its phenomena.
Application on the theme “Mushrooms” made from natural material
Very simple, but beautiful, you can make a craft from natural material - dry leaves. Freshly collected material must be dried with an iron or between the pages of an unnecessary book. The result will be a beautiful and original application. Mushrooms are made using this technique like this:
- Cut out a blank for the cap and stem from thin paper.
- Cover each piece with dry leaves of the desired shade.
- Glue all the elements into place.
- At the bottom of the base, make grass from thin leaves or dried blades of grass.