The main advantages of tools made with your own hands are not only that they cost almost nothing. This, of course, is also important, but we must not forget about one more thing - the educational process. In kindergarten or at home, you can talk as much as you like about the usefulness of independent work; children listen to such moral teachings, but do not react properly. Positive consequences can only happen when they, together with their parents or educators, engage in manual labor. This is an axiom of any upbringing; one must always remember it and try to apply it at the first opportunity.
Depending on the complexity of the work, toys can be made by children of different ages; the most complex ones should be made together with children of older preschool age. During classes, they get acquainted with the methods of making certain instruments, mainly noise instruments. At the same time, methods of playing them are studied. Both parties benefit from joint activities: children acquire direct practical skills in making various crafts with their own hands, and adults have invaluable experience of close and confidential communication with children.
DIY musical instruments for kindergarten
Examples of homemade tools
As an example, we will give only some of the simplest and most interesting tools. You can change them, come up with your own solutions, etc. The main requirement is that everyone should be interested.
Table. DIY tool options.
| Tool name | Brief description and manufacturing features |
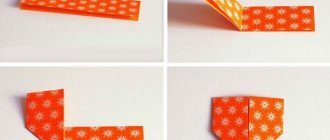
Tambourine | You need to prepare an ordinary wooden hoop that is used for embroidery. This will be the body of the instrument, and the sounds are made by lemonade lids (10 pcs.), which are fixed on metal axes (wire Ø 1 mm). Hard plastic measuring approximately 1.5 x 1.5 cm and electrical tape are used to secure the two parts of the instrument. The hoops are disconnected, and pieces of wire are inserted between them, and metal covers are put on each. There are five pairs in total. Then cardboard or plastic plates are inserted between the individual elements and the entire structure is connected with tape or insulating tape. |
| Panflute | A musical instrument can create not only noise, but also similar sounds. It can be made from cocktail straws, but it is better to find straws with a slightly larger diameter. You will need 7 straws, tape and thick cardboard. Shorten each tube a little, the length of the first should be within 15 cm. Let each child independently experiment with sounds and length. He will really like this, he should understand the dependence of sound on length. When all the tubes make different sounds, fix them on cardboard of the appropriate sizes, the upper ends should be located in the same plane. The cardboard can be painted with various colors, the instrument will become more attractive. Do not forget that the lower ends of the tubes must be sealed, otherwise the instrument will not play. |
Chinese drum | It is made from a tin can, preferably metal. The diameter does not matter; you can use different ones and make entire sets of tools. Plastic lids are put on the jars; instead, you can use a thin but durable polymer. The walls of the drum are pierced, a ribbon is inserted into the holes and tied on both sides with a knot to secure it. |
Hanging bells | The craft is hung outside and makes sounds only in windy weather. For bells, use solid tubes that produce ringing notes when struck. You can fix store-bought bells on a cardboard tube or wooden handle. |
These examples are given only so that you can navigate the different types of homemade tools.
How to make a rain flute
A little theory about homemade musical instruments
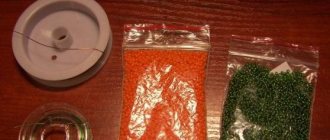
The process of creating musical instruments with your own hands is quite painstaking and sometimes requires materials that are not quite usual for a kindergarten: plastic bottles, tin cans, rubber bands for money, buttons, and so on. Involve your parents - there are probably similar things in every home that are no longer needed. Explain that the children will develop creatively in the process of needlework and then they will brag about their inventions at the next matinee.
Here are the main points to consider:
- The sounds produced by homemade musical instruments most often have nothing in common with those produced by real ones. Your task is to show that it is possible to extract different sounds from available means. You will improvise. And it wouldn’t hurt to convey the appearance of real instruments either: decor, shape, accessories like a shoulder strap.
- Toys made from improvised materials often break. DIY musical instruments for kindergarten are no exception. Immediately tell the children about the fragility of the products, their special value for your group (after all, they will remain as a memory of each of the kindergarten students).
- All materials must be hypoallergenic and safe.
- Try to come up with tools that the child could make on his own, especially if we are talking about a preparatory group. It is also better to define the concept initially: these will be the same products for each child, or preschoolers will make instruments in groups with their own hands - each group will have their own instrument.
Playing music and playing it, even in this form, will benefit children. Perhaps some of them will discover real talent or will awaken a desire to enroll in a school after kindergarten and then seriously pursue their passion there.
Instructions for making drums from plastic bottles
Such a tool is not made in one day, and children cannot concentrate on one thing for a long time. They get tired quickly and become uninterested. But you can find an effective way to interest little masters. To make the tool, two two-liter plastic bottles are required.
Step 1. Place the bottle on a flat place, draw parallel strips between the protrusions of the bottom under the ruler. There are five such protrusions; accordingly, there should also be five lines. Make sure that they are parallel; if the children do not succeed, then help them. You don’t have to do everything instead of them, just hold the bottle or ruler, this makes drawing lines much easier.
Longitudinal lines are drawn on the bottle at equal intervals.
Step 2. Using scissors in a circle, cut off the bottom and neck of the bottles; the length of the flat part should be approximately 10 cm. The exact dimensions do not matter; in any case, the toy will be functional.
Cut off the bottom and neck of the bottle
Step 3: Use a hot iron to straighten and round the edges. Such work should only be done by adults, especially in kindergarten. The iron must be heated to approximately + 120°C, at this temperature the plastic begins to melt. How to properly round edges?
- Hold the iron with one hand, and with the other, press the end of a cut piece of a plastic bottle onto its surface.
- Apply gentle pressure as the material softens, and try to level the cutting plane at the same time. It is necessary to ensure that it is perpendicular to the axis of the bottle.
- Bend the ends inside the bottle by about 0.5 cm. Don’t worry, when heated, the plastic reduces its linear dimensions and will only bend inward.
The edges of the workpiece are folded inward
Work very carefully, do not overheat the material. It is more difficult to work with the first workpiece; learn to bend and align the edges on the cut bottom or neck. If you have practical experience, the work will go faster and better.
Step 4. Using a drill with a diameter of approximately 1 mm, drill holes in the bent shelves, one near each previously drawn line. There is no need to select the exact diameter of the drill; we give only approximate technological parameters. On the other hand, drill holes between the lines, this is very important.
Drill holes in the workpiece
Step 5. Paint the inside of the drum with bright colors, and cover the sticks with other colors.
Paint the inside of the bottle and sticks
Important. On the sticks, you should leave a longitudinal strip approximately 2–3 mm wide unpainted. This is where the hot glue will be applied and it will not stick to the paint.
Use acrylic paints to make two stripes around the circumference of the outside of the drum; they greatly improve the appearance of the craft.
On the outside of the case two contrasting stripes are applied around the circumference
Step 6. Thread a large needle with a woolen thread and thread it through the first hole in the drum, tie the end with a knot so that it does not come out. Next, thread it through the upper and lower holes, you will get oblique lines. It was for them that holes were made in the bent parts of the structure. The last thread must be cut and the end also tied with a large knot.
A thick thread is pulled through the holes
Step 7. Cut the second bottle lengthwise to create a rectangular plate, place it under the weight for alignment. Apply hot glue to one end of the workpiece and press it tightly to the plate. You need to hold it in this position for several minutes, during which time the glue will harden.
Apply glue and press the end of the body to the plate
Step 8: Use scissors to carefully trim away any excess material. The same steps must be repeated on the other side of the drum.
Trim off excess material
Step 9. Make holes in small foam balls, fill them with hot glue and insert tubes. The balls must be attached on both sides. After the glue has hardened, glue these beautiful tubes around the perimeter of the drum at the same distance.
The tubes are glued to the drum
Step 10. Using sushi chopsticks, poke holes in the foam balls, fill them with glue and push them into place. You will get beautiful elements for playing the drum. If the sticks are very long, then they need to be shortened a little so that it is convenient for the child to knock.
Finished drum
Glue gun prices
Glue gun
DIY musical instruments for kindergarten
Here are several small master classes on creating interesting and unique musical instruments. You'll see, everything ingenious is very simple.
Drum
Any metal or plastic can that is hollow inside can become a drum. You are unlikely to find such children in kindergarten. But you can ask your parents to bring old plastic jars for mayonnaise, jam or shish kebab. For a variety of sounds, you can take cans of different sizes and wall thicknesses.
Absolutely any will also work as sticks. It is important that the tree (if you choose it) cannot injure children’s hands, that is, it should be coated with a special varnish. For example, chopsticks intended for eating Japanese dishes can play this role.
Wooden xylophone
DIY musical instruments for kindergarten are made from a variety of materials! If you have extra plinth, you can even make a tool out of it. It is enough to cut it into equal sections 10-15 cm long and screw it loosely to the base daughter with screws. The base must be treated so that children do not get splinters. The plinth pieces are placed in the same position one below the other.
To extract sound from this handmade musical instrument, a child moves any wooden stick from top to bottom. The more solid the stick, the louder and richer the sound will be produced.
Gusli
The basis can be a shoe box, in the lid of which a circle is carefully cut out slightly offset from the center. Rubber bands for money are wrapped around it or screwed so that all the “strings” pass over the hole. To prevent the rubber bands from lying on the surface and making sound, they need to be supported with something.
A pencil can serve as a support. However, if you want to raise the “strings” higher, then it is better to make a triangular structure with your own hands, because, as you know, it is the most reliable. Now you can play.
Cugicle
This wind instrument is made from ordinary straws, which are usually offered to children for drinks. It is better not to take those tubes that are attached to juices, since they are small and have a spring for bending in the most inappropriate place. And so, take several tubes of the same diameter (they can be replaced with anything: “cases” for pens, balloon sticks, etc.).
Then, from one of the edges, the second tube is sawed off from below by 1-1.5 cm. The third tube is sawed off to double the distance. Each subsequent one is sawn off in the same way so that a kind of uniform ladder is obtained. Then take a wide tape and place the tubes on it exactly along the edge, one next to the other. Then you need to tape it on the back side.
If your musical instrument is large, then it is better to first cover 2-3 tubes separately with small tape, and only then all together. The lower holes of the musical instrument with your own hands for kindergarten need to be closed. This can be done with plasticine, cut pieces of eraser, or even chewing gum.
Analogue of a triangle
To recreate the subtle sound of a metal stick touching another metal object suspended in the air, you can take the idea from this musical instrument. To make it, you will need 2 metal tubes, one of which will be suspended from any improvised handle by strong threads. The other child will hit and make a pleasant sound.
Maracas
To make your own maracas for kindergarten, any hollow oblong container that can be filled with granules, cereals or larger objects can be suitable. The easiest option is to take a simple pencil, pierce it through a plastic egg from Kinder Surprise and secure it. Peas or rice are placed inside, depending on the desired sound output.
Another option is 0.5 ml plastic bottles. You can put unnecessary buttons or the same cereal inside. Of course, to make the musical instrument look realistic, the bottles should be painted, preferably with acrylic paint to be sure. You can do something different with filled plastic eggs: take small plastic spoons and place them on both sides so that the tips of the base touch. In principle, spoons can be placed on glue, but for beauty, they can be covered with colored tape around the perimeter.
The musical instruments that children make for kindergarten with their own hands will allow them to learn to improvise with sounds and understand the world through play. After all, even in a store, children are more attracted to those toys that can make some sounds, words, or light up. Remember that almost everything that surrounds us can become a musical instrument.
For example, let's take a regular empty cardboard box. It is enough to knock on it with your hands or sticks - and it is already a drum. Anything that can be filled with something and moved from side to side is a potential maracas. DIY musical instruments for kindergarten are a potential source of individual sounds for staging fairy tales. A loud knock - a clap of thunder or the roar of a wild animal. The paper rustles - it’s the wind blowing or autumn leaves falling. Music is all around us.