How to become a royal heir?
Using a pencil is not only an important skill that determines the level of development of a child’s personality, but also a great way to show one’s creativity. What kid doesn't dream of living in a real royal house! To walk through different rooms all day, get confused in corridors and stumble upon secret doors... Make your child happy and invite him to draw a real castle. But we will tell you later how to do this easily and beautifully. You will need a pencil, ruler, eraser and... imagination.
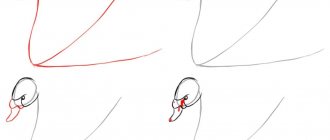
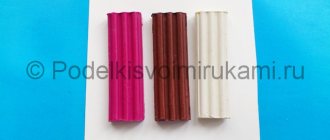
Beaded crown
The miniature snowflake costume perfectly complements the beaded decoration. You can construct the main part from small beads and the main gem inside. A detailed diagram of such a craft can be easily seen on almost any handicraft website.
However, if you can’t do this, you can do everything simpler.
Cut out a cardboard or felt blank. To do this you will need a snow queen crown pattern. Having prepared the fabric, we sew or glue it completely with multi-colored beads. Choose the right color to suit the upcoming occasion: silver, transparent, white, pale pink and a little gold.
Attach to a hair hoop.
Castle in Gothic style
Illustrations for fairy tales most often depict castles in the Gothic style. These buildings are distinguished by their special grandeur and beauty. It is quite easy to identify a structure that belongs to such a famous medieval architectural movement. You need to cover the part of the palace up to the line of the towers with your palm - the upper part will look like a separate, independent castle.
Instructions:
- Draw a rectangle.
- On the left and right we add one more narrow one to it, making the upper part slightly protruding above the main figure.
- Using the base of the upper protrusion, we draw an isosceles triangle with slightly protruding lower corners.
- We add teeth to the top line of the main rectangle - the wall.
- We finish drawing the third tower behind the battlements. Draw two parallel lines and add an isosceles triangle on top.
- Making an entrance arch.
- Let's get down to details. Add reliefs under the roof triangles.
- We mark the lattice on the arch gate.
- On each turret we draw windows - ovals with a straight lower frame.
- On the roofs of the towers we show with strokes an imitation of masonry.
- We draw fragments of bricks on the walls.
- Lightly shade the windows.
- On the spiers of the towers we finish drawing fluttering narrow flags with a sharp end.
- Drawing lines. The castle is ready.
For work you will need : thick A3 paper - several sheets (depending on the size of the composition), one sheet of thick A4 paper, A4 xerox paper - several sheets, scissors, PVA glue, pencil.
Legend: the solid line indicates the cut, the dashed line indicates the fold of the sheet.
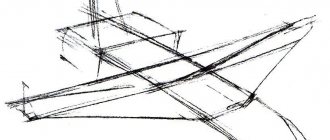
1. Decoration of the Snow Queen's palace First, we will make “large ice floes” from thick sheets of A3 paper. Let's draw the outlines of the ice floes on paper (Fig. 1, 2) and cut them along a broken line reminiscent of ice breaks. In the middle of the bottom edge of the sheet we will make an inclined cut (or cuts) about 10 cm long. From the end point of the cuts we will make folds along the previously marked lines. From the scraps we will use the same method to make “small pieces of ice” (Fig. 3). The lower edges, bent in opposite directions, will give the parts stability. Place the parts on a large white sheet without gluing them (Fig. 4). During the theatrical action they can be moved.
2. Throne of the Snow Queen Prepare a sheet of thick white A4 paper. We cut a strip 10 cm wide along the long side of the sheet. We cut the upper part along inclined lines symmetrically (the angle is arbitrary) (Fig. 5). Let's make two horizontal folds, departing from the bottom edge first 7 cm, then 6 cm (the sizes of the folds can be changed). Bend down the side and top edges of the part. To do this, we will use the edge of the table, pressing the sheet to its corner, as shown in Figure 6. We will make side cuts and folds (Figure 5,7). Taking into account the width and height of the throne seat, we cut out two rectangles - the sides, and bend the edges - the armrests (Fig. 7). Let's connect all the parts using glue (Fig. 8).
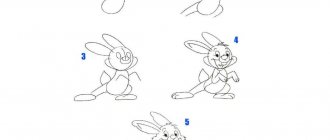
3. The Snow Queen To create the image of the Snow Queen, you will need several sheets of A4 size xerox paper and a cylindrical container (for example, a 300g plastic bottle). Let's crumple two sheets of xerox paper several times (this will give the paper plasticity) and straighten it out. First, let's make the base of the figure. Roll the sheet into a tube. To do this, we use a plastic bottle, which will act as a frame (Fig. 9). We will seal the edges of the sheet. Squeeze the tube at the level of the neck of the bottle. You will get a waist. Next, fill the upper part of the dress up to the waist with a wad of crumpled newspaper, leaving a space to join the neck (Fig. 10, 12). Let's make the head. To do this, cut out a square with a side of 10 cm from the prepared second sheet. Then crumple a lump from the newspaper, corresponding in proportion to the head of the figure. Place the lump in the middle of the sheet and cover it with paper: connect all the edges and corners of the sheet and squeeze it in the neck area (Fig. 11). Let's connect the head and body. To do this, we will make several vertical cuts along the top of the dress, as shown in the figure, coat them with glue from the inside, and also coat the neck. Let's place the head closer to the back of the body and press the cut parts to the neck. The newspaper ball should remain closer to the front of the figure (Fig. 12). To strengthen the connection and give the neck a more natural texture, we will cover it with a paper strip coated with glue (Fig. 13). The base of the figure is ready. You can start making the costume and other parts.
Let's prepare two sheets of photocopier paper (no need to crumple the paper). The front part of the costume will be made from half a sheet. According to Figure 14, cut the top edge of the sheet along an arc (the center of the arc should be at the level of the figure’s chest). Let's draw the lines, make the folds (Fig. 15) and glue the folds at the top. The raincoat is made from a whole sheet of xerox paper in the form of an accordion, diverging downward (Fig. 16). We bend the collar in an arc (Fig. 17). Let's glue the manufactured parts of the costume to the figure - first the front part, then the cloak (Fig. 18).
Let's make the Snow Queen's face smoother. To do this, cut out an oval piece from smooth paper (Fig. 19); glue on a nose cut from a piece of sheet folded in half; Draw the details of the face and carefully glue it to the front of the head, trying not to wrinkle it. Then we cut out the part of the costume that covers the upper part of the figure and glue it on top of the dress, trying to close all the joints (Fig. 20). We will make the hat from a sheet folded in half according to the preliminary drawing (Fig. 21). Let's make sleeves (Fig. 22) and glue them to the side of the raincoat under the collar, and the hands - inside the sleeves (Fig. 23).
The finished figure can be freed from the frame - the bottle, given stability, supplemented with decorations and placed surrounded by palace decorations.
Natalya Meister Photo by the author
___________________________________
You can also watch Natalia Meister’s master classes on making paper turtles and birds
A house for a princess
Every girl dreams of becoming a princess. And not only because you can wear lush dresses and wait for the appearance of a handsome prince who will disenchant her with a kiss. But also because the daughters of the royal couple live in a luxurious castle. And even though it’s impossible to live in it yet, it’s quite possible to draw it.
Instructions:
- We start with two perpendiculars for the base. On the vertical line we denote by horizontal lines 3 levels of tower height.
- We delimit the side parts of the future castle with two lines, not forgetting to mark the corners for marks under the roofs of the turrets.
- Then we begin to draw the lower tier - two squares in the middle, side rectangles on the sides with parts protruding above the level of the central wall.
- On the side elements we draw isosceles triangles of towers, the corners of which are slightly rounded at the base.
- Let's move on to the second tier. In the center we draw symmetrical parts of the stepped column.
- We finish drawing two side columns between the boundaries of the first and second levels.
- To the left and right of the central column we draw two spiers.
- Now we have reached the third level. We start by decorating the top of the column in the center. To do this, draw a trapezoid with a base slightly smaller than the top side of the figure.
- We draw the triangular roofs of the side turrets.
- On the sides of the central column we draw two columns with flat roofs.
- Let's detail the drawing. We designate the windows on the towers, flags and masonry connecting the walls with the triangles of the roofs.
- Adding a gate.
This guide, which explains how to draw a princess's castle, can be greatly simplified if you depict the house of the daughter of the lord of the deep.
An easy and quick method to draw a castle
We begin the lessons with the most common image, which not only beginners, but also children can easily master. We draw it with a black marker, but color it with oil pastels of various shades.
How to do it:
- Place the album horizontally. At the bottom of the sheet, draw a line on the side of the castle. Draw a vertical line to the left of it. Move it a little to the right and draw a line of the same length.
- At the right end of the side, draw a similar sketch. We finished the illustration with a connecting line between the strokes. As a result, we get 2 rectangles folded at the bottom.
- Draw a horizontal line just below the top of the image. In the middle, on the way from each other, we will draw 2 lines and cross them in a semicircle at the top. You will get a gate on the castle wall.
- They are now divided vertically into parts by lines. On the wall we present a row of small-volume semi-squares. Now draw a triangular roof and a flag on top of the right sketch of the tower. We complement the picture with a small window.
- In the picture to the left of the tower we will draw a thick letter Ш and complement the image with a window with a rounded top. We will depict a low tower above the wall. With a rounded bottom. Let's draw a huge window on it and distribute it with a cross. We extend the outline with a triangular roof on which the flag is located. The picture of the castle is almost complete.
- But, like almost all castles located on a hill, they are covered with a huge hole. At the bottom of the base we depict a hill. Let's also draw a huge semi-oval around the entire perimeter of the castle. We will make a castle on a mountain surrounded by water. Below in front of the gate we depict the road.
- Improving the image. Let's start coloring. Draw the sky and water around the castle with blue chalk. Paint the second layer of water with blue chalk. We paint the road light brown. Let's cover the relief with green color. The flags are painted red, the gates are brown.
- Then paint the castle light brown. The roofs of the towers are first covered with red chalk, and then we will apply a brown tint on top, which must be darkened with black chalk. We tint the black shade in some places in the castle. We complete the image with small checkmarks and a small green line.
The result is this image. Now you remember how to draw a castle using the usual method. Children and budding artists will design such a castle.
Ariel Castle
Instructions:
- We draw a triangle for the roof of the upper tier of the towers.
- On the right we finish drawing a fragment of the triangle of the second roof.
- At the level of the last third of the base of the central figure, draw a triangle of the second tier.
- At the same level on the left we sketch another tower.
- Then we draw three triangles for the lower level of the turrets.
- Now we use lines to show the walls coming from the base of the roofs.
- We finish painting the windows and flags on the roofs.
- On the wall of the central tower we draw a round door. The house for Ariel is ready.
Snow Queen's Fortress
Andersen's fairy tale is popular among more than one generation of children. Therefore, it will be useful for many to know how to draw the Snow Queen’s castle with a pencil step by step so that it best matches the description of the great Dane. Here's one option.
Instructions:
- We draw a horizontal center line through the sheet.
- We divide the lower part into three fragments. In the central part we have a castle, and on the sides there are snow-capped mountains.
- Draw a horizontal rectangle.
- Having retreated a third from the top edge, we finish drawing another rectangular figure - a tower.
- In the remaining space we make another turret.
- We finish drawing two more towers on the sides, bringing their spiers-triangles of roofs to the border with the base.
- We fill the second level with columns, and the third (last) with thin long spiers.
- We draw flags on the roofs, designate windows and gates. The castle is ready.
How to make a chieftain costume from the fairy tale “The Snow Queen” with your own hands?
A mother, grandmother or even grandfather can temporarily turn into the main robber. Take an existing vest and skirt and sew tinsel on these items of clothing. You need to sew a small hat from fabric, decorate it along the edges with strips of fur or the same tinsel.
You can make a chieftain costume from old things. If you have a striped vest or sweater, wear it. Put on an old skirt, you can tie it with an apron. Tie a bandana around your head. Sew a fabric bag and hang it on your belt.
Costumes for the fairy tale “The Snow Queen” can be made from scrap materials. Wear a skirt with a wide belt and a fitted T-shirt. Tie the scarf so that the knot is on the side. Throw a scarf or sheepskin coat on top. Decorate your neck with beads. You can use several pieces at once.
You can make a sword for the chieftain and for her daughter. To do this, use the following template. Cut it out of two sheets of corrugated or three ordinary cardboard. Color it.