If you dream of learning how to draw a portrait in watercolor, then put aside all fears and doubts and, using this step-by-step drawing lesson for beginners, feel free to take the first steps towards making this dream come true.
Available recommendations with step-by-step photos will help you easily master the basics of drawing a portrait of a girl with watercolors. Tools and materials
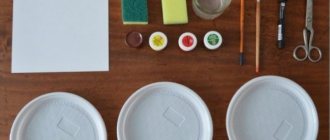
To paint a portrait in watercolor, you will need the following materials:
- watercolor paper;
- pencil;
- eraser;
- watercolor;
- brushes with a thickness of one to four (it is advisable to exclude the use of synthetic materials and give preference to natural ones: squirrel, pony);
- glass of water;
- palette
How to Paint a Portrait in Watercolor: A Step-by-Step Guide
1. First you need to draw a face with a pencil on paper. For convenience, it is best to take a photo from which you will paint a portrait. In order to correctly perform the construction, it is necessary to measure the angle of the head, the height and width of the head, the ratio of the parts of the face in relation to each other.
When constructing, it is necessary to monitor the pressure of the pencil - the lines should be light and non-greasy. After the pencil portrait is completed, you should erase all the auxiliary lines that were used to construct the face, leaving only the main lines - the outline of the eyes, nose, lips, hair, oval of the face.
2. The next stage of work will be to apply in watercolor the initial “framework” of the color component of the portrait. First of all, it is necessary to paint the darkest and most prominent places in the portrait to obtain volume, but you should not get carried away with any particular area of the face; you need to paint the entire portrait with a thin layer of watercolor.
Advice! To apply large-scale shadows, you can use brushes numbered 2 and 3; to draw small details (eyes, lips), it is better to use thin brushes – numbers 1 and 2.
At this stage of developing the drawing, it is good to use the technique of applying spots, to paint the entire portrait with local colors. To better see what shade should be applied to a particular area of the face, you can slightly squint your eyes.
During this process of work, you can avoid blurring the contours of the shadows, but you need to be careful not to darken the light areas of the portrait. The first layer of watercolor should be thin. Watercolor must be well diluted with water.
3. After the first layer has dried, you can start drawing in more detail: apply a light layer of the background (a brush number 4 is suitable for this) and fill in all the white places in the drawing (hair, clothes) with watercolors.
Important! The final detailing is still a long way off, but at this stage of work you should apply watercolors more carefully and skillfully than at the beginning of the work.
When painting dark areas, you need to slightly blur the edges between the color spots with a damp brush, forming them into a single soft shade. This procedure is necessary to achieve a realistic image. For this work, a brush number 2 is suitable.
On a note! It is worth knowing an important rule that you should not paint dark places with pure black.
It may seem that in the darkest place black dominates, but you should not use this color in its pure form without first mixing it with another.
To understand what color you need to mix black with, you need to look at the photo with your eyes squinted. Also, so that this color is not too active, you can paint it in a thin layer and cover it with another color on top.
4. The technique of painting with watercolors is a technique of gradually darkening the drawing by overlaying layers on top of each other. But it’s worth remembering that a watercolor portrait should first of all be “airy,” so the main thing is not to get carried away with layering. Final detailing (drawing of eyes, mouth, hair) must be done at the end of the work process.
Before final detailing, for a realism effect, you can slightly blur the edges of the facial contours (eyebrows, lips) with a damp brush. The same technique is good to use for drawing hair, so that it looks more realistic. The background can also be worked out at the final stage of painting the portrait.
Advice! To make the background have a smooth transition (from dark to light), you should make a tonal stretch. To do this, you need to dilute the paint well with water.
Artist Victoria Lemtyugova shared artistic secrets on how to paint a portrait in watercolor with readers of the “Wings of Inspiration” project.
How to choose gouache for painting
- First you need to decide on the artist's goal. If a small child will paint with gouache, you can choose the simplest paint. The quantity may vary, but usually children's sets consist of 12 colors, including primary and secondary colors. Some craft kits provide 24 colors, which include a variety of shades of primary colors. If gouache is bought for an adult who has already mastered various drawing techniques quite well, then it is better to choose paint with a large number of colors and shades.
- Pay attention to the country of manufacture. Do not underestimate domestic manufacturers, since many Russian paints are of good quality.
- There are different types of gouache. The first is artistic. It is convenient to draw on rough cardboard (uncoated) for creativity, thick watercolor or tinted paper. Artistic gouache is a mixture of gum arabic (special glue), white and colored pigments ground into powder. The second type of gouache is poster. This paint consists of the same ingredients, but instead of white it contains kaolin. This material makes the paint look brighter. This paint is perfect for creating posters, posters and large paintings in the pop art style. The third type is acrylic gouache. It is suitable for painting glass, fabric and many other surfaces. And finally, the fourth type is a special paint for children's creativity. This paint dries faster, practically does not wear off and does not crumble.
Tips for work
Gouache is a material that contains gum arabic, ground pigments and white (in some cases, kaolin). In order for the material to lay easily on the surface, you need to know some features and secrets of working with paint.
- To work with this material, it is best to choose thick paper. Cardboard, sketching paper or watercolor paper, as well as tinted paper will work.
- How to draw? It is better to draw from dark to light. First you need to apply all the dark shades, and then arrange and draw all the light details and highlights. A step-by-step tutorial on applying highlights can be found on the Internet.
- Gouache is a fairly dense material, so you should not use too much water to thin the paint. It’s better to apply everything in one dense layer than to run a wet brush over the surface several times, creating unpleasant streaks and contaminating the design.
- To prevent the color you use for your painting from appearing muddy, you should use a special artistic color wheel. It will help you choose the right shades and mix them to create a pure color. To make the shadows believable, you should mix colors from opposite sectors rather than from neighboring ones. To create shadows, you should choose purple, blue and green colors, avoiding black. Detailed videos and master classes on creating shadows can be found on the Internet or sign up for master classes on creating shadows for objects in your city.
- If you make a mistake while drawing, you should not immediately try to erase the resulting stain. Direct impact and mechanical interference will only make your drawing dirty. It is better to wait until the paint is completely dry, and only then moisten the brush in warm water and carefully erase the erroneous stroke.
- It is important to remember that paint tends to lighten as it dries, which is why don’t be afraid to use bright colors and apply the material in a thick layer.
- If you've never worked with this medium before, you probably don't know that soft brushes are not suitable for applying gouache to a surface. It is best to use dry hog bristle brushes that are easy to dip into the gouache.
Master class: drawing with gouache step by step
How to draw a tree
Gouache painting lessons are fun and interesting. Winter landscape is a fairly popular painting theme, drawing which does not take much time and does not require much effort. Usually, beginning artists are asked to draw a tree standing against the backdrop of a winter landscape. Using gouache you will be able to create an interesting painting step by step using the lesson. For the lesson you need to stock up on the following materials:
- water;
- hard brushes of different sizes;
- thick paper;
- gouache.
The master class will allow you to easily draw your first picture.
- First you need to paint the background of the winter landscape . To do this, you need to choose light winter shades: white, blue, silver.
- In the place where the tree will be located, it is necessary to highlight the background with a bright shade, since the white branches should clearly stand out against the background of a dark brown tree.
- Wait until the background dries.
- Using a simple pencil, draw the silhouette of a tree. You should not press too hard on the pencil; you should try to make the outline barely noticeable.
- Continue work: use dark brown paint to paint the tree trunk. Use a thin brush to work on individual branches. To make the tree look beautiful, you should draw more small branches on the main branches. It is better not to make thin branches too dark, using light shades.
- Detail the tree. This can be done using dark and light shades of brown. Make small branches lighter, paint the trunk with dark brown and black paint.
- Add additional colors to the background to brighten up the composition. It can be yellow, blue, pink and peach. You can mix them, but don't forget to use a color wheel to avoid making your drawing look messy.
- Using white paint, paint snow on the tree. When the first layer is dry, you need to add gray shadows to the branches. A tutorial on how to apply eye shadow can be found on the Internet.
- You can add interesting details: bullfinches, forest animals, or even a garland: whatever your imagination tells you.
Thanks to a simple lesson and step-by-step master class, you can create a unique winter landscape that will certainly decorate one of the walls of your home.
Painting with gouache is a fun and interesting activity . This magical composition will be an excellent gift for family and friends. Don't be afraid to create and experiment, and gouache will become your favorite creative material.
Looking at the paintings of famous artists, you involuntarily admire their creativity and ability to depict the world around them in bright colors. Each of us can also try to master the art of drawing and make this hobby our favorite pastime. Here are beautiful gouache drawings for beginners; they will allow you to test your talent in painting and master the technique of painting with paints.
Drawing spring in pencil, step by step
Drawing with pencils is much easier than with paints. They are easy to manage, and such work does not smudge or get dirty at all.
Spring hares
In the picture we depict the melting of ice and hares who are in a difficult situation.
We will divide the surface of the sheet into zones: on the first and third stripes we will place blooming snowdrops, the second zone is a river along which the first broken ice floes float, silhouettes of hills can be seen in the distance.
Let's add snowdrops and ice floes floating on the river to the sheet.
Now let's depict a hare watching the movement of ice.
One little hare is trapped on an ice floe, and several of his brothers are watching the difficult situation.
Let's add the contours of lying snow and the first May rainbow to the hills.
Now you can start coloring the work.
Warm spring
One of the signs of the arrival of warm weather is the arrival of migratory birds and the awakening of bees.
We will begin the work by drawing the outline of a mighty tree and the first grass near its trunk.
On the right we will draw a small river with a decorative bridge.
Let's add the first blooming flowers to the work.
At the top we will draw a large warm sun, clouds and a row of flying birds. Next to the tree we will place a hive from which the first bee has already flown out.
In the branches of the tree we will draw a birdhouse, where a starling is resting on a perch after a long journey.
Now the work can be colored with pencils and slightly shaded.
Spring is red
It is best to draw a spring landscape from life, but by following the steps below, you can also convey all the beauty of spring nature. Make a small sketch of the landscape on paper. The silhouettes of trees are outlined and the horizon line is drawn. The branches and outlines of the snowdrifts are drawn in more detail.
A small house is placed on the horizon line, as well as the outlines of greenery around it. Now the structure itself is detailed, adding windows, a roof and a path leading to it. A mighty tree will peek out from behind the roof of the house.
The image is outlined with a black liner and delicate snowdrops growing in thawed patches are added. Use an eraser to erase a pencil sketch.
The skies are painted with a blue tint, and the house and tree are painted in brown-red tones.
The forest peeking out in the distance is painted a soft green color. Birch trunks are hatched with stripes. Snowdrifts should have a blue tint, and thawed patches should have a brown tint.
To make the landscape brighter and cleaner, you can paint it over with watercolors.
What do aspiring artists need to know?
To master the gouache painting technique for beginners, you need to have:
- Set of gouache paints of twelve colors.
- A pair of flat pig bristle brushes.
- Palette and dishes with water.
The aroma of gouache paints is familiar to everyone from childhood. It is not difficult to understand how to draw with gouache; the technique of such drawing is quite simple. You need to draw, starting with a pencil sketch.
A palette knife is used to apply paint and mix it. With its help you can apply paint in even strokes.
From an early age we draw a simple, unpretentious landscape in gouache in an album. But, you can paint patterns, flowers, mountains, and even city buildings with such paints. For beginners, working with gouache is simply an ideal option.
By drawing a sketch with a pencil, you can avoid mistakes and do the work accurately. If you smear and mix paints directly on the canvas, you will just end up with dirt on the painting. Therefore, you can add a little water to gouache and it will turn into watercolor.
Drawings for sketching spring
Of course, the arrival of the beautiful Spring can be felt by the special aroma of freshness, melting snow, cold rain and the first greenery. However, you should not combine all its features in one work. It is enough to depict one thing that will help accurately convey the spring revival of nature.
Gouache painting techniques
Among the techniques known to artists for painting paintings with gouache, the following are common:
- Apply a wet layer of paint over the not yet dry layer. In this case, the paint applies tightly and takes a long time to dry. This method is more suitable for painting with watercolors.
- Using a dry brush, gouache paints are applied to the dried layer.
- Using a sponge, a textured picture is created. This technique is ideal when we are painting an autumn landscape; we can easily depict the bright colors of golden autumn.
- For a beginner, the technique of splashing paint on the canvas will cheer up and help overcome anxiety. It is enough to wet the brush in paint and spray the gouache on the paper or canvas. The result is a bright and beautiful painting. Be sure to learn this method of applying paint, which helps train your hand.
Of course, we cannot paint a picture without the right brush. It is advisable to choose brushes made of nylon, goat or pig hair.
On video: how to beautifully paint the sky with gouache.
Types of gouache
Gouache is suitable for painting on cardboard, paper, canvas and other surfaces. But not every gouache has such universal properties. Let's look at the main types of such paints:
- Artistic gouache. Suitable for use on surfaces intended for painting only. It is absorbed into the material and allows you to apply a second layer, making the colors in the painting more saturated and bright.
- Poster gouache. It has a more saturated pigment and bright coloring abilities. It is used to decorate theatrical scenery. Children's gouache contains PVA glue, so it dries quickly. This gouache is convenient to work on plywood, ceramics or canvas. But acrylic paint fits perfectly on any surface, and after drying it does not wash off and does not lose its original color.
- Fluorescent gouache. Amazing in its properties and quality. It glows when exposed to ultraviolet rays. The color is too bright, which gives the picture a special beauty.
Children's drawings of spring, photo
Most often, landscape drawings are used to convey the favorite time of year. As you know, the first heralds of the green season are fluffy snowdrops.
To convey the spring mood, children's drawings often depict the bright sun, the arrival of the first birds and spring drops.
No matter how hard winter tries, it is losing ground on all sides.
Additional recommendations
A step-by-step method helps even children understand the basics of painting with gouache. Such lessons will allow you to master this wonderful creativity and learn how to paint in a certain sequence, choose the right paints to reflect the real beauty of nature, representatives of the flora and fauna on canvas.
To create pictures of nature, like drawings on any other topic, you need to start with a pencil sketch. It's easiest to draw by starting at the top of the canvas or piece of paper. As a rule, at the top is the sky, which is colored blue along the pencil contours.
Clouds are painted with whitewash, brushing white highlights across the blue sky.
Mountains are depicted in brown colors, and vegetation in green tones. The trees below are depicted in lighter or darker green gouache. The main thing is that the colors in the painting look like in reality. Paints can be mixed directly on the sheet, changing the water periodically. To create fine lines, you need to choose the right brush.
When using gouache, you must adhere to the following tips:
- You can buy gouache in tubes or jars; everyone chooses the most convenient packaging for themselves.
- The colors you need to choose are those that will be needed to work on the painting.
- Tests should be done on the palette, only after selecting the desired color, transfer it to the canvas.
- If the paint cracks, add a little gum arabic to it and stir thoroughly.
- To apply the next layer, you need to wait until the previous one has dried.
- It is advisable to coat the painting with varnish after drying.
Having mastered the technique of drawing, you can achieve success in artistic creativity. Moving step by step, from simple to complex, beginning artists gradually master the technique of painting with gouache. Below are video tutorials, the purpose of which is to help you depict the chosen plot on the canvas as accurately as possible. This step-by-step approach allows you to quickly learn how to work with paints such as gouache.
Drawing of a beautiful spring, paints step by step with photos
They say that birds on their wings bring long-awaited warmth to the earth. To make a beautiful drawing, you need a landscape sheet or canvas, paints and a brush. Before starting work, you need to make a sketch of the painting.
The surface is painted over with blue paint, and a little white tint is added in the center and a circle is formed. Allow the work to dry.
Start drawing the outline of one of the birds.
Then they finish drawing a couple for her.
They depict the beginning of the main branch where the birds rest.
Add thickness to the branch and make small branches to the sides.
To give the work a 3D effect, all that remains is to glue paper or fabric flowers to the canvas.