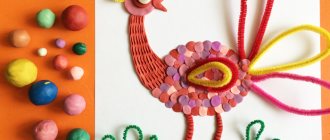
Rose made from cotton pads
Floral arrangements made from unexpected materials always look original. Cotton pads are no exception. Thanks to their soft, multi-layered structure, the flower they make is light and airy, just like a real one.
To create a rose you need to find in the house:
- cotton pads;
- wooden sticks 15-20 cm long, with a cross-sectional diameter of up to 0.5 cm;
- corrugated paper;
- cotton threads;
- PVA glue;
- acrylic paints or gouache.
Before starting work, soft rounds need to be painted. Masters do this in two proven ways.
The first method looks like this:
- Acrylic or gouache is diluted in a small amount of water;
- Cotton pads are dipped into the resulting solution;
- Leave to soak for 10 minutes;
- Remove and dry.
The second method suggests using a regular brush and paints. Only the top layer will be painted, the rest will remain white.
Master class on creating a rose:
- Prepare painted discs;
- Roll the disk into a tube;
- Loosely attach another disk to the tube and wrap it around in the same way;
- Wrap several layers of cotton rounds in a similar manner;
- Secure the resulting petals at the base of the bud with PVA glue;
- Place the bud on a wooden stick using glue;
- In the middle of the bud, place a beautiful large bead with a needle and thread;
- Decorate a wooden stick with green corrugated paper; this will be the stem of the flower.
If the idea is that the rose should be elastic, then before starting work you need to soak cotton pads in a starch solution and dry. In this case, you will have to paint the petals with a brush; the method of dipping into a solution with paint will not work.
Preparing for work
Before making an application, you need to correctly select all the necessary materials and tools. The attractive appearance of the finished product will depend on their quality. It is very important to do your preparation in advance. This will help during creative work not to be distracted by trifles and not to waste precious time searching for this or that item.
Each craft can use its own materials, but most of them are used to create all products without exception. Before starting work you need to prepare:
cotton pads;- quick-drying glue (glue stick or glue gun);
- a sheet of thick cardboard that will serve as the base;
- sharpened scissors for cutting out individual appliqué parts;
- watercolors or gouache;
- decorative elements to decorate the finished product and give it a holistic look (ribbons, beads, pieces of felt, natural materials).
Crafts from cotton pads for children 3-4 years old
It is important to involve children of primary preschool age in creative work. This has a beneficial effect on their development, fine motor skills improve, imagination is activated, and there is an interest in finishing what has been started in order to see the result.
It is difficult to find a material at hand for children's creativity that would be as safe as cotton rounds. They can be crushed, twisted, separated layers, and they will never hurt the baby. The soft structure is pleasant for children's fingers. Children love to work with soft discs, so they are often used in classes in kindergartens and development centers.
You can come up with a huge number of compositions from cotton pads, because the circle is a universal figure. The simplest tasks using the appliqué technique are suitable for kids. For example, make a sun, a snowman, or a simple animal figurine. To secure the parts, PVA glue is used; it is recognized as safe and allowed for children’s work.
Sun
The simplest option for crafts made from cotton rounds is the sun. It is interesting because you can hold it by the tube and twist it in your hands.
To work you will need:
- two cotton pads;
- cotton buds;
- cocktail straw;
- PVA glue;
- yellow paint, brush.
The step-by-step action plan is very simple:
- Place one round piece on the table;
- Place a large drop of PVA glue in the center and spread in a circle;
- Cut the cotton swabs in half (does it for an adult);
- Place cotton swabs in a circle like rays of sunshine;
- Add a little more glue to the tips of the rays that are inside the disk;
- Add a tube at the bottom of the sun;
- Place a second cotton pad on top, press down so that the structure sticks well;
- When the future sun dries, paint it with yellow paint, draw eyes and a smile.
The funny toy is ready. The toy evokes positive emotions in the child precisely because he made it himself, with his own hands.
Applique, postcard made of cotton pads with flowers as a gift for mom on March 8
A handmade postcard is the best gift for mom on March 8th. To work you need to stock up on the following items:
- Colored cardboard
- Openwork napkins
- PVA glue
- Crepe paper
- Brush
Execution process:
- Glue cotton sponges in the shape of a flower onto colored cardboard and paint them in different colors. Make the central part of the flower from a colored disk.
- Make an envelope from an openwork napkin and glue it to the cardboard.
- Take crepe paper. Make a stem and leaves from it, glue them on top of the napkin.
- Glue the corners of the napkin together. All. The gift is ready!
Gift for mom
Daisies
For this craft you will need the help of an adult. Toddlers do not yet know how to use scissors and cut dense objects. You also need help in laying out the petals in an even line.
At the beginning of the work, the adult cuts off the ends of the cotton swabs with soft material. These will be chamomile petals.
Cocktail tubes are glued onto a sheet of colored paper to form a flower stem. Three small circles (2-3 cm in diameter) are cut out of yellow paper. Yellow cores are glued to the ends of the stem, and soft petals are attached around them along the contour. You can use another option and glue the core on top of the petals. In both cases, the daisies turn out equally charming.
Rainbow with clouds
In this craft, the child is invited to work with two dissimilar materials - plasticine and cotton pads. Many children cannot roll plasticine sausages, but this skill is necessary for the development of fine motor skills, massage of the palms, as well as cultivating a sense of diligence and willpower.
To make a rainbow, you need to roll seven sausages of different colors. Next, they are attached to a thick sheet of paper or cardboard. This part of the job is not easy, so an adult should help so that the child does not feel disappointed.
Oval-shaped clouds are cut out of cotton pads and glued above the rainbow or directly to it. The child copes with this part perfectly and then proudly shows his work to his grandmother and grandfather.
Snowman for the holidays
For a snowman made from cotton pads, you need to take four cotton pads, cardboard for the base, black buttons (three medium and two small), glitter, a piece of orange thick fabric, two small twigs for hands, scissors, paint and glue.
We paint the base cardboard with gouache; the background depends on your imagination. Since a snowman usually consists of three large balls, for the first and largest one we take a whole cotton pad and glue it to the dried background. We cut out the second ball with scissors and make it slightly smaller in diameter than the first, and also glue it, slightly overlapping with the first. And we cut out the third, smallest cotton pad, which forms the head, with a diameter even smaller than the second cotton pad. Glue the disk head to the snowman's body. We press everything carefully, but firmly so that it sticks well to the cardboard.
Related article: DIY rhinestone applications on clothes: diagrams with photos and videos
Now we glue the buttons. Two small buttons act as eyes, and the middle ones act as buttons on the snowman’s body. We glue the branches to the places of the hands. We roll the orange thick fabric into a cone - this will be a carrot nose - and glue it by the bottom to the upper disk. A snowman's hat or bucket can be cut out of black or gray cardboard, or it can be cut out from the remaining cotton pad and, painted black with gouache, glued to the applique.
The remains of cotton pads can be glued to the bottom of our future picture, these will be snowdrifts. Let's complete the craft with decoration: apply sparkles to the snow and the background; instead of sparkles, you can use beads or small beads.
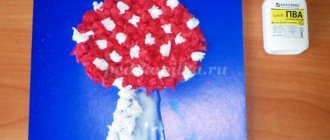
Christmas tree
In anticipation of the New Year holiday, it is important to make themed crafts and new toys. You can ask your child to make a simple Christmas tree using the appliqué method. To do this, an adult draws a simple outline of the future Christmas tree on a sheet of paper with a pencil. The child’s task is to glue cotton pads inside the space and paint them with green paint. Additionally, you can decorate the Christmas tree with shiny sequins or fragments of bright candy wrappers.
The same principle is used to make a snowman. You can decorate a room with children's compositions. This will improve the mood of the household and the child, who will proudly show his creativity to guests.
An interesting Christmas tree is the one whose branches are formed by halves of soft round balls. Moreover, the halves can be placed on the sheet in different ways. A similar game with geometric shapes develops spatial thinking. A child can easily cope with such a craft, and the result will delight with its originality.
Another version of the New Year tree involves painstaking work. The result is a cozy beauty that decorates the New Year's interior of the house. Materials you will need:
- a lot of cotton pads;
- PVA glue;
- a sheet of thick A3 paper or larger (depending on your wishes for the size of the tree);
- hardware pins.
The master class includes the following steps:
- Draw a circle on a sheet of paper with a compass, the radius is equal to the height of the future Christmas tree.
- Divide the circle into four hours, cut out one part.
- Roll the paper to form a cone with a sharp tip.
- Glue the edges together and wait for it to dry.
- Prepare cotton pads. To do this, fold each round piece in half, then in half again. The resulting figure is fixed with a stapler at the base. Use your hands to straighten the folded discs a little, giving them volume.
- The prepared round pieces are attached to a cardboard cone with pins.
The resulting Christmas tree is decorated with artificial snow, garland, beads, and sequins. A traditional star, prepared in advance from foil, is placed on the tip of the tree. There are many photos of crafts made from soft rounds published on the Internet on thematic resources.
Cotton pads are great for creative activities with children. The round shape allows you to create unusual crafts, involving the whole family in fun work.