Paper applique for kids is a wonderful activity that allows you to make simple and at the same time beautiful crafts with your own hands.
Decorative applique can have many faces - you can make monochrome images from black paper on a white background. This could be a picture of a city. Colored paper or cardboard can make a wonderful basket with flowers, geometric fruits, a rose, a heart, a still life, and so on. Subject applique allows you to create various crafts. You can use ready-made templates, blanks and master classes to create step-by-step beautiful paper applications. Simple templates for applications made from colored paper can include, for example, a Christmas tree with balls, a tree with apples, and others. You need to apply a drawing to the base sheet. In addition to ready-made templates, you can use children's coloring books or come up with a sketch yourself.
Paper applique is a wonderful activity.
Some tips
Parents whose children create paper applications should ensure that this activity is safe for their children.
- You should not leave a small child under 5 years old alone in the room if there are scissors next to him. Cutting paper with them risks injury.
- Also, do not leave it near the glue. An inquisitive child can drink this substance.
- To instill in your child an interest in creating paper applications, you should start creating them yourself in front of him. This will certainly interest the child.
Gallery: paper applique (25 photos)
Paper applique: ideas for 3rd grade
What interesting paper applications can be made in 3rd grade? For example, a flower. The technique for making it is quite simple. The work is carried out in 2 stages: in the first, an origami flower is made from colored paper, and in the second, it is glued to cardboard or another surface. You can make origami not entirely, but in parts.
The technique of making a flower is quite simple
So here's the way to do it:
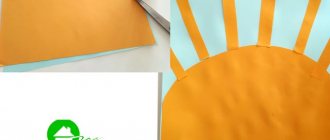
- You need to take a bright-colored material from which the petals will be cut. For example, yellow color. It is necessary to cut out 6 petals, the approximate size of which is 8-9 cm. For children, it is recommended to first draw a leaf with a pencil and then cut it out with scissors.
- To make the future application voluminous, you should round off the petals with a pencil or scissors.
- 3rd grade is the school period when children strive to be creative. They can be asked to come up with an original center of the flower. For example, it could be candy or a mother’s face cut out from a photograph. The selected center of the application is attached to the surface. If it is a paper element, then you just need to glue it.
- The petals are glued around the center. But if the central element is small, you must first glue the petals to the surface. This will make the child's work easier.
- Then the flower stem is made from paper. The sheet must be folded several times like an accordion so that its colored side “looks” at the person.
- The stem is glued to the surface under the petals.
- After this, you need to cut out 2 leaves of a green flower from paper. They can be glued symmetrically or not.
It turns out to be a very beautiful and creative postcard that a child can give to someone close to them.
Notes on the “Still Life of Fruit” nodes (application)
Summary of GCD in the senior group
“Still life of fruit” (applique)
Prepared by: teacher Belkina O.V.
Goals:
improve the technique of cutting out round shapes from paper folded in half, respecting the proportions; develop a sense of color when choosing colors, compositional skills; give the concept of foreground and background; to cultivate an aesthetic attitude towards nature in the surrounding world.
Equipment: fruits or their dummies (orange, banana, apple, plum), colored paper, scissors, glue, brush, napkin, markers, bag.
Preliminary preparation: conversation about the benefits of fruits; examining fruits to determine their shape; solving riddles about fruits.
Progress of the lesson:
- 1.Creating gaming motivation.
- Educator: Today we will paint a still life. Who can tell me what is depicted in a still life? (children's answers)
That's right, a still life is a genre of fine art, a painting that depicts objects: vases, flowers, vegetables, fruits, etc. What will be depicted in our still life? Guess it! - The teacher invites the children to identify the fruits lying in the bag by touch. You can use riddles as a hint:
- Balls hang on the branches -
- Turned blue from the heat. (plum)
- Round, rosy,
- I grow on a branch:
- Adults love me
- And little children. (apple)
- Bright, sweet, poured,
- The cover is all gold.
- Not from a candy factory -
- From distant Africa. (orange)
- -Yes, today we will create a still life of fruits, and we will do the work using the appliqué technique.
- 2. Updating knowledge.
- Educator: In order for our applique to turn out beautiful, we need to arrange the fruits correctly. When laying them out, you must remember that large fruits should be in the background, that is, behind, but smaller ones should be placed in front. What happens if we do the opposite? ( children's answers)
Yes, small fruits will not be visible then.
Offer your options for staging a still life, not forgetting about the combination of colors. It is hardly appropriate, for example, to place a yellow orange and a yellow-green banana next to each other. (children complete the task)
What a beautiful still life we created! Now you can cut out the applique details. - 3. Demonstration of working methods.
- Educator: In order to cut fruits out of paper, you need to know what shape they have. Tell me. (children's answers)
Do you know how to cut a circle from a square?
(children's answers)
What geometric shape can you cut an oval from?
(children's answers)
Yes, we will cut out an orange and an apple from squares folded in half, and a plum from a rectangle. How to cut a banana? First we will draw it, and then cut it out along the drawn outline. - After we cut out the necessary parts, we lay them out on a sheet of paper the same way we have fruit on the table. Then we glue the distant parts first, and then the near ones. Spread a little glue on the parts to make the applique neat. The missing small details can be completed with a felt-tip pen.
- The teacher shows techniques for making an applique.
4. Practical work.
Assignment: complete an appliqué of a still life of fruit.
5. Summary of the lesson.
Children's works are exhibited at the stand.
Educator: What amazing still lifes you have created! These fruits should be on your tables every day, because they contain so many vitamins and other beneficial substances. If you eat them daily, you will be healthy and cheerful.
Templates for application in second grade
In second grade, crafts should be somewhat simpler than in the previous version. For example, you can make a snowman.
In second grade, crafts should be easier
Work plan:
- The surface for application is selected. It is best to use cardboard paper as a basis, but it should not be white, as the snowman will then merge with the background.
- Circles with a diameter of 10 cm are cut out of white paper. One circle will be used as the snowman's head, and the rest will have to be bent in half, but not too much. This is done to form a fold line.
- The process of gluing the bottom of the snowman begins. The paper is coated with glue and attached to a cardboard sheet. The head is glued.
- Then you can start gluing the bottom. One circle with a fold line should be glued under the head, and then the remaining circles should be glued onto it, one by one. The result is a three-dimensional application.
- Cut out a snowman's hat from blue colored paper. To give it a woolen look, you need to use a blue marker or felt-tip pen and draw the threads.
- Elements of the snowman such as buttons and a carrot nose are also cut out of paper.
To complete the composition, it is worth gluing a piece of knitting thread under the snowman’s head. This is reminiscent of edging sewing. The thread will be his scarf.
Large plate with different fruits
Having learned to draw individual fruits, you can begin to arrange them, and a still life image would be an excellent solution. To make drawing easier, all objects can be placed on a large plate, which can be easily redrawn from a picture or used as a photo base:
- a plate is depicted on the piece of paper; to do this, you need to draw a semicircle; it doesn’t have to be closed, leaving space to place all the selected fruits and vegetables;
- in the foreground it is best to depict simple and quickly recognizable figures, these can be apples and pears, they can be placed horizontally and vertically;
- fruits such as plums will decorate the composition and add additional colors to the resulting picture, but it is best to complement the image with small details;
- A purple bunch of grapes will look beautiful on a plate; for this, a pile of small circles covered with an openwork green leaf is drawn behind the apples;
- all the berries must be carefully outlined and painted in a lighter shade than the outline, so the berries will not merge into one lump of color and will be clearly visible in the drawing;
- It’s very easy to draw a green grape leaf; a maple leaf template is suitable for this, only the edges of such a sketch need to be drawn with openwork lines;
- Place several cherries along the edge of the plate; to do this, two circles with a concave top are connected with a green L-shaped pin;
- It is also better to draw single cherries with petioles, this will make it possible to quickly recognize them in the picture and draw it with small details, which will emphasize the naturalism of the picture;
- The final stage of drawing will be coloring the picture; having saturated it with colors, you can begin to decorate the background; it is best to choose calm and shallow shades for it.
Using watercolor paints, it is easy to turn the resulting drawing into a real masterpiece and, after drying, place it in a frame and under glass. These paints help to paint individual fruits to imitate their real color with different shades and natural chiaroscuro reflecting the depth of color.
Simple master classes will help you learn fruit drawing techniques, which will be useful for creative activities with children of different ages. Even if children are not interested in creative lessons, they can be used to learn shapes and colors, the names of new fruits and even vegetables.
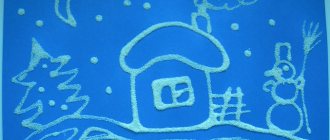
Application made of colored paper for children
How to make a vase with daffodils:
- Such work should always begin with choosing the background of the application. Since daffodils are white flowers, it is recommended to choose a blue base.
- The vase should be made first. It can be any color, but not blue or white for obvious reasons. A sheet of paper is folded in half. On one side of it the outline of a vase is drawn. Then you need to cut out this outline. The finished vase template is carefully glued onto the paper or cardboard base of the craft.
- After this, you can cut out the daffodil leaves. Since this flower has straight and long ones, it will be easy to make them. A thin sheet of green paper is folded in half and an outline is drawn on it, gradually tapering towards the top.
- Then the vase and leaves are attached to the paper base using glue.
- The daffodils themselves need to be made like this: squares are cut out of white paper. The side of the squares should be no more than 10 cm. After this, their edges must be processed with scissors. The flowers will be convex, and the applique itself will be voluminous.
- The center of each daffodil will be a yellow dot. To make the craft more neat, first glue the center onto the base, and only then the flower itself.
Such work should always begin with choosing the background of the application.
Sparkles should complete the composition.
Plums and apricots
Identical in shape, these fruits are even easier to draw than apples, the only difference will be in the color chosen for coloring:
- you need to draw an oval on paper, this will be the outline of the fruit;
- the oval is divided by a longitudinal strip, and its edges need to be rounded;
- Using chiaroscuro you can convey the curves on the skin of the fruit.
It is better to paint plums in dark purple or blue, and for apricots choose pastel tones of beige or pale orange.
How to make a still life from colored paper for 6th grade?
When creating such a craft, it is important to think in advance what elements will be present in the composition. This is necessary in order to select the paper of the desired color.
So, the work plan is as follows:
- After the colored sheets for the still life elements have been prepared, you should select a base sheet. It is recommended to use cardboard paper.
- On colored paper, use a pencil to draw the outlines of the desired figure. For example, the outline of a banana is drawn on yellow paper.
- The resulting figures are cut out of paper.
- At this stage you need to think about the type of composition. For children in grade 6, a more complex craft should be completed. As an option, you need to draw a basket in advance on cardboard paper in which all the elements of the composition will lie.
- Using glue, the elements are carefully attached to cardboard paper.
When creating such a craft, it is important to think in advance what elements will be present in the composition.
Crafts from palms: interesting applications and master classes Modular origami dragon, Chinese dragon from modules Paper plastic for beginners step by step: templates and diagrams DIY felt angels and patterns
The applique is completed with glitter or drawing other details with a pencil.
Origami from crumpled balls
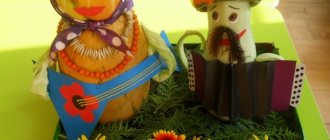
Handmade items made from crumpled balls can be considered an equally effective and interesting means for developing fine motor skills and creating beautiful decorative fruits. It looks unusual, takes little time, and does not require much expense.
You can form balls from napkins, newspapers, colored or even toilet paper, the main thing is to color it in advance, or choose napkins of suitable colors. We crumple the material into balls of various sizes and glue it to the base on which the image of the fruit is already outlined.
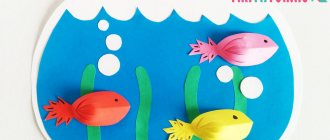
Paper applique for kids
Kids are recommended to make the simplest applications, for example, a clearing with mushrooms.
Work plan:
- The base sheet should be white.
- You should use green paper to make grass. Its base should be smooth and the top should be fir-tree-shaped. You can cut 3 pieces of grass.
- The grass is glued to the base sheet with PVA glue.
- Then you can cut out the mushrooms. Each mushroom will consist of two parts: a cap and a stem. The stem of the fungus should be round, because this way it will seem more attractive to the child. It is recommended to cut out the leg from yellow paper.
- The mushroom cap is cut out of brown paper. The false cap is glued over the stem of the fungus.
All elements are located on a white sheet.
Lesson summary Drawing “Still life using collage technique.”
Applique is actively used in furniture decoration. One of the most common methods of appliqué is decoupage. In furniture terminology, the word “applique” is often replaced by the term “overlay” to avoid confusion with inlay - intarsia or marquetry. Unlike applique, these patterns are cut into the surface being processed.
Collage
(French word) a special type of appliqué, which comes from the French word, which means “pasting, sticker,” that is, making various compositions from different materials (colored paper, newspaper, wallpaper, fabric, rope, braid, etc.). gluing onto the base materials that differ in color and texture.
Unlike appliqué, collage allows the possibility of using three-dimensional elements in a composition, both whole objects and their fragments (dishes, sports equipment, watches, coins, records, shoes, gloves, fans, hats, etc.). Moreover, the artist can combine various artistic techniques, combine appliqué and collage, introduce collage into the colorful layer of the painting, etc. And all this is done in order to create a unique artistic image, to find the most suitable means for realizing the artist’s plan.
History of origin.
Collage became particularly popular in the 20th century, but is not a recent invention. Similar techniques can be found in the icon, where a variety of materials are combined - painting, gold halos and background, rich precious clothing consisting of woven vestments.
The widespread use of collage began during the Art Nouveau style. And turning to it happened not so much consciously as intuitively in the process of searching for an increase in the decorative sound of the works.
Before we begin practical work, let’s remember about safety precautions and the stages of working on a collage.
1. Choose a collage style. You need to think about your manner or style of working. The collage design should be decorative. All his objects are stylized. Create a project on paper by first drawing it.
2. Select a suitable substrate. While paper or cardboard as a base is a common choice, the base can be anything. For example, fabrics (burlap), newspapers, old book covers, wood, smooth bark, plastic, etc. If the surface is convenient for gluing, then it can be used to create a collage.
3. Gather the pieces of fabric that you will use to create your collage. Look through your own fabric supplies, use unwanted clothes in your wardrobe, large pieces of fabric can be bought in stores. Some examples are: Fabric cutouts, Cutouts from a piece of clothing you have worn before, Square pieces of blankets, Specialty fabrics such as tulle, organza, silk, satin, etc., Thread, wool, yarn, lace, ribbon, lace , mesh, etc., Sewing embellishments such as buttons, sequins, sew-on appliques, etc.