Crafts made from natural materials
Nature contains an immense amount of materials for beautiful, bright crafts for kindergartens and schools. For spring-themed robots, children often use:
- pasta, cereals (peas, rice, buckwheat, beans);
- seeds (pumpkin, sunflower);
- twigs with swollen buds, pieces of tree bark;
- bird feathers;
- stones of different shapes.
Some of the simplest and most common crafts are floral arrangements, images of animals and birds. For flower arrangements, you need to draw stems and flower petals with felt-tip pens or cut out flower petals from colored paper, and arrange the inflorescences themselves from the seeds of white and red beans, peas, and pumpkin seeds. To depict animals, you must first draw an outline with a pencil, and then fill the layout with a variety of cereals (buckwheat, millet, rice, peas) everything will depend on the color of the animal and the baby’s imagination. Such works will be interesting for preschoolers and first-graders; they are simple, easy to work with, and at the same time the completed work looks nice and presentable.
An interesting activity is to create a panel of pasta. It is enough to sketch a sketch with a pencil, then fill it with pasta using glue. Decorate this one with your own colors. This type of craft includes several techniques. The finished panel is bright, looks beautiful, well suited for an exhibition in a kindergarten, for a gift for a spring holiday, the image is chosen at your own request.
Layout "Spring". Master Class
Tatyana Bezmenova
Layout "Spring". Master Class
Spring is increasingly asserting its rights, birdsong is heard everywhere, green grass and the first flowers delight the eye with their appearance. The special and unique aroma hanging in the air seems to say - here it is, Spring is Red, rejoice and enjoy, which of course we do.
The teachers also rejoice in the spring, hastening to change the group’s winter decorations to spring ones - we decorate the windows, hang spring modules, hang posters and wall newspapers with a spring theme. And I, of course, also try to update the group with spring “outfits,” and one of these elements of the spring transformation was the “Spring” layout, the master class of which I want to show.
Purpose of the layout.
Group interior decoration. For the cognitive development of children.
Target.
Making the “Spring” model.
Tasks.
-Give children primary knowledge about changes occurring in nature,
with the arrival of spring
-To develop a sense of beauty in children
-Improve the ability to examine the layout, do not tear the pictures, do not put the details of the layout into your mouth
Materials.
Cardboard box, pictures of grass, flowers, flowering trees, pink and green paper, tape, plasticine, titanium glue, small artificial flowers and berries, hole punch, dry tree branches, white napkins.
Progress
We take a cardboard box (for cookies, etc.), cut off the top, and slightly spread the side walls apart.
We cover the walls of the box with pictures of flowers and flowering trees, printed from the Internet (can be replaced with drawings)
Using a pink paper hole punch, we make flowers.
Using white napkins, we make flower centers using a glue stick.
Using titanium glue, glue the flowers to the branches.
Using tape, we attach the resulting branches to the walls of the box on top of the pictures (to get a volume effect)
Now we glue a picture of grass to the bottom of the box.
We prepare artificial flowers and berries.
Using plasticine, we firmly attach flowers and berries to the grass picture.
We make a border for the layout using green and pink paper.
The layout is ready. You can invite children to look at it and carefully touch the flowers and berries. Talk with children about the coming season, about the characteristic signs of spring. In order for children to clearly see the difference between all seasons, you can display models of winter and autumn, compare and talk about all seasons. There are of course a lot of options here.
Plastin is a favorite material for crafts
Working with plasticine is a favorite pastime of almost every child. From such material you can embody a variety of ideas on different topics. In the spring, children's hands can mold gifts for mothers, grandmothers, sisters for March 8, create decorations for the bright holiday of Easter, and simply sculpt at their own request, for no reason. You can make entire compositions or individual figures from such flexible material, the variety of colors is only possible.
Modeling a chicken is considered popular for spring themes, because the yellow color characterizes the sun, warmth, and we look forward to it more than ever after winter. Also symbolic are colorful butterflies, ladybugs, and various flower arrangements.
Using plasticine, works are created using non-traditional drawing techniques. A very interesting technique that preschool children like. It's easy to work with:
- Draw the base on colored cardboard or cut it out of colored paper and glue it
- Create a cardboard template for the main parts
- Thinly spread the plasticine over the prepared templates.
- Remove excess plasticine particles from the template
- Transfer the resulting blank to the base of the picture.
The activity is very exciting, exciting, and quite simple.
Spring forest
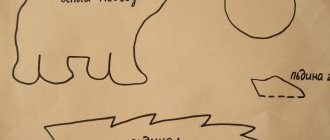
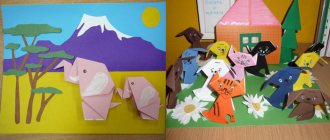
The first master class on the theme “Spring” with templates is one of the versions of applications on spring themes. We will create a spring forest that has just woken up from its winter sleep.
To make crafts, take:
- Colored paper. You can also use velvet paper for some elements;
- White paper;
- Colored cardboard;
- Glue;
- Pencil;
- Black marker or felt-tip pen;
- Ruler;
- Scissors;
- Cut out templates (see photo).
It is better to cut out the templates in advance and distribute ready-made cut out figures to the children.
Before starting work, remind your kids about safety precautions when working with scissors so that children do not damage their clothes or fingers.
So, let's get to work.
- Let's work on the details first. Take white paper and cut it into three identical strips. Let's twist the strips so that we get three identical tubes - these are birch trunks. Using a marker, we will apply a design on them - thin black markings on the bark.
Related article: Alsatsiy scallops with knitting needles: video with a pattern for knitting a skirt
- Next, trace the sun template on yellow paper and cut it out. Using red velvet paper, cut out the center of the sun according to the template.
- When the parts are ready, we start working with glue. First glue the yellow sun onto the blue cardboard, then place the red center on top of it.
- Now let's glue the birch trunks. You can arrange them however you like.
- Next, we’ll make a birdhouse. From colored paper or cardboard, cut out the birdhouse parts according to the templates and glue them to one of the birches.
- Then we move on to birch leaves. Take green paper, trace the leaf templates and cut them out. To get several leaves at once, you can fold the paper in several layers and only then cut out the leaves. Use scissors to give them volume, slightly cut them, and bend them in half. This way our picture will look more voluminous. We glue the leaves to the birch trees.
- Cut out bird templates from black paper. You can use velvet paper to show texture.
- We glue the birds onto tree trunks, and glue wings cut from any colors of paper to them.
In addition to birds, butterflies can be placed in the picture. The application is ready! This application will be easy for kindergarten, school and extracurricular activities.
Spring work with scrap materials
Using the materials at hand, you can create unique works on the theme of spring. It is interesting to make crafts from this type of material not only for young children, but also for older ones and adults. You can use whatever you see fit, as long as you have enough imagination and ideas.
Simple and easily accessible materials for such an activity are:
- disposable tableware (spoons, glasses, boiler tubes);
- sewing materials (buttons, rivets, sequins, pins, threads);
- some hygiene products (cotton pads, cotton swabs for ears, paper napkins)
- light bulbs.
To create a work on a spring theme, you should use your imagination, and you can easily find available materials. With their help, flower arrangements, nests with chicks, houses with birds, rafts, boats, spring panels and much more are created.
You can do more than just clap your hands...
In the older group, the children and I made gifts for mothers on March 8th. It will be a cool applique if you create it in the form of a hand with a bouquet. We trace the palm on white paper and cut it out. Glue the palm to the cardboard, but do not glue the fingers. Next, we make a bouquet, for example, tulips, and glue it on top of the palm. Then we bend the fingers so that they seem to hold the stems of flowers, and glue them.
You can make anything out of palms, be it for a spring theme or for any other. There is a large trend in the art of appliqué made from palms. Children of all ages love this technique; even 1st graders will be interested in this type of fine art.
Spring crafts made from colored paper and cardboard
Colored paper and cardboard are the simplest, most readily available materials for creating crafts. With their help, you can make simple spring applications for kindergarten, spring origami for school, and flower bouquets for the spring holidays. Most often, these materials are used by young children, because at this age they really like to work with scissors, as a rule, parents approve, because exercise with scissors has a good effect on hand motor skills, the main thing is to purchase a safe tool.
Popular crafts made from colored paper are made in the style of quilling. In this technique, thin strips of paper are rolled into different modules using a special device or a simple toothpick or wooden skewer. In the style of this technique, flower arrangements and butterflies come out very beautiful. You can decorate your work with braid and beads. This technique has a good effect on the child’s eye, accuracy and attention.
A more complex technique is creating crafts from paper - papier-mâché, most often used by school-age children. To work in this style, you need to stock up on a lot of old newspapers, colored paper and glue. The most relevant work in this style on a spring theme is considered to be the creation of an Easter egg.
To do this you need:
- Inflate a balloon of the required size
- Cover it with small pieces of newspaper, previously well soaked in glue (the first and last layers should be laid out with colored paper in the shades of the egg you want to get)
- Leave the ball to dry for 10-12 hours
- Carefully pop the balloon with a needle and carefully pull it out
- Carefully cut a small hole in the egg with scissors.
- Put some hay or pieces of thin paper inside
- Place a chick or a bird purchased or made from plasticine into the egg
- Decorate the egg as desired.
Crafts using the papier-mâché technique are quite painstaking work, but the result is worth it.
Crafts made from cotton pads
Applications made from cotton pads can be found more and more often in kindergartens and schools; this is already a fairly common material for creative projects. The application on the theme “Spring” did not bypass this “field” of ideas, the next master class is about this.
We will need:
- Colored cardboard for background. It is better to choose blue, silver or lilac colors;
- Brown colored paper;
- Multilayer cotton pads;
- Paints and brushes;
- Glue.
Let's get to work. Cut out a tree branch from brown paper and glue it onto the cardboard.
Next, take a cotton pad and divide it into layers. And we will cut each of them into 4 parts, as shown in the photo below.
Article on the topic: Openwork beret, knitted with knitting needles
Let's give each part a round shape using scissors.
Now we need to turn each of the resulting circles into a miniature ball. To do this, bend the outer edges to the middle. Look at the photo, it clearly shows how to do this.
We will need as many of these lump balls as there are branches on your cut branch. Let's glue the balls to it.
Next we need to get the leaves. To do this, cut them out of cotton pads.
And stick it to our work.
Now let's start coloring our “cotton” picture. You can use any paints - watercolor, gouache, acrylic. We cover each leaf with green paint. To create different shades, you can experiment with water: for a more saturated color, use more paint and less water, and, conversely, to get lighter shades, use more water, less paint.
Do not overdo it with water, because cotton wool absorbs it very well, so you just need to barely touch it with a brush and the entire fragment will become colored.
Then we move on to coloring the flowers on the branch. They can be made pink or scarlet. You can not cover the entire flower with paint, but drop colored water into the middle of the flower, and then the water will spread across the cotton wool in interesting patterns. You can drop a more saturated shade into the center, and then add a little more water so that it “spreads the color” throughout the flower.
Let's wait for the paint to dry completely. And finally our spring tree is ready!
You can experiment with the size of flowers and leaves, with different colors and shades - there are no limits to your imagination! And this applies not only to this work, but also to spring applications in general.
Where to get ideas and instructions for work
The most important source of any idea is your own imagination. Well, instructions or tips with photos can easily be found on the Internet, in special books, magazines. If you want to study this area in depth, you can attend master classes, watch video lessons on the Internet, purchase specialized literature and get information from there.
Spring is one of the most wonderful periods of the year. In spring, nature comes to life, animals wake up, birds return from warm countries, trees acquire white outfits, rivers melt, the first rays of the sun begin to warm...
At this time of year, you want to admire all the delights of nature and try to remember these moments. Spring crafts are one of the best ways to present, convey, and share the spring mood with others!
Application “Blossoming tree”
In a similar style, you can make a voluminous applique on the theme of spring in the form of a fabulous flowering tree.
To work, you will need the same set of tools and materials as in the first MK.
- colored or printed paper for the background;
- glue stick and glue moment;
- scissors;
- black marker or colored pencil;
- buttons;
- a simple pencil and eraser.
- Print any background you like, for the sky, hills and flowers.
- Prepare stencils of hills, a tree trunk and a flower, the outline of which you can draw yourself, or you can use the drawings below.
- Cut out the details of the spring applique from colored paper and paste it onto the main background.
- Decorate the craft with buttons or half-beads, and place it in a frame if desired.
And if you use this template of flowers and leaves, then the applique on the theme of spring will turn out to be more voluminous and expressive.
Video: Together with your child, we make a tree applique from fabric and colored paper
Ideas on the theme “Spring has come” for kindergarten with photos
A variety of crafts on the theme “Spring” will help kids feel all the charm of spring and the significance of the change of seasons. So the children will pay attention to the main signs of the coming spring: the warm sun, the singing of arriving birds, the first flowers, swollen buds on tree branches. In addition, needlework will develop fine motor skills, attentiveness and creative thinking.
Simple children's crafts are easy to make from disposable plates. There are many variations, for example, birds and butterflies.
For such crafts, you will need a background in the form of a sheet of thick cardboard, colored paper, watercolor paints, felt-tip pens, ready-made plastic eyes, glue and the plates themselves (preferably of different sizes).
Together with your child, it’s easy to make a simple card for kindergarten using pumpkin or squash seeds.
- Prepare the background. It is best to take not just plain cardboard, but print a gradient of preferably blue or blue tones on paper and stick it on a thick base.
- Draw branches with leaves. Depending on the available number of seeds and preferences, lily of the valley, chamomile, and snowdrops are suitable.
- Invite your child to color the picture. Make a pre-painted blank for your child.
- Show on a “draft” piece of paper the process of gluing seeds in the form of a flower and let the child create a bouquet himself.
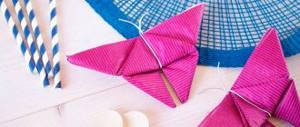
Original flowers are made from multi-colored plastic bags in just a few minutes. Just prepare:
- packages of suitable colors (pink, red, yellow);
- glue gun;
- scissors,
- base in the form of a plastic tube, wooden stick;
- colored paper.
- Cut strips about 4 cm wide from the bags.
- Carefully cut them into two thirds.
- Using scissors, “curl” the resulting fringe.
- Using a glue gun, glue the strip to the base, twisting it in a spiral.
- Wrap the remaining part of the “twig” in green colored paper and glue the leaves.
- Repeat this with stripes of different colors and create a rainbow spring bouquet.
A spring bouquet can be not only floral, but also palm. It’s easy to make such a bouquet from plasticine.
You will need:
- cardboard background;
- brown plasticine;
- cotton wool;
- yellow gouache;
- satin ribbon.
Draw branches on the cardboard.
Roll long thin sausages out of plasticine and press them along the lines of the branches.
Make buds by rolling small balls from plasticine and gluing lumps of cotton wool to them, which must be painted over with yellow gouache.
At the bottom of the palm bouquet, cut holes for the ribbon and tie a bow.
Plasticineography is a relatively recently used technique in children's handicrafts, but it has become quite popular.
Using it, even a student in the junior group can make an original, bright craft. You need to draw or print a template and add plasticine strokes to it.