Application vase: with fruits in different groups of kindergarten
Contents
Applique is a type of fine art. It develops a sense of color, composition, creativity, and trains fine motor skills . Its implementation teaches skills in working with paper, glue, and scissors. When performing a collective application, children learn to work together, which helps improve relationships in the group. Application classes are held in all kindergarten groups with children from 5 to 8 years old. Each group has its own characteristics of conducting classes.
In the younger group, children glue ready-made fruits from paper. In the middle one I can cut fruits and vegetables myself. In the older classes, children are introduced to different types of appliqué and the techniques of mosaic and broken appliqué. Develop independent execution of still lifes of fruits and vegetables in a basket or on a plate.
In the preparatory group they do the work independently, repeat geometric shapes, get acquainted with subject and other types of application.
Contents of the material
Middle group lesson
- Children develop cutting skills and learn to use scissors correctly and safely.
- They learn composition, improve their skills in working with paper and glue.
- Develops creative abilities.
- They foster hard work, responsibility, the ability to complete work, and accuracy.
To work you need to prepare:
- colored paper, cardboard for the base;
- scissors, fruit templates;
- glue: pencil or PVA, then you need to prepare brushes and remind you how to work with them;
- pencils.
At the beginning of the lesson, the teacher conducts a conversation about fruits: how they are useful, how they grow and look. Explains what they will be doing today and reminds them of the rules for handling scissors and paper . You can remember the riddles. Then the teacher shows the picture “Fruit Bowl” and explains that today they will make a three-dimensional applique.
Children in this group already have cutting skills, so the Fruit Basket applique will not seem difficult to them.
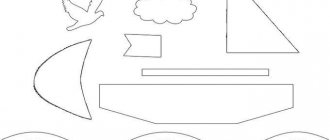
First you need to prepare a template for a vase or plate. You should draw it and cut it out. For children who find it difficult to do this, the teacher helps them draw a template, and they cut it out themselves. A paper basket or plate is glued onto plain cardboard.
Then they start making fruit. The yellow paper is folded in half and then doubled again. Draw a pear pattern. Since the paper has four layers, cut out 4 fruits.
We cut out the rest in the same way, but for the apple we take pink and yellow paper and cut out 2 apples of each color.
We also recommend reading:
Fold each piece in half. Then we glue four blanks onto the sides. Now you need to harmoniously arrange the finished fruits on the vase, glue and open each one.
At the end of the lesson, the children examine their work, and the teacher gives each work an assessment, usually positive. After praise, children have increased self-esteem and a desire to work further.
To consolidate your skills, you can later conduct the “Applique vegetables on a plate” lesson.
Gallery: applique fruit bowl (25 photos)
Creating a broken appliqué in the senior group
Goals:
- cultivate interest in the application;
- introduce you to making appliqué from scraps of paper;
- develop fine motor skills;
- Accustom to work carefully, consistently and independently.
Required materials:
- Colored paper;
- Colored cardboard;
- Glue;
- Template picture with fruits on the tablecloth;
- White threads for knitting;
- Pencil.
After the introductory conversation, the children begin making a vase. Each child has a template with a drawn vase and fruit. The teacher suggests taking purple grape paper and tearing small pieces. Then glue is applied to the silhouette of the fruit. The pieces of paper are glued neatly and tightly to each other. The remaining silhouettes are filled in the same way.
The tablecloth is smeared with glue and filled with pieces of white thread no larger than 1 cm in size.
With a pencil, children draw tails and leaves for each fruit. Then, from scraps of colored paper, they make a frame around the edge of a sheet of cardboard with a vase.
As a result, the children of the older group, together with the teacher, admire their works.
“Fruit basket” in the preparatory group
Children of this age have skills in working with applications, so they complete the task independently. They continue to improve their skills and abilities, as well as learn new techniques and develop their creativity . Children repeat geometric shapes.
What you need to prepare for class:
- colored paper and cardboard;
- basket and fruit templates;
- scissors, glue;
- still lifes of famous artists.
The teacher explains what the children will do during the lesson. Explains what a still life is, demonstrating prepared illustrative material.
They begin work by making a basket. Brown and yellow paper is cut into strips. Brown stripes are laid out on the table, yellow ones are intertwined with brown ones, creating an imitation of basket weaving. It turns out to be a checkered rug. It is turned over and the basket template is applied to the reverse side, traced with a pencil and cut out. Glue onto cardboard or a sheet of thick paper. This process is complex, some children will need help from a teacher .
Children draw fruits and cut them out. Then, using these templates, they cut out and glue the fruits into the basket. Glue on green tails and leaves. A couple of fruits are glued near the basket, as if they had fallen out.
You can conduct classes on the following topics: “Basket with vegetables”, “Basket with mushrooms”. The last task is complicated by the fact that the mushrooms consist of two parts of different colors. You need to cut out red or brown caps and white or gray legs. Then glue both parts into one mushroom.
The application “Fruits on a plate” is carried out to strengthen the ability to work independently.
In the senior or preparatory group, you can conduct the lesson “Vase with Flowers”. It is worth pointing out to children that for fruits and vegetables you need a low, wide vase, and for flowers, a tall, beautiful one. Thus, you can teach children to cut out symmetrical objects from paper folded in half. In this case, we cut out half of the template and get the whole after unfolding the cut out silhouette.
After this you can cut out the flowers. You need to offer children the opportunity to make simple flowers: tulips, bells or any others. Children can decide for themselves : to stick them so that the flower stems are not visible or to stick the flowers higher, adding green stems and leaves.
In the senior and preparatory groups, you can introduce children to creating fruits and vegetables by crumpling a napkin of the desired color into a ball. Then we glue the balls onto a vase, plate, or basket. You can do thread appliqué in these groups. Drawn fruits and vegetables on a paper plate are smeared with glue and thick thread trimmings of the corresponding colors are glued onto it.
Features of applique classes in the younger group
Young children do not yet know how to cut. The teacher cuts various fruits or vegetables, and cuts out the silhouette of a canning jar. The lesson can be conducted individually , then each student has a jar; in collective appliqué, children stick fruits into a common jar.
Before class, the teacher tells a fairy tale about how bunnies or bear cubs need fruit. He reads poems or riddles. Repeats with children the names and colors of each fruit, explains why fruits need to be preserved.
Then the children get to work and glue the finished paper fruits onto the jar as the teacher explained: so that they do not protrude beyond the edges of the jar and do not creep on one another. If the youngest child is confused and cannot start working, the teacher helps .
Then the children admire the work together with the teacher. He praises the children's good work by giving them fruit.
The influence of applique classes on the development of children's creative abilities
In kindergarten, appliqué classes are held in all groups and become more complex with age . Children learn to cut, work with scissors, paper, and glue. They not only develop physical skills, but also mental development: during the lesson they learn to remember the names of fruits and vegetables, distinguish them by appearance, remember the names of colors, repeat geometric shapes, and gain basic knowledge of composition and color combinations.
In these classes, children develop accuracy , the ability to plan their work and bring it to the end. In collective applications, children learn to work together, not to interfere with each other, to help if necessary, and to enjoy the results of collective work.
At school, applique classes continue and children improve their skills acquired in kindergarten. Accuracy, hard work, and responsibility for one’s work are in demand at school during labor lessons and even in such serious lessons as mathematics and foreign languages.
Children will need these useful personality traits more and more as they grow older. Therefore, appliqué work should be treated with due respect .
Other types of needlework
1igolka.com
bowl of fruit and autumn carpet
Application in the preparatory group lays down the basic creative skills. Helps in the formation of logical thinking and imagination. While working, children can make various simple geometric shapes. When working with children under 3 years old, pre-prepared parts are most often used. Sometimes, under supervision, you can let the children carefully prepare the parts themselves.
While making appliques, children become familiar with basic working techniques and skills in handling paper and glue. Children learn to correctly place the necessary fragments, form a whole image from disparate parts, and lay out pictures in a certain sequence in accordance with the plot.
Among other things, children learn basic geometric shapes, shapes of various objects, and learn to harmonize colors. They begin to create the simplest compositions.
While working, children in the preparatory group master the basic types of cutting. The program provides for the creation of plot applications, during which children think through the plot of their work.
Applications in the preparatory group can be on any interesting subject: seasons, transport, plants, etc. The main thing is that the storyline is familiar to the baby and occurs in his everyday life.
Autumn tree
On the theme of autumn, an excellent application for children in the preparatory group would be to create an autumn tree with a crown of palms.
To do this, under the guidance of the teacher, they trace their palms on a sheet of paper.
Carefully cut them out.
And glued to the tree crown prepared in advance by the teacher. It turns out to be such a wonderful group craft.
A bowl of fruit
Another great theme for an applique would be a bowl of fruit.
The teacher should tell the students about the most common fruits, then ask the children about their favorite ones, and then offer to make a composition with the ones they like.
The vase can be prepared by the teacher in advance. You can also make a large number of apples, pears, lemons, and oranges from paper so that kids can cut out their own fruits using a template and “put” them in a vase.
Bright carpet
An autumn carpet applique would be interesting. To make it, you can use both leaves cut out of paper and real natural material. Only such leaves need to be prepared in advance. To do this, after collecting, remove dirt from them, wash and let dry under pressure for 2-3 days. Then glue the leaves in random order onto the base.
If the craft is a group project, then it is best to use whatman paper as a basis, which can be pre-colored.
Must get such a great job.
Other options
Many children are familiar with mushrooms. You can also invite the children to complete an application on this topic.
Who hasn't watched a wedge of migratory birds? Show some photographs on the topic of migratory birds to the students and offer to do work on this topic.
Each child will complete an application on the theme “My Family” with great interest.
You can invite the children to make a tree, in the appropriate places of which their parents will help them stick photographs of their family members.
All children love animals, so they will be very happy to make crafts on the theme “Pets”.
A good educational applique would be making the “Spikelet” applique. It is made from origami modules.
For children in the preparatory group, you can offer ready-made modules; they will only need to connect them together. The theme of getting to know vegetables can also be complemented by making an applique.
Ask the children what vegetables they like and invite the children to fill the pots prepared in advance by the teacher.
Video on the topic of the article
Similar articles:
knittochka.ru
Collective application
Sometimes the teacher plans for the children to work together. At the same time, the application of a bowl of fruit is done by all the kids. Responsibilities are distributed in the younger group by the teacher, and older children negotiate on their own.
They do such a great job on a piece of whatman paper. The background is painted in advance. To make the fruit voluminous, you need to cut identical parts according to a template - the contours of pears and apples. They are folded in half, and the fold lines are smoothed out well.
Then the parts are glued in halves, and the last and first are glued to the background. The leaf is also bent in half, and one of the parts remains unglued. Children arrange the details on whatman paper in any order, as desired.
If you liked any of the presented compositions, then you can try to make such an application at home. Add a few autumn flowers to the still life, and such work can be taken to an exhibition in a kindergarten or elementary school.
bowl of fruit and autumn carpet
Application in the preparatory group lays down the basic creative skills. Helps in the formation of logical thinking and imagination. While working, children can make various simple geometric shapes. When working with children under 3 years old, pre-prepared parts are most often used. Sometimes, under supervision, you can let the children carefully prepare the parts themselves.
While making appliques, children become familiar with basic working techniques and skills in handling paper and glue. Children learn to correctly place the necessary fragments, form a whole image from disparate parts, and lay out pictures in a certain sequence in accordance with the plot.
Among other things, children learn basic geometric shapes, shapes of various objects, and learn to harmonize colors. They begin to create the simplest compositions.
While working, children in the preparatory group master the basic types of cutting. The program provides for the creation of plot applications, during which children think through the plot of their work.
Applications in the preparatory group can be on any interesting subject: seasons, transport, plants, etc. The main thing is that the storyline is familiar to the baby and occurs in his everyday life.
Autumn tree
On the theme of autumn, an excellent application for children in the preparatory group would be to create an autumn tree with a crown of palms.
To do this, under the guidance of the teacher, they trace their palms on a sheet of paper.
Carefully cut them out.
And glued to the tree crown prepared in advance by the teacher. It turns out to be such a wonderful group craft.
A bowl of fruit
Another great theme for an applique would be a bowl of fruit.
The teacher should tell the students about the most common fruits, then ask the children about their favorite ones, and then offer to make a composition with the ones they like.
The vase can be prepared by the teacher in advance. You can also make a large number of apples, pears, lemons, and oranges from paper so that kids can cut out their own fruits using a template and “put” them in a vase.
Bright carpet
An autumn carpet applique would be interesting. To make it, you can use both leaves cut out of paper and real natural material. Only such leaves need to be prepared in advance. To do this, after collecting, remove dirt from them, wash and let dry under pressure for 2-3 days. Then glue the leaves in random order onto the base.
If the craft is a group project, then it is best to use whatman paper as a basis, which can be pre-colored.
Must get such a great job.
Other options
Many children are familiar with mushrooms. You can also invite the children to complete an application on this topic.
Who hasn't watched a wedge of migratory birds? Show some photographs on the topic of migratory birds to the students and offer to do work on this topic.
Each child will complete an application on the theme “My Family” with great interest.
You can invite the children to make a tree, in the appropriate places of which their parents will help them stick photographs of their family members.
All children love animals, so they will be very happy to make crafts on the theme “Pets”.
A good educational applique would be making the “Spikelet” applique. It is made from origami modules.
For children in the preparatory group, you can offer ready-made modules; they will only need to connect them together. The theme of getting to know vegetables can also be complemented by making an applique.
Ask the children what vegetables they like and invite the children to fill the pots prepared in advance by the teacher.
Video on the topic of the article
dekormyhome.ru
Application “Vase with Fruit”: manufacturing options.
This article will introduce the reader to methods for making the “Vase with Fruits and Flowers” applique. Parents of children will learn what exactly children should be able to do at different periods of their lives according to the requirements of the kindergarten program.
Development of skills of children of different ages
At the beginning of the school year, kindergarteners study the gifts of autumn. Teachers introduce children to fruits, vegetables, berries, and autumn flowers. On walks, children watch the harvest. During fine arts classes, this knowledge is deepened and repeated. Children, when drawing fruits or vegetables, take a closer look at their structure and shape. Understand what a flower is made of.
Children also sculpt fruits from plasticine or create crafts from natural materials. During the applique class, children in the younger group glue fruits cut out by the teacher either onto a sheet of paper or onto a plate. In the senior and preparatory groups, children already own scissors and can use templates or self-drawn contours to cut out the fruit needed for work.
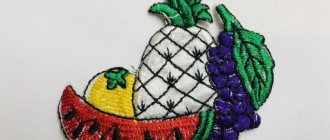
Appliques are made in different ways: from paper and folding napkins, from fabric and three-dimensional figures, or by mosaic method from scraps of paper. Natural materials are also used. In this article we will look at how children of different age groups can complete the “Fruit Bowl” appliqué, and we will see samples of finished work.
Textured vase
This applique was made specifically on a dark background so that the textured paper from which the different fruits are made would look more contrasting. It can be smooth, ribbed, polished, compressed, shiny.
This type of work is done by children in the senior group of kindergarten. To do this, parts are cut out according to a template from different types of paper. Children of this age should already understand that they can be glued not only side by side, but also so that one partially covers the other. During the preparatory work, the children look at still lifes, and it is explained to them that those fruits that are at the back of the picture are located further, in the depths of the vase, and those that are drawn in front are closer.
Children perform the fruit bowl appliqué shown in the photo as follows. First, bananas are glued on, then a green ribbed apple, an orange and a bunch of grapes next to it. The pear is glued on last. At the very end, the vase is glued on. Next to it you can make a chrysanthemum flower, thanks to this you will get an original applique of a vase with fruits and flowers.
So that children know where the boundaries of the vase are, its contours are drawn with a pencil on a sheet of paper. Children should place all the fruits inside this outline, and the flower outside.
Breaking method
This kind of work is done with a mosaic made from pieces of paper. Children tear them off from a whole sheet of colored paper. The contours of the vase can be outlined with a simple pencil. Children begin work by covering the vase and the orange rim. Children are already making fruits on their own, visually defining their boundaries.
Before starting work, you need to explain to the children that some of the fruit is in a vase and is not visible, so their contours below are even.
This seemingly easy application of a fruit bowl can only be made by children of older preschool age. They need to clearly understand where to make a bend in the contour, because the fruit should not be “prickly,” that is, scraps of paper should not stick out from the part with sharp corners. And only older children can try this hard.
Printed apples in a basket
This is an interesting work done in different techniques. A complex basket made of woven strips of paper, independently cut by the child along the paper lines. But in addition to the fact that they need to be cut into several pieces, you also need to weave them together correctly.
If parents want to make such a picture at home with their child, then instead of strips of paper, you can use thin twigs, gluing them in decreasing order. You will get the application “Vase with fruits and branches”.
But apples are made by printing. To do this, you need to cut the fruit in half. Dip one half in red paint, and the other half in green. When the prints are completely dry, a basket is glued on top. The last apple can be printed on top of the picture. Children in the older group can do this work.
Decorative composition
A fruit bowl can also be applied using a combined method. The background is painted with gouache paints. This is the wallpaper and tablecloth of the table. Then fruits are depicted separately, which are cut out along the contour with scissors. You can complete all preliminary work the day before class. Everything will dry well and will not stain children’s hands.
During the applique class in the preparatory group, all that remains is to glue on a vase of fruits (flowers). Place the parts in the pre-drawn outline of the vase. Fruits are arranged differently: some partially overlap others. At the very end, attach a vase.
Collective application
Sometimes the teacher plans for the children to work together. At the same time, the application of a bowl of fruit is done by all the kids. Responsibilities are distributed in the younger group by the teacher, and older children negotiate on their own.
They do such a great job on a piece of whatman paper. The background is painted in advance. To make the fruit voluminous, you need to cut identical parts according to a template - the contours of pears and apples. They are folded in half, and the fold lines are smoothed out well.
Then the parts are glued in halves, and the last and first are glued to the background. The leaf is also bent in half, and one of the parts remains unglued. Children arrange the details on whatman paper in any order, as desired.
If you liked any of the presented compositions, then you can try to make such an application at home. Add a few autumn flowers to the still life, and such work can be taken to an exhibition in a kindergarten or elementary school.
fb.ru
Textured vase
This applique was made specifically on a dark background so that the textured paper from which the different fruits are made would look more contrasting. It can be smooth, ribbed, polished, compressed, shiny.
This type of work is done by children in the senior group of kindergarten. To do this, parts are cut out according to a template from different types of paper. Children of this age should already understand that they can be glued not only side by side, but also so that one partially covers the other. During the preparatory work, the children look at still lifes, and it is explained to them that those fruits that are at the back of the picture are located further, in the depths of the vase, and those that are drawn in front are closer.
Children perform the fruit bowl appliqué shown in the photo as follows. First, bananas are glued on, then a green ribbed apple, an orange and a bunch of grapes next to it. The pear is glued on last. At the very end, the vase is glued on. Next to it you can make a chrysanthemum flower, thanks to this you will get an original applique of a vase with fruits and flowers.
So that children know where the boundaries of the vase are, its contours are drawn with a pencil on a sheet of paper. Children should place all the fruits inside this outline, and the flower outside.
Fruit applique on a plate: templates for the younger group
Making appliqués with children helps develop their creative thinking and creative abilities. The applique of fruits and vegetables, beautifully placed on a plate, provides wide scope for creativity and, depending on the chosen materials and complexity, can be done in both the younger and older groups. In this article we will talk about which applications are suitable for which age groups and what unusual techniques can be used to make such paper work.
We are considering options for applications with fruit in a vase and on a plate
An applique bowl of fruit is an excellent craft for children in the middle group. Such work can be done collectively, or individually. Depending on the assigned tasks. Collective pleasant pastime, creativity, will help children learn to work in a team and make compromises, and independent work will express the individuality of each child. Before making the applique, it will be useful to talk to the children about the names of fruits, how fruits and vegetables differ, and what shape each individual fruit resembles (this will be useful in the applique). To complete the application we will need:
- Colored paper of different colors
- Glue
- Scissors
- White or neutral cardboard for the base
- Gouache
- Tassels
- pencil
Progress:
1) Draw the outline of the vase on white cardboard. Paint the vase with gouache
2) Cut out fruits from colored paper
3) Glue the fruits into the vase
In the case of a collective application, the teacher should draw the outline of a large vase and invite the children to color it. It is necessary to show how to cut fruits out of paper (at the middle group level, you can use the cutting technique on a piece of paper folded in half so that the halves of the fruit are symmetrical). You can ask children to draw the outlines of fruits themselves (connect fruits with geometric shapes - an apple looks like a circle, only with a tail, a plum looks like an oval, and so on) or use ready-made templates.
We create an application with fruits for senior preschool age
For children in the older group, a more complicated version of the applique - a basket with fruits - is more suitable. We will need:
- colored paper of different colors
- scissors
- glue
- marker or felt-tip pen
- white or neutral cardboard for the base
- pencil
Progress:
1) First, draw the outlines of the basket on brown colored paper and cut it out.
2) Glue the basket onto the cardboard. After this, you can draw a pattern on the basket with a marker.
3) Draw and cut out any fruits from colored paper. Cut out fruit cuttings from green paper. To make the applique more interesting, you can cut out exotic fruits with characteristic silhouettes - pineapples, bananas. On the pineapple, as well as on the basket, you need to draw an ornament.
4) Glue the fruits with cuttings into the basket. Several can be stuck next to it to complete the still life.
The most suitable activity for a younger group would be a lesson on “canning” fruit. Before you start making the applique, you need to talk to the children about fruits, ask them to remember the names of their favorite fruits. You can ask why we preserve fruit, you can ask riddles or read poems. Then you need to give the children ready-made templates of “jars” made of cardboard for the base of the application and paper fruits, invite them to choose the fruits that they want to add to the “compote” and put them in the jars. Having assessed how the children arranged the fruits (so that the edges do not stick out and the fruits do not intersect), we proceed to gluing.
In the preparatory group, it is important to familiarize children with unusual techniques for working with paper, for example, creating a three-dimensional picture or with the technique of broken, mosaic appliqué. We will talk about cut-off appliqué. To complete the fruit applique in a vase we will need:
- white or colored cardboard for the base
- pencil
- glue
- colored paper of different colors
Progress:
1) Draw the outlines of the vase and fruit on a sheet for the base. The outlines should not be too small; it should be convenient to stick parts in them.
2) Select the desired colors of paper and tear it into small pieces. The pieces should be neatly shaped, they should not be too long or too large
3) Glue pieces of colored paper onto the base. Make sure not to go beyond the edges of the sketch.
A similar applique can be made using scissors. In this case, the parts should not be torn, but cut out and glued at a short distance from each other in order to preserve their outlines. The application will look like a mosaic of individual bright fragments.
Video on the topic of the article
[media=https://www.youtube.com/watch?v=Ja4ih6um7Go&app=desktop]
sdelala-sama.ru
Application on the theme of vegetables and fruits
In kindergartens, classes on a similar topic are held from a very early age, but tasks for such classes are selected taking into account the age of the children.
Typically, vegetables and fruits applique
in the younger group it is carried out using templates that were prepared in advance by the teacher. In this case, children just need to place them correctly on the sheet and then glue them.
Before each lesson, the teacher draws up a summary of the application “Fruits”
, which identifies the goals and objectives of the lesson, describes the necessary material, and also describes the course of the lesson step by step.
Fruits: applique in the middle group
The work here can be done in several ways. In addition to the traditional technique using ready-made templates, at this age children can be introduced to the technique of cut-out or volumetric appliqué.
Also in the preparatory group there is an expansion of knowledge about the shapes of various objects and their differences.
At this age, kids learn to create one whole object from several simple objects, figures or parts. Such tasks develop fantasy, memory and imagination, make children more attentive and teach them to think logically.
In the middle group there is an applique on the theme of fruits
can be made in the form of a bright vase.
To work, you need the following materials: a set of colored paper, scissors, a simple pencil, a glue stick (if you use PVA, you will also need a brush to apply it). A landscape sheet or cardboard is suitable as a base.
The parts must be cut out from colored sheets. To do this, the teacher first draws them on the back of a sheet of a suitable color (to simplify the task, you can use templates), and preschoolers cut out the blanks themselves. You can also pre-prepare and cut out the blanks, and during the lesson simply hand them out to the children so that they can glue the parts onto the base.
In addition, you also need to prepare the vase. It is made from paper or colored cardboard, and then glued to the base.
If the group plans to work collectively, instead of a landscape sheet, you can use whatman paper as a basis. In this case, the vase also needs to be larger so that each child can place their part of the composition in it.
When all the parts are prepared or distributed, you can start working with glue. If you use a glue stick, everything is a little easier. If PVA is used for gluing, it should be poured into a shallow container, and then give the children brushes and explain how to carefully apply the glue to the part so as not to get their hands dirty and make a neat craft.
At the next stage of work, the teacher’s task is to observe the children, who must complete the task independently. If someone needs help or a hint, the teacher should help and invite the child to continue further work independently.
When the works are ready, they can be reviewed collectively. At the same time, it is very important to praise the kids, since this will not only increase their self-esteem, but will also be an excellent incentive for further independent work.
Lesson notes on the application “Fruits”
in the older group, it is compiled taking into account the age of preschoolers, their skills and abilities.
Since at this age children, as a rule, know how to use scissors and cut out simple geometric shapes without outside help, they can be asked to make three-dimensional ones.
Volumetric application of fruits in the senior group
done on colored paper. In addition, you will need a simple pencil, scissors, a glue stick and a felt-tip pen.
Since at this age preschoolers have some skills in working with colored paper, the teacher should clearly show them the manufacturing process, and they will repeat it.
First you need to fold each sheet three or four times, and then draw some fruit on it and cut it out. Since the sheet was folded several times, several identical blanks can be cut out at a time. For each fruit you will need three or four preparations. Next, each part must be folded in half. After this, you can begin making the cores. To do this, several circles are cut out of white paper (their number depends on the number of parts that make up the craft), and then they are glued in the center of each side of the craft. You can draw seeds in the center of the cores with a felt-tip pen. Next, the parts need to be glued together on their sides.
To make the work more fun, you can supplement it by making green leaves or a funny worm out of paper. To make a worm, you need to cut out two strips of paper, glue them together so that the bright side is on the outside, and then fold them like an accordion. For the worm's face, you need to cut out a circle, draw eyes and a mouth on it, and then connect a paper accordion with the face and stick everything on the craft.
Another interesting option is a voluminous appliqué made from threads, which can be original for children's institutions.
For this you will need: a base (it can be cardboard), multi-colored thick threads, scissors and PVA glue.
During the lesson, children are given sheets of paper on which some kind of drawing has been previously drawn with a simple pencil and threads cut into pieces about a centimeter long. After this, kids should apply glue to small areas of the design with a brush, and sprinkle it with threads of a suitable color on top. When the glue dries, the craft is ready!
In this simple way you can make collective ones. These could be, for example, New Year's greeting cards, which would be a wonderful New Year gift for parents or grandparents.
If you liked our site, express your “thank you” by clicking on the buttons below.
Making appliqués with children helps develop their creative thinking and creative abilities. The applique of fruits and vegetables, beautifully placed on a plate, provides wide scope for creativity and, depending on the chosen materials and complexity, can be done in both the younger and older groups. In this article we will talk about which applications are suitable for which age groups and what unusual techniques can be used to make such paper work.
Notes on the node “Still life of fruit” (application) - me-po.ru
Summary of GCD in the senior group
“Still life of fruit” (applique)
Prepared by: teacher Belkina O.V.
Goals:
improve the technique of cutting out round shapes from paper folded in half, respecting the proportions; develop a sense of color when choosing colors, compositional skills; give the concept of foreground and background; to cultivate an aesthetic attitude towards nature in the surrounding world.
Equipment: fruits or their dummies (orange, banana, apple, plum), colored paper, scissors, glue, brush, napkin, markers, bag.
Preliminary preparation: conversation about the benefits of fruits; examining fruits to determine their shape; solving riddles about fruits.
Progress of the lesson:
- 1.Creating gaming motivation.
- Educator: Today we will paint a still life. Who can tell me what is depicted in a still life? (children's answers)
That's right, a still life is a genre of fine art, a painting that depicts objects: vases, flowers, vegetables, fruits, etc. What will be depicted in our still life? Guess it! - The teacher invites the children to identify the fruits lying in the bag by touch. You can use riddles as a hint:
- Balls hang on the branches -
- Turned blue from the heat. (plum)
- Round, rosy,
- I grow on a branch:
- Adults love me
- And little children. (apple)
- Bright, sweet, poured,
- The cover is all gold.
- Not from a candy factory -
- From distant Africa. (orange)
- -Yes, today we will create a still life of fruits, and we will do the work using the appliqué technique.
- 2. Updating knowledge.
- Educator: In order for our applique to turn out beautiful, we need to arrange the fruits correctly. When laying them out, you must remember that large fruits should be in the background, that is, behind, but smaller ones should be placed in front. What happens if we do the opposite? ( children's answers)
Yes, small fruits will not be visible then.
Offer your options for staging a still life, not forgetting about the combination of colors. It is hardly appropriate, for example, to place a yellow orange and a yellow-green banana next to each other. (children complete the task)
What a beautiful still life we created! Now you can cut out the applique details. - 3. Demonstration of working methods.
- Educator: In order to cut fruits out of paper, you need to know what shape they have. Tell me. (children's answers)
Do you know how to cut a circle from a square?
(children's answers)
What geometric shape can you cut an oval from?
(children's answers)
Yes, we will cut out an orange and an apple from squares folded in half, and a plum from a rectangle. How to cut a banana? First we will draw it, and then cut it out along the drawn outline. - After we cut out the necessary parts, we lay them out on a sheet of paper the same way we have fruit on the table. Then we glue the distant parts first, and then the near ones. Spread a little glue on the parts to make the applique neat. The missing small details can be completed with a felt-tip pen.
- The teacher shows techniques for making an applique.
4. Practical work.
Assignment: complete an appliqué of a still life of fruit.
5. Summary of the lesson.
Children's works are exhibited at the stand.
Educator: What amazing still lifes you have created! These fruits should be on your tables every day, because they contain so many vitamins and other beneficial substances. If you eat them daily, you will be healthy and cheerful.
me-po.ru