Psychology of middle preschool age
In the interval between 4 and 5 years, a child determines himself, develops a line of behavior in relation to the world around him and accumulates a maximum of information. His capabilities are growing, he is already fluent in many artistic tools: a brush, pencil, crayons, and knows how to cut out and glue simple appliqués onto the base.
A little person wants to be independent, to show his individuality, but at the same time, he needs constant contact with his parents, their support, and approval of his actions. Origami allows you to fulfill both of these needs. The whole family can fold paper figures, understanding the patterns together and enjoying the results. Then they organize home performances with the models, which brings the child even closer to their parents and helps build warm, friendly relationships.
The educational role of origami
The ancient art of paper folding is not just fun. It contributes to the development of such important skills at four to five years of age as:
- Accuracy. It is still difficult for parents to convey to their children how important the cleanliness of the workplace, dining table, dishes, and clothes is. But if you fold origami figures carelessly, they may not turn out at all. Gradually, the child will understand that without accuracy, he will not be able to achieve success.
- Perseverance. Another “stumbling block” for five-year-olds. Many of them cannot curb the desire to constantly move, which hinders them in adulthood, when schooling begins. So patience, the ability to organize yourself and persistently achieve success, simply need to be cultivated in advance.
- The ability to finish what you start. The situation when a little creator abandons a drawing, a plasticine figurine or appliqué halfway through, is familiar to parents. But unlike other types of applied art, Japanese papermaking produces results only upon completion of all stages of folding; there are no intermediate stages. So you will inevitably have to discipline yourself.
- The desire to create, not destroy. Children with an easily excitable nervous system can spoil and break something simply to discharge psychologically, to give an outlet to accumulated negative energy. It has already been proven that folding paper figures can relieve stress and have a calming effect, while simultaneously simulating creativity and imagination.
- Communication skills. Actually, any type of joint needlework teaches communication with both peers and adults. Origami is no exception.
Parents, for their part, should not be too protective of the little master; it is better to come to the rescue only after his request. At 4–5 years old, children are able to independently figure out a simple origami diagram and follow all the steps indicated in it.
Utility models
An excellent option is functional paper crafts, which can then be used for very specific tasks. For example, add a figured origami hat to a New Year’s costume, and put brushes and pencils in a glass. It turns out that while playing, a preschooler creates useful and necessary things, learning the truth that work is not a heavy punishment if it is a joy.
Hat
By taking a one-sided sheet of red paper, you can easily stock up on a bright Santa Claus headdress. Or cover your head from the sun on a hot summer day. For this model you will need not a square, but a rectangular sheet of paper. If the hat is intended for a doll or pet (some of them can stoically tolerate such outfits), a standard A4 sheet will do. To make a headdress for a child, you will need A2 format.
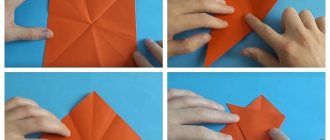
Work algorithm:
Place the sheet with the short side facing you. Fold in half from top to bottom. Now from left to right. Open the last fold. We bend the upper corners to the intended center line. We iron all the fold lines well.
We bend the lower part of the layer, which is closer to us, upward, forming the brim of the hat. Turn the workpiece over. We do the same with the other side. We open the workpiece from the inside so that it gains volume.
For long-term use, the hat is folded from thick paper, such as whatman paper or craft paper. You can make holes in the corners and attach a rope - the model will not fall off. And arrange a photo session for your beloved pet.
samurai hat
This model of headdress, reminiscent of a samurai kabuto combat helmet, looks much more impressive. This type of battle armor was decorated with an overlay plate in the form of horns or an inverted crescent, which served as a badge of honor for powerful and noble warriors.
It is best to take a sheet of A1 format and make a square out of it by folding the short side towards the long side. It is undesirable to use colored paper for children's creativity - it is too thin and fragile, so it will quickly fray on the folds or tear. Designer cardboard, washi, craft with a print, or, for example, thick wallpaper with an oriental pattern are suitable.
Work algorithm:
We take the original square - in the example we use special origami paper with a thematic image of a samurai. We place it on the table with the top facing us, turning it into a rhombus. Fold from top to bottom. We bend the outer corners towards the middle. We get a rhombus again, only smaller in size.
Fold the top two layers in half vertically. We bend the inner corners outward along the lines indicated in the figure. We smooth out the resulting “wings” well. Bend the third layer as shown in the picture, slightly below the center line.
We smooth out the triangle. We turn its base again, getting the margins. Bend the remaining lower triangle upward. Smooth out the crease. We tuck the corner inside the hat. The model is ready, you can wear it.
Glass
Is it your child's birthday? Why not prepare something original for the holiday together with your parents. Cute paper cups to hold sweets, cookies and other edible favors for guests are a great idea. And after the treat is eaten, they can be used to play billbok.
It is advisable to take moisture-resistant paper for packaging and decorative work. We start assembling with a classic square, 20x20 cm in size.
Paper plastic as one of the means of forming a suit
The article reveals the main points of using paper-plastic means for three-dimensional shaping of clothing models.
Key words: costume architectonics, tectonics, structure, space, paper plastic, volumetric shaping, artistic design
The pace of change in economic and social conditions of life in the modern world places high demands on the quality of clothing design. Developing projects for beautiful, aesthetic, and at the same time functional and comfortable things requires the search and synthesis of various artistic design techniques.
The shape of any costume is based on a certain artistic image, which depends on the rational choice of composition and manufacturing technology. The shaping of the suit, during which the shape of the designed model appears, is a unique synthesis of design and artistic creativity, manifested in the structuring of individual elements, on the basis of which constructive, spatial, utilitarian products are built. The architectural expressiveness of the costume is inextricably linked with the volumetric-spatial solution of its form. The complex surface of a form includes the following elements: geometric appearance, structure, surface, mass, texture, color scheme. The external shape is greatly influenced by silhouette, structural and decorative lines.
The designer, in search of new forms, uses a variety of technical means that serve both to express the image of the model through its structural construction, and to directly manufacture the model from different materials. To find new silhouette and design forms at the stage of creating a costume project, the paper prototyping method can help. Prototyping refers to the process of shaping a suit on a mannequin. This method helps to more clearly trace the architectonics of the costume. The constructive construction of the model (architectonics) is expressed in the harmonious arrangement and connection of all structural elements of the costume.
A suit is considered a multilayer spatial system (a hygienic layer (inner) and an information layer (external). [2] When the form is filled to the maximum with elements, an ensemble is formed. With an excessive number of details or their insufficiency, the compositional destruction of the product’s shape occurs. Development of the shape of the costume from the point of view of artistic design is closely related to the formation of the visual structure of the model, its characteristic features (directions, angles, alternation and structural arrangement of elements, plasticity. The process of shaping connects all elements of the form until a harmonious image is obtained. The structure of the costume reflects stable and mobile elements (geometric appearance, structural and decorative lines and elements) The structure forms the most important connections between parts of the costume.
One of the modern methods of shaping clothing is artistic design using paper plastic (paper plastic).
Paper is an unusual structural material, fragile, but with enormous plastic capabilities. The method of papermaking, namely the transformation of a flat sheet into a three-dimensional form, has been known for a very long time. When transforming a flat sheet of paper into three-dimensional forms, the following can occur:
- while maintaining the overall dimensions, the internal elements change “qualitatively”;
‒ change the overall overall dimensions in accordance with the purposes.
When working with paper, it is necessary to take into account its texture and texture features. The bending of a sheet depends on the direction of the fibers of its structure. When designing designs that require rigid shapes, it is best to use thick paper. The base of any suit made of paper is formed by a system of stiffening ribs, which are obtained by bending or cutting a sheet of paper. By bending, twisting, creating stiffening ribs, and corrugating, rigid volumetric ornamental forms can be obtained. All structural properties of the future product will depend on the number and direction of cuts. [1]
In the process of creating quite complex structures, the need for curved design lines often arises. These lines can be obtained by cutting paper using flexible patterns or by hand. It is necessary to monitor the depth of the cut to avoid the possibility of cutting through the paper.
The relief surface of paper clothing can be based on rhythmic construction, folding and notching methods and techniques that can change the physical properties of the material and its structural characteristics (texture, texture). The paper-plastic technology is based on the following design techniques: creasing, folding, die-cutting and cutting, gluing.
Creasing is done by drawing a straight or curved line on a flat sheet of paper. Subsequently, the sheet is folded along this line. Folding is the process of folding a sheet. Together, these two operations produce three-dimensional modeling that forms the main structural element - the stiffener. There are several types of folding:
1) mutually perpendicular - each subsequent fold is performed strictly perpendicular to the previous one;
2) parallel - only parallel folds are formed;
3) combined - the structure combines both parallel and perpendicular folds.
The tectonics of a paper volumetric structure depends to a large extent on the stiffening ribs, since they make the structure more resistant to deformation and give expressiveness to the form. A volumetric-spatial design in the form of a sheet of paper, structured with folds, helps to determine compositional patterns. The laws of compositional shape formation appear when varying metric or rhythmic alternations of elements. The laws of symmetry are manifested in the symmetrical construction of a volumetric composition.
During the cutting process, a piece of the product is cut out or certain slots are made in the piece—cuttings. With the help of die-cutting and notching, a visual organization of a three-dimensional form occurs.
The techniques of cutting and die-cutting are original means for reflecting the visual organization of a sheet of paper. A die-cut located against the background of a sheet fold will visually appear as a bright spot, an accent of the work. From an artistic design perspective, die cuts exhibit the individual tectonic qualities of the paper structure, which impart particular strength to the structure.
Gluing is the process of joining structural elements together.
In addition to the main methods, there are also auxiliary ones: bending, twisting, embossing, stretching.
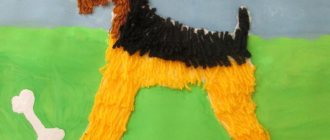
The main methodological goal in classes on volumetric shaping (architectonics) in the educational environment of a university is the ability to freely construct structural elements of a form and create a harmonious volumetric space. The professional activity of a clothing designer consists of their ability to build compositional connections determined by design and technological requirements. The plastic organization of materials shapes the creativity of the designer’s thinking and develops practical skills. Each element of the costume, made using the paper-plastic technique, is self-sufficient, complete and autonomous. Formative elements are characterized by complex curvature. Figure 1 shows a model made by students of the training direction 03/54/03. “The Art of Costume and Textiles” within the discipline “Architectonics of Volumetric Structures”.
Rice. 1. Volumetric shaping of a suit made of paper.
Creating a three-dimensional structure of a paper suit requires the designer to have special skills and abilities to work with the material. The designer must know the structural, compositional and plastic properties of paper. By completing tasks on the architectonics of volumetric structures, students learn to determine the properties of a material tactilely, identifying plasticity to model the shape of a suit. The structural transformation of fabric fabric is similar to the method of volumetric shaping from paper, therefore, from our point of view, paper plastic is of great help when designing clothes.
Literature:
- Danilova O. N., Sheromova I. A. Architectonics of volumetric forms. - VGUES, 2005. - 102 p.
- Cheremnykh A.I. Fundamentals of artistic design of women's clothing. - M.: Light Industry, 1977. - 144 p.: ill.
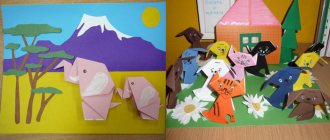
Origami gifts
Children always make beautiful cards and surprises from paper that can be given to older family members with special pleasure. Some models also make excellent holiday garlands for home and garden.
Autumn crows
A combined postcard with origami elements looks “grown-up”, but is quite accessible to most five-year-olds.
Before you start folding, it’s worth introducing your child to crows a little closer by telling him interesting and educational facts from their life. Then there will be no desire to offend these unique birds - the outstanding intellectuals of the animal world.
Work algorithm:
In addition to a two-color square sheet measuring 15x15 cm, you will need:
- a twig with artificial “autumn” leaves;
- printed cardboard for scrapbooking;
- plastic doll eyes;
- glue;
- scissors with wavy edges (optional).
Place the square with the top facing you, white, wrong side up. Fold it in half vertically and open it again. We bend the side corners as shown in the figure. We lower the top corner to the line of the sidewalls. It turns out to be a head.
It should be folded in half again so that the “beak” touches the top line of the workpiece. Then bend it again.
We turn the workpiece over and make a “tail”. Fold the figure in half. The bottom corner should touch the top edge. Then we bend the tail in the opposite direction so that it can be seen from the front side.
Playful kitten
Despite the large number of steps, this cheerful pet gets ready quickly enough. And on a postcard for March 8 or a birthday, it will look simply amazing. The figurine consists of two parts - the head and the body, which are finally fastened together.
Work algorithm:
- Place a square measuring 10x10 cm with the white side up and mark diagonal folds in both directions.
- Having unfolded it like a diamond, we bend the lower peak under the workpiece. And we fold the top one to the middle line.
- Then we bend the workpiece in half a second time.
- We lower the outer corners of the resulting trapezoid, aligning them to the center.
- The result is a rhombus.
- We lift its lower corners up and diagonally, as shown in the figure.
- You get ears. We fold the diamond sticking out between them in half to form the top line of the head.
- We turn the model over.
- The muzzle is ready, all that remains is to finish drawing or gluing on the eyes.
- We fold another square of a similar size from both sides to the center line.
- We arrive at the basic “kite” shape.
- Fold the workpiece in half from right to left.
- We bend the acute corner, “laying it” along the left edge.
- And we make a fold in the opposite direction along the line indicated in the figure. The body is folded.
- All that remains is to attach it to the head by inserting it into the “pocket” on its back side.
Models for 5th grade
Ten-year-olds are presented with complex designs, often involving several folding steps. First of all, the emphasis is on classic modular origami - kusudama and polyhedra from several identical parts. You can also make functional products: jewelry, boxes, bookmarks, lamps, wall panels, Christmas tree decorations, and so on.
Simple flower kusudama
Kusudama is a paper ball used as an interior decoration. Previously, it played the role of a hanging sachet and was filled with aromatic herbs to sanitize the air. The simplest kusudama is floral. It consists of 6-petal lilies, assembled in a modular manner.
Similar kusudama made from kami paper with different patterns look very beautiful. You can also use sheets of old glossy magazines, music notebooks or calendars. In Japan, openwork paper balls were considered a talisman and as such they can be given to loved ones and friends.
Step-by-step instruction:
You will need 6 squares of paper of any size - the larger they are, the more voluminous the resulting ball will be. However, the density of the sheets should increase accordingly. The standard size is 15x15 cm.
- We bend the sheet diagonally. This is the basic “Triangle” (“Kerchief”) fold, with which the production of origami figures often begins.
- Raise the right and left corners of the workpiece, aligning them with the top point. We place both halves along the center line. We iron the folds well with a stack or a ruler so that they turn out clear and even. The appearance of the flower depends on this.
- We bend both halves of the top layer of the workpiece to the sides, aligning them with the edges of the figure.
- We open the “pockets” we just made. This technique in origami is called “squash fold”. We lower the upper triangles on both sides down.
We bend both squash folds in half and glue the sides together. It turns out one petal of our lily.
We are producing 5 more similar parts. All that remains is to sequentially fasten them together.
Hot glue or Moment Crystal are suitable for this. To prevent the sides from moving apart, they are held together with a clothespin or paper clip while they dry.
You can make the lily monochromatic by assembling kusudama from several contrasting or nuanced shades. Or add patterned petals.
For a medium-sized ball you will need 12 flowers.
We start the assembly with two halves. We connect 6 lilies. We coat the back sides of adjacent petals on one flower with glue, do the same on the second and apply them to each other exactly, without shifts. Secure with clothespins until dry.
5 lilies form a circle with a common center.
We paste the last one - the sixth one - into the middle.
Connect the two halves and leave overnight until completely dry. If you use a heat gun, there is no need to wait.
Kusudama is ready. Origami balls are often made during the “extracurricular activities” provided by the Federal State Educational Standard in the 5th grade, especially during preparation for the New Year or other holidays. To make the product more neat and decorative, the center of each lily is decorated with buttons, scrapbooking details, rhinestones, and so on. You can add decorative cords and make pendants.
But kusudama flowers are used not only in balls. If you attach them to floral wire, you can assemble an incredibly fashionable bridal bouquet in the “hand-made” style today.
Another version of a very beautiful flower kusudama, indicative from the point of view of geometric constructions. It will require 30 rectangles, measuring 7x11.5 cm. One part represents one module.
Models for the game: fruit cocktail
It’s good when children make their own objects for play. These creations, even if not as beautiful and perfect as store-bought ones, are much more valuable to their creators. What if you cook a luxurious lunch using origami products? To stock up on delicious ingredients, it is enough to use the simplest schemes for children 4–5 years old.
Strawberry:
Banana:
A pineapple: