Hello everyone, hello! Do you remember that I recently promised you that I would make a detailed article on the topic of creating New Year’s cards with your own hands?! I keep my promise and share my work.
So, today I will show you ways to make original cards for the New Year 2020, which you can make with your children. These will include voluminous congratulations, and simple applique, as well as origami and drawing.
Remember that such homemade gifts will be a pleasure not only to give, but also to receive. And joint creativity will bring a lot of pleasure to both children and their parents.
The main elements of holiday souvenirs will be Christmas trees, snowflakes, Snowmen, Santa Claus and little animals. All winter landscapes and all subjects associated with this magical event will also be appropriate. Whatever your imagination is enough for, then depict it!
Templates and diagrams for making New Year cards
But for those who have little imagination, it is best to use ready-made ideas and templates. Then you, too, will make cool products and give them to your closest people.
For example, you can easily and simply make Christmas trees from adhesive tape. Here are the samples.
Or, according to the following scheme, make a three-dimensional postcard.
According to the instructions below, cut out and create a congratulatory tree.
Or use this template as a basis.
And everyone's favorite Snowmen.
Or mittens for creativity.
Here is a paper bunny for applique.
Or a template for a finished postcard. Print, cut out and color.
Another 3D option with a Christmas tree and snowmen.
A simple spruce in the form of an applique or regular coloring. Just right for children's creativity.
I also found a scheme for creating a three-dimensional product as a gift. I hope you find it useful.
And a beautiful description of how to create winter candles. It looks very original.
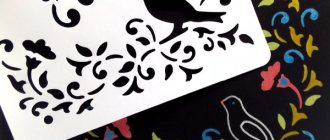
How to make a DIY New Year's card with snowflakes flying out of it
Now I want to talk about how you can beautifully combine winter beauties - snowflakes - in such crafts. Everything is very simple. We take the vytynanka as a basis and begin the process.
"Carved Snowflake"
You will need:
- Snowflake stencil;
- Shiny cardboard;
- Scissors;
- PVA glue;
- Glue crystal (moment);
- Stationery knife;
- Rhinestones;
- Eraser;
- Ruler;
- Pencil;
- White ribbon.
Manufacturing process:
1. Download and print the snowflake stencil.
2. Select a dark blue cardstock and fold it in half (recommended size is 12 by 15).
3. Now cut the gray snowflake stencil with scissors.
4. Attach the cut out snowflake to the middle of the card on the left inner side and trace it with a pencil.
5. This is how the snowflake should appear.
6. Next, reduce the snowflake stencil on the computer, print it and cut it along the contour. You won't need the big snowflake template anymore.
7. Trace the small snowflake around the center of the larger one.
8. Take a sharp utility knife and slowly, carefully cut out the design as shown in the photo.
9. As a result, you should have 2 snowflakes: cut out and on cardboard.
10. Grease the cut out snowflake with glue.
11. Fold the base and glue a small snowflake (smeared with glue) in the center of the cut out snowflake.
12. Decorate the product with rhinestones.
13. Next, tie a bow from a satin ribbon and also glue it to the front side of the craft.
Here is the finished sample.
Next is the method of “flying out”, that is, voluminous snowflakes using the kirigami technique.
"Snowflake Kirigami"
You will need: white and blue paper, a template, a sharp stationery knife.
Manufacturing process:
1. Save and print the template on white A4 paper.
2. Place the blank on the cardboard and begin to carefully cut out a snowflake along the contour with a sharp knife.
3. Next, bend the sheet in half, while doing the fold in the opposite direction. Glue blue colored paper to the back so that the cut out image is clearly visible.
4. Additionally decorate the front side, glue wishes or sign the card.
"A simple option for preschoolers"
You will need: snowflake diagram, cardboard, knife.
Manufacturing process:
1. Print out the snowflake template.
2. Choose a base for the product. Transfer the snowflake according to the stencil to the inside of the base. Carefully cut out the design. Fold the cardboard in half. Decorate the front as you wish.
These are such simple, but simply awesome ideas for creating greeting souvenirs with snowflakes.
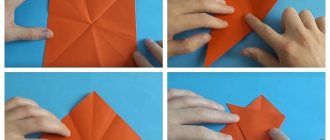
New Year cards with a three-dimensional tree on the cover
YouTube channel EzzyCraftsDIY
What do you need
- Green double-sided paper;
- ruler;
- pencil;
- scissors;
- red cardboard;
- glue;
- yellow paper.
How to do
Cut out one square of green paper with sides of 12 cm, 10 cm, 8 cm, 6 cm and 4 cm.
YouTube channel EzzyCraftsDIY
Fold one of them in half.
YouTube channel EzzyCraftsDIY
Slightly bend the figure crosswise in half so that there is a barely noticeable mark in the middle. Fold the upper left corner of the rectangle towards the center.
YouTube channel EzzyCraftsDIY
Now fold the upper right corner in the same way. You will get a triangle.
YouTube channel EzzyCraftsDIY
Make similar triangles from the remaining paper squares. Cut out a rectangle measuring 26 x 15 cm from red cardboard. Bend it in half crosswise. On yellow paper, draw many small stars and one larger one, cut them out.
YouTube channel EzzyCraftsDIY
Apply glue to the back of the small green triangle. Glue it to the top of the future card. Attach a large star higher up.
YouTube channel EzzyCraftsDIY
Apply glue to the same side of a slightly larger triangle. Attach it so that the top slightly overlaps the previous glued triangle from the inside.
YouTube channel EzzyCraftsDIY
Glue all the other triangles in the same way, forming a Christmas tree.
YouTube channel EzzyCraftsDIY
Add paper stars to the cover.
What other options are there?
A similar Christmas tree can be glued together from paper circles:
It’s easy to make a Christmas tree from a wooden stick and a paper accordion:
And another very simple option from an accordion:
Master class on making a postcard in the form of a mitten. The most interesting and easy ideas
Here I want to share with you a method for making a very bright and creative craft with beautiful mittens. I think you have been looking for this option for a long time. The only thing is that the level of work is a little more complicated than in previous products, so trust such needlework to schoolchildren.
"New Year's Mittens"
You will need: background paper, card base, lace, ribbon with an inscription, lace, figured cardboard frame, double-sided tape, cardboard gloves, stamps, paint, fancy braid, glue.
Manufacturing process:
Well, now the selection of ideas is a little simpler, there are already options for preschoolers. Look and choose!
And of course, templates for making such products.
Postcards for the New Year 2020 with the symbol of the year Rat (Mouse) for children
As you know, this year will be held under the symbol of the Metal Iron Rat (Mouse). Therefore, a great idea would be to depict this animal on the product itself.
I propose a very simple technology).
You will need: yellow and white colored paper, scissors, glue, decorations.
Manufacturing process:
Take a sheet of yellow paper. Fold it in half. This is the basis. Cut circles on it to imitate cheese. Draw on white paper or print the finished mouse. Glue it onto the base as shown in the photo. Complete the products with festive decor - snowflakes, stars, sequins. Sign the card.
And here is another idea with the image of the main character of this New Year. Watch it quickly and make it with the guys.
This option is for celebrating the Year of the Pig.
"Piggy"
You will need:
- colored paper in pink shades (dark, light);
- base - a rectangle of cardboard;
- felt-tip pen or gel pen;
- pencil;
- scissors;
- glue.
Manufacturing process:
1. Save and print the pig template. Cut out the stencils.
2. Transfer the details onto paper using stencils and cut them out. At the same time, use darker pink paper for the legs and muzzle, and cut out the heels and ears from light paper. Also, do not forget to draw the fold lines, that is, all the dotted lines. Make a cut on the muzzle.
3. Take the base and fold it in half. Draw nostrils on the heel and eyes on the muzzle.
4. Fold the legs along the dotted lines. Lubricate the bent parts with glue and glue them to the base as shown in the picture.
5. Now make folds on the head. Lubricate the bent corners with glue and glue the muzzle.
6. Fold the heels and ears. Glue them too. Sign the front side.
New Year cards with a three-dimensional tree inside
YouTube channel Paper Magic
What do you need
- Blue double-sided cardboard;
- White paper;
- scissors;
- glue;
- green double-sided paper;
- yellow paper;
- pink paper.
How to do
Fold the blue cardstock in half crosswise. Cut the white paper approximately in half lengthwise using a wavy line. The figure should resemble snowdrifts. Coat it with glue and attach it to the bottom of the blue sheet. Fold the future card along the fold again.
YouTube channel Paper Magic
Cut out a large circle from green paper. You can circle the plate or use a compass. Fold it in half and cut along the fold. You only need one half.
YouTube channel Paper Magic
Fold this part in half and straighten it out. The fold will divide it into two parts. Fold one edge to the middle of one of them.
YouTube channel Paper Magic
Turn over and fold this “triangle” towards the fold.
YouTube channel Paper Magic
Continue folding the paper in the same way, turning it over each time. Cut out several small triangles along the fold.
YouTube channel Paper Magic
Open the paper so that there is a convex part with holes in the middle. Glue the Christmas tree to the middle of the card.
YouTube channel Paper Magic
Cut out a star from yellow paper. From yellow and pink - small round decorations for the Christmas tree. White - round snowflakes. Glue the details onto the card.
What other options are there?
To make such a card, you need to cut out many identical paper Christmas trees and glue them together:
And here’s what a lush Christmas tree can be made from paper accordions:
New Year card using scrapbooking technique. Step-by-step instructions:
Next, I prepared a product for you using the scrapbooking technique. Moreover, I chose the simplest option so that the kids could easily create their plans. Of course, if you have big kids, then choose more complex options.
“Christmas tree in scrapbooking style”
You will need:
- thick colored paper or colored cardboard;
- scrap paper;
- PVA glue;
- pen, felt-tip pen (or other similar item);
- decorations.
Manufacturing process:
1. Decide on the size of the Christmas tree that will appear on the craft. Based on this, cut several rectangles of different widths from scrap paper.
2. Using a pen, roll each rectangle into a tube. Secure each tube with glue so that they do not unwind.
3. Glue the tubes together.
4. Make a base and glue our glued Christmas tree onto it.
5. Decorate the spruce and the base itself as you wish.
And here are just more complicated ideas for creating New Year’s cards using this technique.
DIY New Year cards with a snowman
YouTube channel IDEA OF THE DAY
What do you need
- Light pink cardboard;
- blue cardboard;
- ruler;
- pencil;
- scissors;
- glue;
- compass;
- white cardboard;
- blue felt-tip pen;
- bulky double-sided tape;
- brown cardboard;
- any colored or patterned cardboard;
- orange cardboard;
- black and red rhinestones (you can take felt-tip pens);
- figured hole punch “Snowflake”.
How to do
Cut a square 13 cm wide from light pink cardboard, and 12 cm wide from blue cardboard. If you want the card to open, make a rectangle measuring 26 x 13 cm from pink cardboard and fold it in half. Glue the blue piece onto the pink piece so that the sides have identical frames.
YouTube channel IDEA OF THE DAY
On white cardboard, draw circles with a radius of 4 cm, 3 cm and 2.5 cm. Cut them out.
YouTube channel IDEA OF THE DAY
Touch up the edges of the circles with a blue marker.
YouTube channel IDEA OF THE DAY
Glue two pieces of tape to the back of the large circle. Glue the circle into the center of the blue square. Draw branch handles on brown cardboard and attach them on the back side to the middle circle. Glue it in the center of the first one.
YouTube channel IDEA OF THE DAY
Glue two strips of colored or patterned cardboard to the back of the small circle. This will be the snowman's scarf. Attach the circle to the middle one closer to the top edge. Make buttons and eyes from black rhinestones, and a mouth from smaller red rhinestones. If there are no rhinestones, you can simply draw everything with a felt-tip pen. Cut out an elongated triangle from orange cardboard and glue the nose between the eyes.
YouTube channel IDEA OF THE DAY
Cut out snowflakes from white cardstock and glue them around the snowman.
What other options are there?
Cute cotton wool snowman:
Volumetric snowman made of paper circles:
Here is an interesting postcard with a three-dimensional snowman from the inside:
You can also make a snowman out of buttons:
We draw New Year cards in watercolors
In addition to appliqué and paper folding, such works can also be created by simply drawing or painting certain subjects.
"Multi-colored garland"
You will need:
- scrap paper (or regular thick paper);
- scissors;
- paints;
- brush;
- simple pencil.
Manufacturing process:
1. First prepare the base for the craft. To do this, fold a thick sheet of paper or scrap paper in half.
2. Next, using a simple pencil, draw a wavy line with curls on the front side. Draw lanterns.
3. Color the lanterns with paints and write the inscription “Happy New Year.”
Finger painting is a great option for kids. It turns out very beautiful.
"Finger Christmas tree"
You will need:
- thick sheet of paper;
- marker;
- ruler;
- paints.
Manufacturing process:
1. Fold a white sheet of paper in half. Now, using a ruler and marker, draw the “skeleton” of the spruce.
2. Next, ask the child to dip his finger in water, then in paint and allow the colored finger to leave marks on the Christmas tree.
And instead of one finger and its print, you can use the entire palm at once. Just help your child color his palm in the desired color scheme and leave a fingerprint.
Or draw the characters from the resulting trace.
You can also add various decorations to the drawn elements, such as buttons.
Basically, of course, you first need to come up with or choose a plot, draw it in pencil, and then color it. You can also use ready-made templates.
I would be incredibly happy to receive such a work created with my own hands.
Interesting ideas for cards made from cotton pads and felt with wishes
And I want to show you how you can use ordinary cotton pads and felt in crafts.
Again, everything is easy and simple here. Choose a theme, cut out felt or discs in the desired shape and quantity, glue it to the base and sign your wish. Voila, everything is ready!
I offer a variety of compositions for your choice.
- "Snow City";
- "Snowman";
- "Herringbone";
- "Father Frost";
- "Christmas decorations";
- "Bunny";
- "Christmas tree and bell."
Here comes the felt art.
- “Spruce from stripes”;
- "Cut-out silhouette";
- "Bear in the north";
- "Gorgeous";
- "Winter composition";
- "Round dance";
- "Forest Dweller"
And now I offer you ready-made options for congratulations and inscriptions. Print them out, cut them out, and let the kids put stickers on their crafts.
DIY New Year cards with Christmas balls
YouTube channel Bubenitta
What do you need
- Red cardboard;
- shiny silver foamiran;
- pencil or compass;
- scissors;
- bulky double-sided tape;
- colored tape;
- glue gun;
- thinner colored tape;
- thin brush;
- white gouache or watercolor.
How to do
Fold the cardboard in half. Cut a circle from foamiran. You can trace something round or use a compass.
YouTube channel Bubenitta
Stick a couple of pieces of bulk tape on the back of the circle. Attach the detail to the cover of the card.
YouTube channel Bubenitta
Make a bow from the ribbon and glue it above the ball.
YouTube channel Bubenitta
Make another bow from a thin ribbon and glue it onto the previous one.
YouTube channel Bubenitta
Above the ball, paint a lot of white dots with gouache or watercolor.
What other options are there?
Postcard with voluminous New Year's balls:
This video shows how to make a ball of glitter and rhinestones:
Another nice option:
And here is an unusual ball with filling: