Drawings
Let's make a simple and beautiful composition in the form of a drawing.
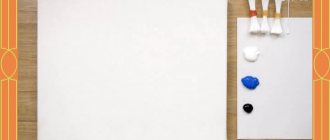
Take a leaf, in our case it will be maple. We attach it to regular printing paper (too thick for drawing). Dip the brush into gouache of the color you want to leave a mark on the drawing. We paint the leaf by pressing hard on it with a brush. If you wish, you can trace it along the contour. Then we put a napkin on top so that nothing moves out of place, otherwise all our work will be smeared and all efforts will be in vain. Carefully set the napkin aside and, with equal care, peel off the sheet. For the first five or ten minutes we do not touch it, let it dry. Next to the picture you can draw anything that comes to mind.
The composition of autumn birch and oak leaves looks extremely picturesque.
Other options are presented in the video:
Middle group. Junior preschool age. Children 4 - 5 years old
GCD for the application “Carpet of autumn leaves” in the middle group
GCD applique “Carpet of autumn leaves ”
.
Middle group. Goal: Creating conditions for the development of creative abilities in children. Objectives: To create conditions for the development in children of: - ideas about the changes occurring in the plant world in autumn , to introduce the concept...
Abstract of an educational activity on drawing and application “Let's cover a hedgehog with a blanket of leaves” for children of the middle group Goal: to teach children to stick natural material ( leaves )
to create creative compositions, carefully using glue. Strengthen children's ability to paint with a brush in different ways. Expand knowledge about animals and their habitats. To develop children's interest in learning...
Butterflies
There are many ways to make crafts from leaves. It could also be butterflies.
We attach a beautiful flower field below. To do this, glue dried chamomile, clover, and violets to the lower half of the leaf. Here everyone is free to reproduce what their imagination dictates. So, let's move on to the most important thing, to the butterflies. We advise you to immediately draw the body with a felt-tip pen or colored pencils, and use it as a guide when creating insects.
We should have two pairs of identical leaves. The upper wings are more massive and small in diameter, while the lower ones are long and thin. We mirror the wings on both sides, placing them on the right and left sides. Then we take smaller leaves and a different color. Some people make four layers on the butterfly, but we will limit ourselves to three. We finish drawing the horns and eyes with a felt-tip pen. You can make a pattern, but the original material is quite enough.
Stages in the photo:
The art of creating paintings from foliage in modern times
In the current time of minimalism and rational use of all things that surround us, simple elements of natural origin have become interesting solutions for realizing one’s creative potential and decorating one’s home:
- Leaves;
- Twigs;
- Dried flowers;
- Sea buckthorn berries are all that are around us.
This is autumn decor and a sign that everything around us is beautiful. DIY leaf crafts are interesting displays that enliven the home and give a warm mood.
Figures
Let's make crafts in the form of figurines from maple leaves.
Take a round sheet without jagged edges. If they are still slightly present, then we give the shape we need using scissors. Let's be careful, because dry products tend to break off, and for the body we will need one that is already quite yellowed, and therefore fragile. The neck will be the same color, but a smaller circle. We put one on top of the other. For the tail we select a multi-colored maple leaf.
Find a small red or burgundy leaf and cut it exactly in half. We put the first part like a beard, and put the second one aside. We imitate the head with the smallest round yellow leaf, put it over the beard and cover one third of the neck. Apply a red comb to the head. It may need to be reshaped again.
Maple will provide the material for the beak. We also cut it in half and glue it symmetrically to the head. We don’t throw away the nut, it will be an eye.
There is no need to drip glue onto the sheet, because some of it will spread and ruin the whole work.
Dip the bottom of the nut a little in glue and place it in the center. For these purposes, you can dip the brush and then run it along the bottom. It is possible that this amount of liquid will not be enough to hold such a massive object.
Turkey is even easier to make. The body will be ordinary brown colored paper. We cut out a large circle for the body, a small circle for the head, and triangles for the beak and eyes. And you don’t even have to play any tricks with the leaves. We just select the ones that we like best and place them the way we want. The main thing is that they are all approximately at the same level. Yes, sometimes you consciously need to put something higher and something lower, but only so that it looks acceptable. We lay out the leaves in a semicircle, and press the body and head onto them on top. Glue all the parts.
Topiary
Topiary is a shrub sculpture. In other words, we need to collect a lot of maple leaves together, and then give them a fashionable haircut.
Take an empty plant pot and fill it with soil. We firmly insert a plastic stick, about fifty centimeters in length. We put a foam ball on it. We will cover it with maple.
Before moving on to the leaves, wrap the entire surface of the ball with tape. If your stick color is not black, then fix it. You may be able to do this with a spray can. It is possible that you can resort to the usual painting of all light parts with black gouache. By the way, the final result also looks good in golden color, but it is even more difficult to achieve. However, they are just a nice addition and the real work remains to be done.
It is better to choose fresh leaves, because dry ones look less aesthetically pleasing and tend to break off even from a gust of wind or over time.
Take 100 grams of glycerin and pour 200 grams of boiling water. Bring to a boil over medium heat, cover with a lid and wait until bubbles appear on the surface. Turn off, remove from stove, let cool. Then shake the solution thoroughly. We dip the stems into the liquid as much as we can.
We try to ensure that the glycerin mixture does not touch anything other than the sticks. Place in a cool and dark place for an hour. Now we stick the leaves into the circle so that there is no free space left on it. For aesthetics, we decorate with beads, threads, ribbons, etc. This decorative topiary is often given as a gift by attaching letters made of cardboard or gift paper to a small tree.
"Applique of autumn leaves"
“Zhitikara audany akimdiginin bolimі” MM
“Balalar oner mektebi” KMM
KSU "Children's Art School"
State Institution "Department of Education of the Akimat of the Zhitikarinsky District"
Plan - outline of an open lesson Topic: Application of autumn leaves preparatory group Completed by: Serikbaeva G.S. teacher of Children's School of Art
October 2020 Plan - outline of an open lesson Topic: Application of autumn leaves
Type of activity
:
on application work with natural materials; learn to work using an algorithm. Educational:
develop aesthetic feelings;
develop fine muscles of the arms, combined Interdisciplinary connections
: fine arts, applied creativity.
Goals
: formation of a creative, moral-aesthetic, comprehensively developed personality through the creative activities of students.
Tasks:
— teach children to independently find simple scenes from the life around them, expand the topics of children’s works;
-develop creative abilities and aesthetic education of junior schoolchildren, artistic taste, fantasy and imagination; — to foster a caring attitude towards nature, to encourage children to learn about the diversity and beauty of their native nature.
Educational:
to instill in students knowledge, skills, practical abilities, imagination, and thinking.
Educational:
To cultivate aesthetic taste, accuracy in work, and a creative attitude to the task.
Form of organization:
individual
Equipment and materials: For the student:
A variety of dried leaves (can be collected on an excursion), colored paper, glue, scissors, colored cardboard, glue brush.
For the teacher:
application samples, presentation on the lesson topic.
Lesson plan:
1.Organizational moment. 2. Introduction to the topic. 3. Report the topic of the lesson. 4. Explanation of new material. 5.Safety precautions. 6. Practical work. 7. Lesson summary. 8. Reflection Lesson progress:
1.Organizing moment.
2. Introduction to the topic.
— Guess the riddle: They grow in the summer and fall off in the fall.
- That's right, leaves. To find out what kind of work we will do with the leaves, listen to the fairy tale. (Reading a fairy tale). The whole summer the green leaf sat on a birch branch, bathed in the rain and basked in the sun. And then autumn came, the wind blew, and the leaf flew, flew and flew all the way to the ground. - Here I am! - he shouted to other leaves that had fallen earlier. -What are you happy about? - the yellow leaves lying on the ground asked him. – Don’t you see: autumn has come, and it’s very sad, because we fell from the trees and now no one needs us. “No,” said the leaf, “I don’t believe that no one needs us.” Maybe something else will happen... - What will happen? - asked the other leaves. - Well, for example, wizards will come and turn us into something good! For example, butterflies! And then the wizards came. “Here,” said the leaf, “I told you: you should never despair, you should believe in a miracle!” And a miracle happened. In the hands of the wizards, the leaves turned into a fish, an ostrich, a hare, a fox... It was very beautiful and very cool, because it turned out that even the yellow leaves that fell from the trees were still needed by someone.
3. Report the topic of the lesson.
-And you? Can you perform such a miracle with leaves? - Let's try! Let's be wizards too!
4. Explanation of new material. —
What is an application?
Students: explain the lexical meaning of the word in their own words. APPLICATION
- making a drawing or painting from pieces of colored paper or fabric glued or sewn onto something. Get ready for the lesson and absorb the information. I show other finished works as an example.
5. Safety regulations.
Before we get started, let’s remember the safety rules when working with scissors and glue. Repetition of safety precautions when working with glue: a) you need to work on a backing sheet or oilcloth; b) take glue in small portions; c) wipe off excess glue with a cloth; d) if glue gets into your eyes, rinse them with water. Repetition of safety precautions when working with scissors: 1. Store scissors in a certain place - in a stand or work box.
2. Place the scissors with the blades closed away from the person working; when passing, hold them by the closed blades.
3. Use well-adjusted and sharpened scissors.
4. Do not leave scissors with blades open.
5. Monitor the movement and position of the blades during operation.
6. Use scissors only for their intended purpose.
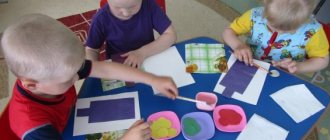
6. Practical work:
These leaves from a wonderful forest flew to your desk.
Game “Guess which tree the leaves are from” Autumn leaves from different trees are laid out in front of the children. Everyone takes one leaf and names the tree from which this leaf fell. The winner is the one who never makes a mistake.
I suggest you become little wizards and turn these leaves into wonderful crafts. We will make animals of our forest from leaves. I propose to approach the task with love and creativity and make not just animals from the leaves, but fairy-tale characters. And I propose to take the Russian folk tale “The Fox and the Hare” as a basis. (You can view a cartoon excerpt based on this fairy tale). Let's remember what animals participated in this fairy tale. Who is the most negative hero of a fairy tale? Who helped the hare drive the fox out of Zayushka's hut? We will make an applique of a fox, a hare, a bear, a rooster and a dog. Everyone chooses their own fairy tale hero. Let's remember the rules for working with leaves. Let's select suitable leaves for the craft.
Let's lay out all the parts on the workpiece.
Let's glue each piece in place.
-Let's get to work. We do everything carefully. We handle the leaves with care, because... they are fragile. (I monitor the progress of the work and help if necessary).
8. Lesson summary.
(Works are displayed on the board).
-Whose applications did you like better? - Why? — What would you like to change or add? Well done. You performed a small miracle, you were able to become a little wizard. I think your work will be even better next time. (We transfer the applications with paper and dry them for 24 hours, pressing them with something heavy, in a warm and dry place).
9. Reflection
– Share your thoughts about today’s lesson.
Examples of applications:
1.
2. 3.
4.
5.
6.
Heart
A cute DIY craft made from tree leaves - a heart.
Either we take it and painstakingly cut out a heart from the middle of the sheet with nail scissors, or we lay it out with burgundy maple ones on paper. As an addition we use yellow leaves, and we will place the heart on them. Both options look cute and romantic. Their positive side is the ease of execution, however, this does not amount to a decent craft. Just like a little charming present.
Creation Mastery
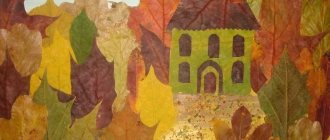
The word herbarium is familiar to everyone, but not everyone has seen the stunning paintings created using leaves.
Using PVA glue, plants are applied to a given cardboard base, partially or entirely, thus creating a mosaic puzzle of multi-colored elements, different densities and configurations - this is how a craft from leaves is created.
Roses
For each rose we need to take seven or eight birch leaves, and they should not be the same in size. It is preferable to leave more medium and small ones, about two large ones. We cut off the sharp triangular part of all of them in order to give them the shape of a rose petal. We take three or four small leaves and place them one on top of the other. On top of each other they should occupy only three-quarters of the total space. After that we roll it into a roll. So we made the middle of the bud.
We wrap the rest of the leaves loosely around, the big ones at the very end. We wrap it tightly with thread at the very base so that our structure does not fall apart. Let's make a tight knot and cut off unnecessary parts. We bend the back petals a little to give a natural and natural look.
The photo shows how to make a rose from birch leaves:
By the way, roses can be recreated in different ways; you don’t have to limit yourself to just birch. For example, there is a method for maple. Take the first red leaf. We bend the middle part towards ourselves, and do the same with the rest. Roll it into a tube. We bend only the middle part of the second sheet, put the first piece there, and fix it with the side leaves. Then we wrap a couple more maple leaves around them. The result is a voluminous bud. We wrap the sticks with green blades of grass to create the impression that these are stems.
Master class on video:
Animals
Crafts made from dry leaves for children are, first of all, a variety of animals.
The video shows how to make a hedgehog:
We take white cardboard and draw the body of a hedgehog on it. Add eyes and nose. Cut it out and glue it onto paper. We coat the back with glue and begin to apply aspen and birch leaves. To imitate needles, choose small leaves; no need to take maple leaves. We put them on top of each other in rows, a little chaotically, because the hedgehog’s needles also stick out in different directions. With this technique we will achieve the effect of volume and even sharpness.
Reindeer are more often represented in winter in Santa Claus's harness, but elk are a recognized inhabitant of autumn forests.
We are looking for an oblong and wide sheet without jagged edges. This is the body of an animal. Birch has so-called “wings”, which we will use as legs. By the way, at their base there are things that are ideal for the role of hooves. The head can be made from any small sheet, there will be no neck, so we put it on the first sheet. We trim the horns with two more lionfish. They must lie horizontally. We cut some large leaf in half to make formidable branched horns. We cut out the eyes from cardboard and place them on the face.
By the way, a lion can easily appear on paper. Just draw the face, cut it out and put it aside for now. We lay out the leaves on the paper, trying to make them look like a luxurious lion's mane. We seal the muzzle on top. Ready. The simplest craft out there.
Master Class:
DIY crafts from dry leaves
You can make an entire aquarium from dried leaves if you learn how to make beautiful fish.
Dry leaf fish
For this you may need ash, poplar, or oak leaves.
And also you will need:
- Glue
- Cardboard
- Scissors
- Markers
- Pencils
First make a sketch of the fish on paper
1. Make eyes from black and white paper by cutting out circles
2. Use a felt-tip pen to shape the fish’s mouth.
3. To make the tail, take two large leaves. Glue them so that the bottom sheet overlaps the top sheet slightly.
4. Use two small leaves to decorate the fins. Glue them on top and bottom of the fish's body.
5. Make fish scales. To do this you need to collect small leaves. Glue them in rows so that the new row slightly overlaps the previous one.
6. Step back from the fish’s eye and glue another leaf like a fin.
You can also make fish in other ways.
Animals made from dried leaves
Using dry leaves you can make beautiful animal appliques. For such crafts you will need: leaves of different sizes and colors, glue, scissors and a base (sheet of paper or cardboard). You can use felt-tip pens or pencils to complete the elements.
Making such crafts is very exciting and interesting. Autumn leaves will not just lie under your feet or at home, but will take their place on the wall in the form of a beautiful craft.
You can also use shaped hole punches to decorate your craft and make it more original.
In order to build a real composition of dried leaves, you can collect leaves, twigs and flowers. Dry all the elements in advance so you can start working at the right time.
Birds
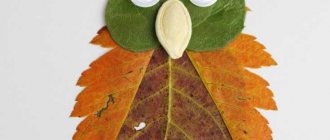
The list of crafts that can be made from leaves on paper also includes cute birds. This option is suitable for schoolchildren and children.
Arm yourself with a green or blue wax crayon and start creating. We make an interesting plain background, but it should not be bright. Place the base on a rough surface and scribble randomly. You will get an intricate pattern. Take a small plate that will fit on A4. Place it exactly in the center. Draw a semicircle with a pencil, the lower part is empty.
Cut out the body of a peacock from yellow paper. It's easy: we make it like a pear, but with an elongated top. Draw the eye and beak. Take red leaves. Red, burgundy and oblong ones will fit well. We lay them out, focusing on the circle, but not exactly along the contour. The layer located closer to the body should be wider and more magnificent.
Creations of time
Crafts made from leaves on paper are an ancient skill, an artistic representation of one’s own worldview, a kind of painting without the use of paints.
To get a more subtle feel for how paintings are created and to present them visually, you can look at photos of crafts made from leaves; there are quite a lot of them on the Internet.
Initially, such a creation had an interpretation of a special state of mind and was a kind of storyteller about the moment that was captured on the canvas.
Bouquets
Flowers made from maple leaves and other trees look great in a bouquet. For him we twist roses from the above paragraphs. Add to them regular maple leaves, bunches of rowan berries, etc. Place in a vase and enjoy.
By the way, you don’t need to think too much about dry leaves. Find some light-colored plant like shepherd's purse and dry it along with the rest of the leaves. These four plants will stand out against the general background, so we place them on all four sides. We weave in a few blades of grass and spikelets. We tie it beautifully with a ribbon.
Do not try to make a bouquet of dried roses; they constantly break and cannot be processed.
Vase
Inflate the balloon and place it in a deep bowl. We remove sticks and cuttings from the leaves. We repeat these simple steps: generously coat the sheet with glue and glue it onto the ball. We should have several layers, preferably three for reliability and strength. Let's stop touching what we've got so far. We'll be back in an hour or two.
There is no need to burst the ball abruptly.
We poke a small hole and wait patiently. When the ball deflates, our beautiful vase will be ready. This presence of layers gives it a solid bottom, so feel free to put objects in it.
Patterns
You can print patterns filling the entire canvas with them. By the way, many people use this on sheets and fabric, it looks amazing and original.
You can also cut out various figures, as we did with the heart - butterflies, stars, geometric figures. We can place the used whole leaves and cut parts together.
Recently, it has become fashionable to pour leaves into plaster, and then get a chic and detailed pattern.
Such products are more durable and are real decor that will decorate any home.
Dresses
Autumn dresses made from leaves look very beautiful. It is easier to sew such festive clothes for children, and much less fabric is needed. We buy it both expensive and cheap, there is no difference. Using a construction gun we connect the leaves to the fabric. We don’t get carried away with the process and follow the color scheme. We never throw the finished image of clothing out of our heads, we always think about the final version and compare it with what we have at the moment. Of course, be prepared for it to be shapeless.
We fix it in a roll so that a child can fit through it. We will put it on through the top, since through the bottom everything can get stuck and tear. To be on the safe side, have the girl raise her arms up and straighten them. If there is a desire, we make straps from birch, but they are purely for beauty and will not hold anything on themselves.
In the second option, fabric is not needed at all. We just glue one piece of paper onto another, and so on many, many times in a row. To prevent them from drying out prematurely, you need to boil them in a sodium solution.
Originality
How to make a craft from leaves without using paper?
We choose the material, it is preferable to take leaves of the same, medium size, so that there is no overabundance and pretentiousness.
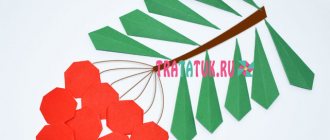
To create the composition we need a twig with small shoots. We cut them unevenly, leaving about 5, and somewhere 2-3 cm. The main rule is to bring the created version closer to naturalness, in nature there are no exact sizes, we do it chaotically.
The result is a wonderful decoration for the wall - a spectacular branch with falling leaves.
Join and explore the options yourself, many more interesting discoveries await you.
Decorations
Let's make a wreath on your head - a wonderful autumn decoration.
Master Class:
We take maple leaves because they have the longest stems. We put them next to each other, place the cuttings diagonally, throw one over the other to make a small free knot. We do this until the wreath fits our head in diameter. We fasten the first and outer sheets and put them on the head.
Now let's create a rowan necklace. Pour out the resin and mix it with glitter, let it sit for three or four hours. The rowan leaf must be dried. Take the cord and wrap it around the stem. This must be done for strength. Lubricate everything with glue so that it sticks better. We do the same with the second cord.
Fill everything with ready-made resin, don’t skimp on the material. Let it not go beyond the edges, but also do not ignore either the edges or the smallest places. Everything must be processed. To help with even distribution, use a spatula or stick.
We wait for everything to harden on one side and turn it over, repeating the pouring process. We attach a lock to the cord; it can be hidden behind the beads. The jewelry is ready for constant wear. Don't be afraid to lie on it or touch it, it will withstand any test within reason.
DIY leaves
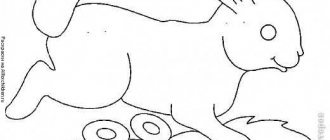
As for what to make leaves for a tree from, everything is simple: you can print out a sketch, blanks, trace the outline and then paint over the void with the desired color. Let's draw the veins and stalk, indistinguishable from the original!
We are talking about a pattern - this is a stencil or a fundamental structure, like a frame for the entire work.
Templates that you can color and also try to pass off as their originals:
How to process
Painting foliage is not only possible, but also necessary to make everything look brighter and more impressive. The question is often asked about how to keep leaves fresh and in their former appearance.
We either iron them or soak them in a glycerin solution. Or we melt the wax in the microwave (or in a water bath), quickly immerse and remove the leaf in it and hold it above the table so that all excess drips off it. Wrap everything in foil or cling film. They will be stored for as long as dried ones.
Below we present you a video of crafts made from maple helicopters and other natural materials:
Bright colors of autumn trees
In autumn, nature, before a long winter hibernation, gives us a chance to admire the bright and rich colors, enjoy the variety of colors and capture in our memory the natural beauty of autumn landscapes. Each leaf is a unique masterpiece created by nature itself.
Magic maple leaves
The autumn fairy tale does not last long, which is probably why many people strive to preserve its beauty in their crafts and applications.
To extend the magical charm of autumn, we suggest you create several applications from leaves, as well as some other natural materials, with your own hands! Children studying in the junior group of the kindergarten, together with their teachers or parents, can make beautiful crafts with autumn trees:
Step-by-step instruction:
- First, draw the outline of the tree on paper. If you are making a birch tree, you can draw its trunk with a black helium pen. If you want to make an applique with a maple tree, you can draw a trunk with branches with brown gouache or cut out these details from colored paper.
- After this, you will need to attach the leaves to the tree. They can be glued using PVA or secured with thin tape.
Video: Autumn tree made from pieces of foliage
An autumn tree can be made not only from whole leaves, but also from small pieces. To learn how to make a tear-off applique from leaves, you can watch a small MK.
This video explains in detail how to make tear-away appliqué from dry leaves, as well as how to use the leaves as a template. By applying such a natural stencil smeared with paint to a paper sheet, you can get an amazing autumn pattern!