Greetings, dear mothers. Today we have a very interesting topic, because... it will concern children's creativity. And together with the kids we will make amazing crafts to decorate their room or as a gift for grandma. Today I present ideas and ways to make fruits from colored paper.
So, let's begin!
Apple
Now we need red and green paper. On the back side we also draw an apple of the required size and cut it out.
We make several of these parts and glue their halves together. In general, we repeat all the steps described above.
We will make leaves from green paper.
If you want to come up with a more interesting option, then make the twig brown.
Let's start simple
To make the “Fruit on a Plate” applique we will need:
- Glue;
- Paper plate;
- Colored paper;
- Scissors.
First you need to draw the fruit patterns. In this master class we suggest using fruits such as grapes, plums, apples and pears.
We cut out templates for each figure. Fold it in half and then in half again. We attach the pear template and trace it. All that remains is to cut it along the contour. For one fruit you will need four parts.
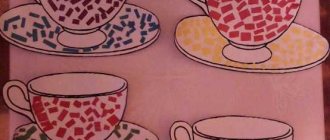
When the parts are cut out, they need to be folded in half, thus obtaining 4 halves of each fruit. Then we glue the halves together so that the other halves remain empty, as shown in the photo.
This is how we get voluminous fruits, which we “put” on our plate. All that remains is to cut out the green leaves and glue them to the fruit.
Related article: How to make a magic wand
Banana
To make a banana like this, you will need to use a small template.
Crafts such as fruits will find their place in your kitchen for an amazing and impressive decoration.
Children will also be able to use their work to create an unusual painting to decorate their room. For example, by making a still life.
You can simply cut out the fruits you need and then stick them together with your child in a paper vase. Like this. In the form of an application.
Watch the video below for an easy technique for creating a beautiful fruit bowl. I think children and their parents will really like this process, because... Fine motor skills of the fingers will be involved here. And this is very useful. In addition, children will be happy to tear so much paper into small pieces, which will amuse them a lot.
Let's not forget about vegetables for our interesting compositions.
Vase with a surprise
To make the “Fruit Vase” applique, we will need the same elements as for the previous “Fruit on a Plate” applique, namely: cardboard, glue, colored paper, scissors.
We also cut out fruits from paper folded four times and glue the halves together to get three-dimensional fruit figures.
You will also need to cut out the vase. We make it in the shape of a half oval. First glue the vase figurine to the cardboard base.
Then we glue our fruits on top of the vase to create the impression that they are lying inside.
Then we complement the applique with hand-drawn branches of fruit, and decorate the vase the way we like. In this master class we used flowers made using a figured hole punch. You can use various ornaments obtained using a hole punch, or cut out with your own hands. You can also decorate the vase with glitter or hand-painted elements.
So, the fruit in a vase made of paper is ready!
Cabbage
If you cut out green round paper blanks of different sizes and stick them one at a time on top of each other, you will get cabbage like this.
In general, it must be said that when creating voluminous vegetables and fruits, you can use foil, crumpled newspaper, all kinds of cones and foam balls as a base and simply cover them with thin crepe paper for children's creativity.
Food basket
A fruit basket can become not only an interesting craft, but also a decoration for a summer table. To make it we will need:
- Large watermelon;
- Sharp knife;
- Fruit for filling.
Let's get to work!
The base of our basket will be a watermelon, so the first thing you need to do is carefully inspect it for damage. Then you need to rinse it well and wipe dry with a towel. Now we take the prepared template for the handle of the future basket so that we know how to cut it out correctly. And carefully cut it out according to the template.
Next, you need to clean the insides of the watermelon from pulp and seeds.
Please pay special attention that this must be done very carefully and carefully, trying not to damage the base.
After the watermelon is cleared of pulp, it must be thoroughly dried from the inside. To do this, first wipe everything with paper towels, and then put newspaper or paper inside to absorb moisture. It is best to change the paper several times until the watermelon is completely dry from the inside.
Related article: Marshmallow booties: video tutorials describing how to crochet
While the watermelon is drying, you can start decorating its exterior. You can cut out various elements directly on the peel, or you can use paints and paint the watermelon in any color.
And finally, we move on to the last step. Fill the basket with fruits and berries.
Fruits and berries in origami style
But also use these assembly diagrams using the origami technique for simple products of your creativity.
Well? I hope you had an interesting time with me today and learned how to make fruits from colored paper? Or maybe you also have your own new ideas on how and what to do with your child in the evening.
Good luck and creative mood. I was with you, Natalya P.
See you on the new blog pages.
Features of applique classes in the younger group
Young children do not yet know how to cut. The teacher cuts various fruits or vegetables, and cuts out the silhouette of a canning jar. Lessons can be done individually
, then each student has a jar; in collective appliqué, children stick fruits into a common jar.
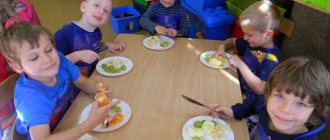
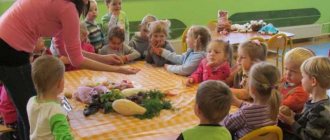
Before class, the teacher tells a fairy tale about how bunnies or bear cubs need fruit. He reads poems or riddles. Repeats with children the names and colors of each fruit, explains why fruits need to be preserved.
Then the children get to work and glue the finished paper fruits onto the jar as the teacher explained: so that they do not protrude beyond the edges of the jar and do not creep on one another. If the youngest child is confused and cannot start working, the teacher helps
.
Then the children admire the work together with the teacher. He praises the children's good work by giving them fruit.
Application "Vegetables" in the middle group
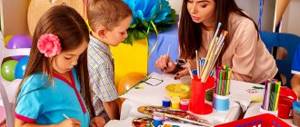
Children at the age of 4 already begin to learn how to use scissors. First, it’s about holding the tool correctly in your hand and cutting the fringe. Children at this age learn to create compositions using plot appliqué. They use work with design elements from geometric shapes, add elements made by drawing individual parts, with the addition of seeds or cereals.
For example, let’s take the “Vegetables” applique on the “Carrot” theme. The teacher prepares the following details for the children:
- orange triangle;
- stripes to match the color of the vegetable;
- green trapezoid.
The guys first do the work with scissors, cutting the fringe of the green tops, making cuts on the trapezoid not completely. Then the green part is glued on first with the cut parts facing up. Next, the main triangle of carrots is glued so that it is located on top of the tops. Only the fringe should be visible. The last part of the work will be to add volume to the vegetable. To do this, take orange strips and crush them in your hand. Next, without completely smoothing the parts, glue the strips across the carrots. The work is done from top to bottom.
Work in the senior group
In making the “Vegetables” appliqué, the senior group uses new ways of working with various materials: natural and waste materials, quilling strips and fabric. The methods of work are also new. Children cut out the parts themselves using scissors from prepared geometric shapes. For example, in order to cut a tomato, the teacher gives the child a square, for a cucumber - a rectangle. A five year old should be able to trim corners.
Children also fold a sheet of colored paper using the origami method. The results are voluminous figures. To make a “Vegetables” applique for children, you can also use symmetrical cutting of paper by folding it in half. Then the part turns out to be the same on both sides.