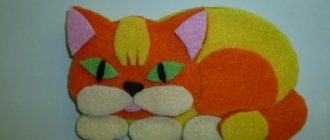
Modeling wild animals from plasticine Wild animals. Based on the Russian folk tale "The Fox and the Wolf"
Lesson notes for the senior group of kindergarten. Modeling wild animals from plasticine
Wild animals. Based on the Russian folk tale "The Fox and the Wolf"
Modeling from plasticine. Senior group. Goal: To teach how to sculpt an animal from one piece of plasticine in a new way. Objectives: Educational: To develop the ability to sculpt animals, to identify the main parts of the depicted object. Developmental: To develop the ability to divide plasticine into the required number of parts, determine their size and shape, work according to the diagram .Educating: To cultivate interest in working with plasticine, to evoke positive emotions from the work process and its result. Preliminary work: Reading the Russian folk tale “The Fox and the Wolf.” Dramatization of a fairy tale. Looking at pictures of wild animals. Mixing plasticine to obtain a gray tint. Methods and techniques: Conversation with children, looking at pictures, working with a diagram, didactic game, practical activities for children. Materials and equipment: Wall magnetic board, geometric shapes and three-dimensional bodies sculpted from plasticine as a fox and a wolf sample. Demonstration material: Pictures depicting a fox and a wolf, an illustration for the fairy tale “The Fox and the Wolf,” graphic diagrams for children (a diagram for dividing a piece of plasticine into parts, a diagram for sculpting individual parts from each part), a didactic game “Where is whose tail?” .Handouts: Plasticine boards according to the number of children, stacks according to the number of children, a set of plasticine according to the number of children, hand napkins according to the number of children. Lesson structure1. Introductory part.2. Main part.3. Final part.
GCD move
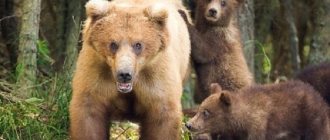
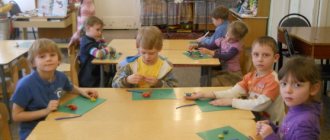
1. Introductory part. - Children, guess the riddles... He looks like a shepherd dog, every bit as sharp as a knife, he runs, grinning his mouth, ready to attack a sheep. (children's answers). That's right, wolf. The second riddle... They say she is cunning and takes chickens out of the yard. But she’s a beauty - all the guys like her. (children's answers). Yes, it's a fox. (I attach a picture of a fox and a wolf to the board). – Children, now you and I will learn how to sculpt a fox and a wolf in a new way. – You have sets of plasticine on your tables. Whoever has orange in the set will sculpt a fox. Whoever has gray is a wolf. Raise your hands, who's orange? ….(list the children) You are sculpting a fox. Raise your hands, who's gray? ... (list the children) you are sculpting a wolf.
2. Main part. Look carefully at the animals that I made... (I demonstrate). Tell me, how many parts do you see in the fox? (children's answers) That's right, three. Name these parts. (children's answers - head, torso, tail). How many parts do you see in a wolf? (children's answers) Three. Name them. (children's answers - head, torso, tail). What do you see in common between the fox and the wolf? (children's answers - they both have a head, a torso and a tail). How are animals different? (children's answers - a fox's tail is long and bushy, but a wolf's tail is shorter and not so bushy). Good. How many main parts does a wolf have? (three) The fox? (three) So how many parts will we divide the block of plasticine into? (in three parts).
The largest part is the body, then the head and tail.
Look, what do we need to mold to make the body? (children's answers). That's right, we'll roll out a thin cylinder and flatten it. How do we get the head? (children's answers). That's right, we'll roll a ball and stretch out one side. How do we make a tail? (children's answers). That's right, a small flagellum. Let's rest a little before work.
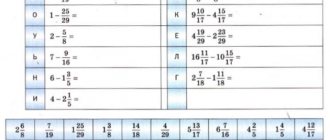
Physical education minute. Like our animals (Clap your hands.) Paws merrily knock: Top-top-top, top-top-top. (Stamping feet.) And the legs are tired, They clap their palms: Clap-clap-clap, clap-clap-clap. (Clap your hands.) And then squat down (Squats.) The animals dance side by side. (Jumping in place.) And when they start running - (Running in place.) No one can catch up with them. Let's get to work. (Children are working, the teacher shows with parallel commentary). We divide the plasticine according to the scheme... First in half. We divide one part in half again. (After each action, the teacher looks at the children’s progress and the quality of their work.) We take most of it and knead it well. They rolled it into a cylinder (sausage). Placed it on a board and pressed it, flattening it. Using a stack, we make cuts on the right and left on the workpiece. The cuts should be the same. We smoothed the cut areas with our fingertips and rounded the entire part to create a rainbow shape. Take part 2. Roll it into a ball. Use your fingers to stretch out one side and sharpen it. This will be the head. At the top of the head we draw out two ears, they look like triangles. Take part 3. What will it be? (children's answers - tail). Right. Let's play the game "Where is whose tail?" (The teacher places images of animals without tails on a magnetic board: a hare, a wolf, a fox, a squirrel. Children explain in words where whose tail is. For example, the first one on the left is a squirrel’s tail, etc. Children repeat which tail is the fox’s, which is the wolf.) Rolled up a flagellum. We sharpen at the ends. We attach the details. What can we do to prevent the parts from falling later? (children's answers - we smooth out the joints with our fingers). We make eyes, but they should not be large. And the nose. Decorate the tail and paws of the fox. Show me what you got?
3. Final part. – Guys, what did we do today? (children's answers - they sculpted a wolf and a fox) - Have you learned something new? (children's answers - sculpt the body and legs from one part) - You tried hard today. Place your forest dwellers on plates. We are cleaning the workplace.
multiurok.ru
How to choose the right plasticine
Plasticine is different from plasticine. In order for the work process to bring only pleasure, you need to choose the right plasticine. If you will be modeling with children, it is better to choose a plasticine substitute. This is a special mass for modeling that does not need to be kneaded before use. It also has pleasant fruity scents. This mass is completely incapable of harming a child, even if he decides to chew it.
Its only drawback is that it dries quickly when exposed to air. For older children, you can completely use regular plasticine. It comes in soft, hard and medium soft. Soft plasticine does not hold its shape for long and collapses under the influence of its own weight, while hard plasticine is practically impossible for a child to knead. It follows from this that medium-soft plasticine is best suited for modeling. It is better not to use hard plasticine when working with children.
Integrated lesson (fiction + modeling) on the topic “Wild animals of our forest”
Sections: Working with preschoolers
Program content:
- Learn to plan your work: conceive an image, divide the material into the required number of parts of different sizes.
- Continue to teach children to create expressive sculpts in a constructive way. Show techniques for decorating a sculpted figurine with additional elements.
- To teach children to feel and understand the nature of the images of a work, to emotionally perceive the figurative content of literary texts, to listen to the rhythm and melody of a poetic text.
- Cultivate an interest in the life of wild animals.
Vocabulary work: Activate the dictionary on the topic “Wild animals of our forest”: little hare, fluffy, stubby (tail), cautious, cheat, etc.
Preliminary work: Reading the fairy tale “The Wolf and the Fox”, arr. I. Sokolova-Mikitova. Reading stories about the lives of animals in our forests. Conversations about the features of their body covering (fur, spines).
Equipment, materials: Text of N. Rubtsov’s poem “About the Hare”, plasticine, stacks, modeling boards, paper napkins, fishing lines, matches without heads, beads, forest composition of plastic trees.
What you need for work
In addition to the plasticine itself and your own fingers, you will also need some tools, such as a modeling board, a special knife, and a roller for rolling out the plasticine. Stacks will also help you in this matter. They are special plastic knives with which you can not only cut the plasticine mass, but also crush it or create grooves and dents of various shapes on the surface. You will also need matches or toothpicks to connect the individual parts together. Among other things, wet wipes will be useful for cleaning your hands while working, as well as a diagram for sculpting animals from plasticine, which explains the whole process step by step, instructions or a master class. Guided by such material, you can easily master the entire process of sculpting an animal, both wild and domestic.
Basic techniques for working with plasticine
Modeling animals from plasticine is a step-by-step process. There are basic shapes that serve as the basis for creating various elements.
These are the ball, cube, pyramid, cake, drop and strip. A cube is formed from a ball by squeezing and pressing it on four sides, and then it can be rolled out using a rolling pin, or left in the shape of a cube, finally aligning the edges with a flat stick. Or, for example, the “drop” shape is also created from a ball. In this case, the round workpiece from one edge begins to be gradually compressed and stretched to the desired size.
GCD move:
Educator: Guys! Do you know who came to visit us today?
The teacher pulls out a big hedgehog
. The children gather in the middle of the room.
The children answer.
Educator: Hedgehog
!
Children looking at a hedgehog
.
Educator: Guys, hedgehog
came to us from the forest. He lives in the forest.
Educator: He is friends with bears, bunnies, and squirrels. And he is afraid of the wolf and the fox. When he sees danger, the hedgehog curls up into a prickly ball and no one can touch him.
Educator: What does he like to eat? The children answer.
Educator: Hedgehog loves mushrooms
, apples, pears and milk
Educator: At home, the hedgehog drinks milk. In winter, the hedgehog sleeps in his hole. That is, in your house.
Educator: Guys, you can’t offend animals. We must love them and treat them with reverence. Look how sad the hedgehog is
.
Let's cheer him up. Children's answers The teacher reads a poem, and the children repeat after him
The hedgehog stomped along the path
And he carried mushrooms on his back (walking in place)
The hedgehog stomped slowly
Quietly the leaves rustle
(we rustle with our palms)
And a bunny gallops towards us,
Long-eared one, jump around.
Something clever in the garden
I got hold of a sideways carrot (jumping in place)
.
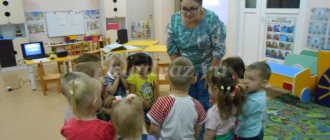
Educator: Guys, I invite you to the table. Children sit at tables where there are blanks with the image of a hedgehog without needles
. –
Educator: These are the pictures with the image of a hedgehog lying in front of you
.
Consider the hedgehog. Oh! He's kind of weird! The hedgehog is missing something
. Children's answers.
Educator: That's right, there are no needles! Let's quickly give the hedgehog some needles
!
Like this! The teacher shows how to make hedgehog needles. The teacher invites the children to make plasticine balls for needles: pinch off small pieces of plasticine with the thumb and forefinger of their right hand and roll them into balls. Children roll 2-4 balls each (the rest of the balls are prepared in advance)
.
Then invite the children to place a plasticine ball over the outline of the hedgehog's
, press it with their finger and pull their finger down.
Educator: It turned out to be a needle! Let's give the hedgehog a lot of needles
!
on a hedgehog
. Children and teacher make needles. The teacher helps those who are not doing well. When the work is ready, everyone admires their pictures and the pictures of their comrades.
Educator: Now I suggest you turn into hedgehogs. The teacher shows the kids how to draw a hedgehog
, clasping your fingers together.
The teacher reads a poem, and while reading, the children repeat
the teacher’s movements.
The little hedgehog is frozen
(press your fingers -
the hedgehog removes the needles )
And curled up into a ball.
The sun warmed the hedgehog
(Straighten your fingers -
the hedgehog showed the spines )
The hedgehog turned around
.
The teacher praises the children for their work and says that we will place our hedgehogs at the exhibition so that they will please us and their parents.
Educator: And now it’s time to say goodbye to our hedgehog
, he goes back to his forest.
Children say goodbye to the hedgehog
.
Educator: Guys, we helped make the hedgehog
?
Did you help the hedgehog?
How did we help him?
Publications on the topic:
Notes on sculpting in the second junior group “Who visited us in our garden?” Integration of educational areas: “Cognition”, “Reading fiction”, “Artistic creativity”, “Communication”, “Socialization”.
Abstract of GCD in the second junior group for modeling "Owl" Educational area: Artistic and aesthetic development Integration of educational areas: Artistic, aesthetic, cognitive,.
Abstract of educational activities for modeling in the second junior group “Multi-colored balls for a hedgehog” Integration of educational areas: “Cognitive development”, “Artistic and aesthetic development”. Objectives: 1. Educational: - teach.
Tasks. Develop plot-game concept and imagination. Make chicken figures from individual lumps. Using pulling and pinching techniques.
Program content: Learn to convey the shape of an object (sparrow, divide plasticine into two unequal parts, learn to fasten two parts in order to...
Notes on object modeling in the second junior group “Gift for Dad” Purpose: to make a gift for Dad (tie). Objectives: Educational: Reinforce modeling techniques: develop the ability to separate a piece of plasticine.
Plasticine is a magical material with which you can make incredibly beautiful figures. These can be fairy-tale and cartoon characters, buildings and plants. Animals made from plasticine deserve special attention. For children, modeling will be an incredibly exciting and educational activity, from which it is impossible to escape for a minute.
Plasticine is a magical material with which you can make incredibly beautiful figures.
Sea inhabitants made from plasticine turn out to be extraordinarily beautiful.
Even a child can make such crafts with his own hands. Making a crab requires just a little attention and patience.
Sea inhabitants made from plasticine turn out to be extraordinarily beautiful
Sequencing:
- Make blanks for the body, a pair of claws and eight legs.
- The largest ball from which the body will be made needs to be pressed down a little.
- To make the paws, make sticks from eight blanks.
- Attach four tabs on one side and four more on the other.
- Form claws from the two remaining blanks and attach them to the crab's front legs.
- Place small circles of a lighter material on the body.
- Make eyes.
Preparing for sculpting
Before you start learning how to make animals from plasticine, you should take care of preparing your workplace. The surface of the table at which modeling will be done should be well lit. In addition, you should protect your workplace from plasticine. It is for such purposes that special boards are used. But if you don’t have one, you can simply cover the table with a piece of oilcloth so as not to get it dirty. For kids, you can stock up on various shaped molds, and then sculpting animals from plasticine will become an even more exciting activity. You can also purchase special gloves for handles so that the plasticine does not rub into the skin during work.