What you need to sculpt piglets from plasticine
Before making a pig from plasticine, prepare the necessary materials and tools. Plasticine, a board, stacks and toothpicks will come in handy. The workplace is covered with newspaper or oilcloth - this way the baby will not be afraid of getting the table dirty.
Expert opinion
Catherine
Sculpting expert
When choosing a plastic material, give preference to environmentally friendly children's plasticine. The mass is harmless to children and kneads quickly in the hands. For children under 2 years old, choose dough with food additives or make unleavened salted dough; it molds just as well.
How to make a pig from plasticine
Step 1. To create the animal we will need two bars of pink plasticine. Knead them thoroughly in your hands. We form three balls from a soft sausage (as shown in the photo).
From two large balls we create the head and body of a pig. We connect these two parts using half a toothpick.
Step 2. Next, roll out a pink thick sausage. Cut it with a plastic knife into two approximately equal parts. We glue both blanks onto the lower part of the body and make notches on them in a stack.
Step 3. We create flat ears from small cone-shaped blanks and attach them to the top of the head. We bend them a little, giving them a realistic shape.
We also glue a nose-piglet onto the face. Immediately draw it with a skewer and a stack.
Step 4. We complement the tips of the legs with brown hooves. To do this, roll four balls from plasticine, flatten them and attach them to the pink legs. We cut the front part of the hooves with a stack.
Step 5. Let's return to creating the animal's face. Above the patch we place white cakes - the basis for the eyes.
We glue blue and black cakes on top. Decorate both eyes with tiny highlights.
Step 6. Under the patch, draw a mouth with a stack.
We also create a curl ponytail from a thin pink sausage.
Step 7. The pig is almost ready, all that remains is to draw small details: eyelashes, eyebrows and folds on the ears.
Step 8. As you know, pigs love to roll around in the mud, so let’s create a small mud puddle for our little copy. We form a ball from brown plasticine, and then flatten it into a cake with uneven edges.
The wide variety of modeling materials available on today's market for children's products is simply amazing. Plasticine manufacturers are trying to protect even those kids who do not miss the opportunity to taste all the surrounding objects. It should not be surprising that some types of sets include bars that can be eaten. Plasticine also differs in consistency and color. When choosing material for work, be sure to focus on the age of the child and the nature of the future craft.
With preschool children, you need to practice creating simple products, introducing them to interesting creativity. By combining several parts of different sizes and shapes, you can create a cute plasticine pig. Using the step-by-step instructions below, get to work.
How to make a pig
Before you mold a funny pig from plasticine, think about the shape. It could be a cartoon character, a book character, or a coloring book. Let the child choose the color of the figurine, decorations and sizes. Little craftsmen find it more interesting to work with simple round shapes; they are easier to sculpt. For older children, a plasticine pig with small details and decor is suitable.
A simple plasticine pig
For this figurine, a piece of mass is divided into 6 parts: a large one for the head and ears, a medium one for the body with a tail, 4 balls for the legs.
Step by step sculpting a pig from plasticine looks like this:
- roll a head ball out of a large piece;
- lightly press down the figure, highlighting the chubby cheeks;
- the eyes are made from plates of white plasticine, the pupil is black, but you can insert beads, it will turn out more beautiful;
- the patch is also made from a bead or button;
- the head is complemented with triangles of ears, they are molded from 2 small balls of plasticine;
- the middle piece is rolled in the shape of a ball - this is the body;
- the tail is made into a thin sausage, slightly twisted and fixed behind the body;
- the legs are made different - 2 larger, thicker - the rear, 2 thinner - the front;
- The ends of the future paws are divided in half by a stack, forming hooves.
The back and front legs are fixed to the body, let the plasticine good pig sit - it’s easier for the baby. The head is attached to the body using half a toothpick.
Expert opinion
Catherine
Sculpting expert
After 1–1.5 days, the mass will dry slightly, the toy can be coated with colorless or pink nail polish. The protective layer will protect the figure from dents and deformations during play.
Yellow pig made of plasticine
To fashion a yellow pig from plasticine, take a piece of material and make 2 oval blanks from it.
This will be the head and torso, then like this:
- Roll 4 small yellow sausages and 4 small pink plates. Sausages are legs, plates are hooves. The ends of the sausages are wrapped with plates, the shape is divided in half - you get hooves.
- Plates are made from 2 small ovals and given the shape of triangles. These will be the ears; they are attached to the oval of the head.
- The muzzle is decorated with eye beads and a snout button. If you don’t have any decor at hand, roll out eyes and a patch from pink or black plasticine. In the snout, 2 holes are made in a stack - nostrils.
They assemble the figurine, make a thin sausage out of a small piece of plasticine, roll it into a spiral - this is the tail. To hold the head more firmly, fix it with a toothpick.
This DIY yellow round plasticine pig can be of any size. Decorate the pig with a bow, ribbon, etc.
Piglet made of plasticine
Your child cannot live without the heroes of A. Milne’s book “Winnie the Pooh and Everything Everything” or enjoy watching a cartoon based on the works of sculpt Piglet. For this figurine you need pink, blue, white plasticine, some decor in the form of beads, a small button (nose patch) and black material for decorating the hooves.
Step by step sculpting Piglet looks like this:
- roll two balls, then make an oval for the head and a plump sausage for the body;
- A ball is rolled out of blue plasticine, several grooves are made on its surface, pressing with a stack;
- the grooves are filled with thin white sausages - these are Piglet’s pants;
- the body sausage is divided in half, one half is fixed on top of the “pants” (it’s more convenient to connect with a toothpick);
- Hands and legs are rolled out of the pink mass, their tips are decorated with black “hooves”;
- fix the legs and arms on Piglet’s carcass;
- The tip of the stacks marks the mouth, the button is attached to the muzzle (piglet);
- the eyes are made from beads;
- The ears are molded from pink plasticine, given the shape of a triangle, secured to the head, and one ear is bent.
Knowing how to make Piglet the pig, it’s not difficult to build figurines of all the cartoon characters. The child will have new toys made with his own hands.
Crafts of a plasticine pig on clover
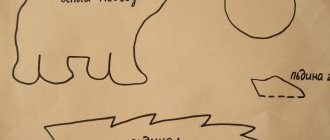
The main nuance of sculpting is the green clover leaf on which you need to sit or lay the pig. Clover is formed from 4 plates of mass, fastened in the center; for realism, a leaf stem is attached from the same green plasticine.
After preparing the base, a figurine of a piglet is constructed. Before making a pig from plasticine, step by step think about the color and shape of the pig.
The simplest option is this:
- roll the head into a ball and the body into a sausage;
- connect two parts, smooth out the joints;
- Decorate the head with eye beads and a snout button;
- fix the ear triangles on the head;
- add a thin sausage tail to the body;
- Mark the legs in a stack, you get a lying piglet.
Now all that remains is to outline the smiling mouth in a stack and let the toy dry.
To make the figurine realistic, sprinkle a little dry dill or other herb on a clover leaf - you get a cute “pig in the hay.”
Peppa Pig made from plasticine for children
The charming fidget from the cartoon is a desirable toy for children.
There is no need to buy a figurine; sculpting Peppa Pig from plasticine will bring more pleasure:
- Prepare plasticine. You need a large piece of light material and 3 pieces of contrasting material.
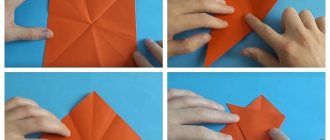
- Roll a ball from the light mass and stretch it to an oval shape.
- A small cylinder is attached to the side - this is Peppa Pig's snout.
- Just below the snout, mark a mouth in a stack or make sponges from red plasticine.
- The eyes are made of beads or material of 2 colors: a black pupil on a white base.
- A sausage body is formed from a piece of mass of a contrasting shade. Roll 4 legs, the upper ones are complemented along the edges with fingers (notches with a stack), the lower ones - with hooves. The hooves are made from black plates, they are wrapped around the ends of the legs and the stack is divided in half - the hooves are ready.
- All that remains is to assemble the toy, secure the parts with toothpicks - and you can play.
The instructions on how to make Peppa the Pig step by step are simple, the child will love the game and will make the whole family of funny pigs.
Pig made from light airy plasticine
Airy plasticine is a material from which a child gets great pleasure when molding piglets. The plastic mass heats up quickly and takes any shape well. You don’t have to rub or crush the piece too much, and it’s okay if it gets on your clothes—the mass can be easily removed with a regular napkin.
Expert opinion
Catherine
Sculpting expert
Airy plasticine hardens perfectly in air within 10 hours, making the toy more durable.
The modeling is very simple - balls are rolled out of a couple of pieces, then one is completed with ears, a snout button and eye beads. The second piece (torso) is placed on 2 small round pieces (lower legs), and the tail sausage is attached to the back. The upper legs are made from two thin sausages. It turns out to be a very funny pig.
Do you often sculpt various animals?
How to make a little pig from plasticine
1. Even the youngest children will point to the pink plasticine from the set if asked what color the pig should be. Choose this color - it is the most optimal. If there is no ready-made pink in the box, create it yourself by mixing white and red or white and purple plasticine.
2. Cut the block into six pieces. One part (the largest) is intended for sculpting the head and ears, the second (middle) is for the body and tail, the remaining four identical pieces (small) are for the legs.
3. Roll a ball to sculpt the head.
4. Press down on the ball, highlighting the pig’s chubby cheeks. Stick two white rounds on the places where the eyes should be.
5. Make a round patch from a purple droplet. Attach it to the center of the muzzle. Use the head of a match to pierce your nostrils.
6. Stick blue and black details onto the white round pieces, showing the animal’s huge naive eyes.
7. To sculpt the ears, prepare two cakes and give them a triangular shape. Attach the ears to the head.
8. Also form a ball from a medium-sized piece. Insert a match.
9. Turn small pink pieces of plasticine into cones to form legs. Attach purple hoof cakes to the ends.
10. Make four identical legs for the animal figurine.
11. Attach the legs to the body.
12. Glue a miniature wiggly tail to the back.
13. Attach the head to the match.
So the pink plasticine pig is ready. After watching this master class, you can be convinced that even the smallest children can work with a bright, soft mass, so parents should definitely buy plasticine.
Show your kids how to make a pig out of plasticine and get two hours of free time as a gift!
There is a lot of truth in this joke; modeling distracts you from self-indulgence and develops perseverance and accuracy. And if such a cute pig doesn’t come out the first time, still praise the little sculpture. Any plasticine will do, but for beginners and preschoolers it is better to choose a softer and more plastic one made from wax. Otherwise, difficulties will arise in the first stages and interest will disappear.
Materials and tools
To sculpt a charming pig you will need:
- plasticine, you can take simple or sculptural - more expensive, but looks more beautiful;
- stack;
- match;
- toothpicks;
- ball pen;
- pen rod;
- a board or rug so as not to dirty the table.
Prepare everything you need before starting work so as not to be distracted from your creativity. The craft is suitable as a souvenir for the year of the pig.
Step-by-step sculpting technique
Make a round head blank for the pig, leaf-shaped ears and a snout from pink plasticine.
Roll out two pink rollers. Divide each one in half to create “arms” and “legs.” Roll out the arm rolls a little more so that they become longer than the legs. Make a thin pigtail for a cute pig's tail.
Make a wide red roller. Make the top part narrower than the bottom to make an a-line dress. Roll two thin rolls of different lengths, press them with your finger along the entire length to form ribbons.
Attach the snout to the face of the plasticine pig.
Using a pen without a refill, highlight the area under the eyes.
Roll small balls of white plasticine and press them into flat circles of the same size. Place your eyes on the highlighted area.
Make circles from blue and black plasticine, decorate the iris and pupils.
Add a white highlight to the corners of your eyes. Mark out the round nostrils on the pig's snout using a dowel.
Carve out a smile with a toothpick or a toothpick. Make sure that there is no excess plasticine left around the edges and corners of the mouth. Attach the ears to the pig's head.
Choose a bright color for your outfit, such as red. Make an oval, and then press the top and bottom of the workpiece. Roll one edge so that it is narrower than the bottom. You will get a trapezoidal dress. Use your finger or pen cap to form a rounded indentation on the top edge. Use flat ribbons to create a small ruffle at the hem of the dress. Make ruffle sleeves and connect the parts.
Make a collar and round buttons from white. Stick the details to the dress, highlight the buttons with a rod. Make a red bow and decorate it with white polka dots.
Press out indentations under the limbs with a match, insert the “arms” under the sleeves. Connect the body and legs of the pig. Insert a small piece of toothpick into the base of the dress. It will serve as fastening parts.
Connect the head and body so that there are no large gaps between the main parts. Add a bow near Marie's ear.
Stick the ponytail on the back side and twist it into a spiral to make it look funny and natural.
A dreamy plasticine pig named Marie is ready! Keep it for yourself or give it to your mother, grandmother or friend.
Children love to create small copies of wild and domestic animals from bright blocks of plasticine. And so today we want to show you a simple way to sculpt one of the most popular inhabitants of the farm - a pig. Thanks to previous lessons, you already know how to create other inhabitants of the farm: a lamb, a chicken and a rooster. We continue to replenish our plasticine farm with new animals.
Let's prepare the necessary tools and material for sculpting a pig:
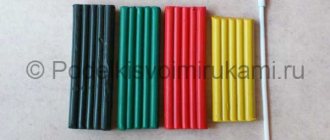
- bars of bright plasticine;
- knife and stack;
- skewer for drawing;
- toothpick for gluing parts.